`.
The
[AbstractClient](/abstract-global-wallet/agw-client/createAbstractClient)
instance from the
[AbstractWalletProvider](/abstract-global-wallet/agw-react/AbstractWalletProvider)
context.
The timestamp for when the query most recently returned the status as
'success'.
The error object for the query, if an error was thrown. Defaults to null.
The timestamp for when the query most recently returned the status as 'error'.
The sum of all errors.
The failure count for the query. Incremented every time the query fails. Reset
to 0 when the query succeeds.
The failure reason for the query retry. Reset to null when the query succeeds.
* fetching: Is true whenever the queryFn is executing, which includes initial
pending state as well as background refetches. - paused: The query wanted to fetch,
but has been paused. - idle: The query is not fetching. See Network Mode for
more information.
Boolean variables derived from status.
Will be true if the query has been fetched.
Will be true if the query has been fetched after the component mounted. This
property can be used to not show any previously cached data.
Boolean variables derived from fetchStatus.
Is `true` whenever the first fetch for a query is in-flight. Is the same as
`isFetching && isPending`.
Will be `true` if the query failed while fetching for the first time.
Will be `true` if the data shown is the placeholder data.
Will be `true` if the query failed while refetching.
Is true whenever a background refetch is in-flight, which does not include
initial `pending`. Is the same as `isFetching && !isPending`.
Will be `true` if the data in the cache is invalidated or if the data is older
than the given staleTime.
A function to manually refetch the query.
* `cancelRefetch`: When set to `true`, a
currently running request will be canceled before a new request is made. When
set to false, no refetch will be made if there is already a request running. Defaults to `true`.
* `pending`: if there's no cached data and no query attempt was finished yet.
* `error`: if the query attempt resulted in an error. The corresponding error
property has the error received from the attempted fetch.
* `success`: if the query has received a response with no errors and is ready to display its data.
The corresponding data property on the query is the data received from the
successful fetch or if the query's enabled property is set to false and has not been fetched
yet, data is the first initialData supplied to the query on initialization.
# useCreateSession
Source: https://docs.abs.xyz/abstract-global-wallet/agw-react/hooks/useCreateSession
Hook for creating a session key.
Use the `useCreateSession` hook to create a session key for the connected Abstract Global Wallet.
## Import
```tsx
import { useCreateSession } from "@abstract-foundation/agw-react";
```
## Usage
```tsx
import { useCreateSession } from "@abstract-foundation/agw-react";
import { generatePrivateKey, privateKeyToAccount } from "viem/accounts";
import { LimitType } from "@abstract-foundation/agw-client/sessions";
import { toFunctionSelector, parseEther } from "viem";
export default function CreateSessionExample() {
const { createSessionAsync } = useCreateSession();
async function handleCreateSession() {
const sessionPrivateKey = generatePrivateKey();
const sessionSigner = privateKeyToAccount(sessionPrivateKey);
const { session, transactionHash } = await createSessionAsync({
session: {
signer: sessionSigner.address,
expiresAt: BigInt(Math.floor(Date.now() / 1000) + 60 * 60 * 24), // 24 hours
feeLimit: {
limitType: LimitType.Lifetime,
limit: parseEther("1"), // 1 ETH lifetime gas limit
period: BigInt(0),
},
callPolicies: [
{
target: "0xC4822AbB9F05646A9Ce44EFa6dDcda0Bf45595AA", // Contract address
selector: toFunctionSelector("mint(address,uint256)"), // Allowed function
valueLimit: {
limitType: LimitType.Unlimited,
limit: BigInt(0),
period: BigInt(0),
},
maxValuePerUse: BigInt(0),
constraints: [],
}
],
transferPolicies: [],
}
});
}
return ;
}
```
## Returns
Function to create a session key. Returns a Promise that resolves to the created session configuration.
```ts
{
transactionHash: Hash | undefined; // Transaction hash if deployment was needed
session: SessionConfig; // The created session configuration
}
```
Async mutation function to create a session key for `async` `await` syntax.
Whether the session creation is in progress.
Whether the session creation resulted in an error.
Error object if the session creation failed.
# useGlobalWalletSignerAccount
Source: https://docs.abs.xyz/abstract-global-wallet/agw-react/hooks/useGlobalWalletSignerAccount
Hook to get the approved signer of the connected Abstract Global Wallet.
Use the `useGlobalWalletSignerAccount` hook to retrieve the [account](https://viem.sh/docs/ethers-migration#signers--accounts)
approved to sign transactions for the connected Abstract Global Wallet. This is helpful if you need to access the underlying [EOA](https://ethereum.org/en/developers/docs/accounts/#types-of-account)
approved to sign transactions for the Abstract Global Wallet smart contract.
It uses the [useAccount](https://wagmi.sh/react/api/hooks/useAccount) hook from [wagmi](https://wagmi.sh/) under the hood.
## Import
```tsx
import { useGlobalWalletSignerAccount } from "@abstract-foundation/agw-react";
```
## Usage
```tsx
import { useGlobalWalletSignerAccount } from "@abstract-foundation/agw-react";
export default function App() {
const { address, status } = useGlobalWalletSignerAccount();
if (status === "disconnected") return Disconnected
;
if (status === "connecting" || status === "reconnecting") {
return Connecting...
;
}
return (
Connected to EOA: {address}
Status: {status}
);
}
```
## Returns
Returns a `UseAccountReturnType`.
The specific address of the approved signer account (selected using `useAccount`'s `addresses[1]`).
An array of all addresses connected to the application.
Information about the currently connected blockchain network.
The ID of the current blockchain network.
The connector instance used to manage the connection.
Indicates if the account is currently connected.
Indicates if the account is attempting to reconnect.
Indicates if the account is in the process of connecting.
Indicates if the account is disconnected.
A string representing the connection status of the account to the application.
* `'connecting'` attempting to establish connection.
* `'reconnecting'` attempting to re-establish connection to one or more connectors.
* `'connected'` at least one connector is connected.
* `'disconnected'` no connection to any connector.
# useGlobalWalletSignerClient
Source: https://docs.abs.xyz/abstract-global-wallet/agw-react/hooks/useGlobalWalletSignerClient
Hook to get a wallet client instance of the approved signer of the connected Abstract Global Wallet.
Use the `useGlobalWalletSignerClient` hook to get a [wallet client](https://viem.sh/docs/clients/wallet)
instance that can perform actions from the underlying [EOA](https://ethereum.org/en/developers/docs/accounts/#types-of-account)
approved to sign transactions for the Abstract Global Wallet smart contract.
This hook is different from [useAbstractClient](/abstract-global-wallet/agw-react/hooks/useAbstractClient), which
performs actions (e.g. sending a transaction) from the Abstract Global Wallet smart contract itself, not the EOA approved to sign transactions for it.
It uses wagmi’s [useWalletClient](https://wagmi.sh/react/api/hooks/useWalletClient) hook under the hood, returning
a [wallet client](https://viem.sh/docs/clients/wallet) instance with the `account` set as the approved EOA of the Abstract Global Wallet.
## Import
```tsx
import { useGlobalWalletSignerClient } from "@abstract-foundation/agw-react";
```
## Usage
```tsx
import { useGlobalWalletSignerClient } from "@abstract-foundation/agw-react";
export default function App() {
const { data: client, isLoading, error } = useGlobalWalletSignerClient();
// Use the client to perform actions such as sending transactions or deploying contracts
async function submitTx() {
if (!client) return;
const hash = await client.sendTransaction({
to: "0x8e729E23CDc8bC21c37a73DA4bA9ebdddA3C8B6d",
data: "0x69",
});
}
// ... rest of your component ...
}
```
## Returns
Returns a `UseQueryResult`.
See [wagmi's useWalletClient](https://wagmi.sh/react/api/hooks/useWalletClient) for more information.
The wallet client instance connected to the approved signer of the connected
Abstract Global Wallet.
The timestamp for when the query most recently returned the status as
'success'.
The error object for the query, if an error was thrown. Defaults to null.
The timestamp for when the query most recently returned the status as 'error'.
The sum of all errors.
The failure count for the query. Incremented every time the query fails. Reset
to 0 when the query succeeds.
The failure reason for the query retry. Reset to null when the query succeeds.
* fetching: Is true whenever the queryFn is executing, which includes initial
pending state as well as background refetches. - paused: The query wanted to fetch,
but has been paused. - idle: The query is not fetching. See Network Mode for
more information.
Boolean variables derived from status.
Will be true if the query has been fetched.
Will be true if the query has been fetched after the component mounted. This
property can be used to not show any previously cached data.
Boolean variables derived from fetchStatus.
Is `true` whenever the first fetch for a query is in-flight. Is the same as
`isFetching && isPending`.
Will be `true` if the query failed while fetching for the first time.
Will be `true` if the data shown is the placeholder data.
Will be `true` if the query failed while refetching.
Is true whenever a background refetch is in-flight, which does not include
initial `pending`. Is the same as `isFetching && !isPending`.
Will be `true` if the data in the cache is invalidated or if the data is older
than the given staleTime.
A function to manually refetch the query.
* `cancelRefetch`: When set to `true`, a
currently running request will be canceled before a new request is made. When
set to false, no refetch will be made if there is already a request running. Defaults to `true`.
* `pending`: if there's no cached data and no query attempt was finished yet.
* `error`: if the query attempt resulted in an error. The corresponding error
property has the error received from the attempted fetch.
* `success`: if the query has received a response with no errors and is ready to display its data.
The corresponding data property on the query is the data received from the
successful fetch or if the query's enabled property is set to false and has not been fetched
yet, data is the first initialData supplied to the query on initialization.
# useLoginWithAbstract
Source: https://docs.abs.xyz/abstract-global-wallet/agw-react/hooks/useLoginWithAbstract
Hook for signing in and signing out users with Abstract Global Wallet.
Use the `useLoginWithAbstract` hook to prompt users to sign up or sign into your application using Abstract Global Wallet
and optionally sign out once connected.
It uses the following hooks from [wagmi](https://wagmi.sh/) under the hood:
* `login`: [useConnect](https://wagmi.sh/react/api/hooks/useConnect).
* `logout`: [useDisconnect](https://wagmi.sh/react/api/hooks/useDisconnect).
## Import
```tsx
import { useLoginWithAbstract } from "@abstract-foundation/agw-react";
```
## Usage
```tsx
import { useLoginWithAbstract } from "@abstract-foundation/agw-react";
export default function App() {
const { login, logout } = useLoginWithAbstract();
return ;
}
```
## Returns
Opens the signup/login modal to prompt the user to connect to the application
using Abstract Global Wallet.
Disconnects the user's wallet from the application.
## Demo
View the [live demo](https://sdk.demos.abs.xyz) to see Abstract Global Wallet in action.
If the user does not have an Abstract Global Wallet, they will be prompted to create one:
 If the user already has an Abstract Global Wallet, they will be prompted to use it to sign in:
 # useRevokeSessions
Source: https://docs.abs.xyz/abstract-global-wallet/agw-react/hooks/useRevokeSessions
Hook for revoking session keys.
Use the `useRevokeSessions` hook to revoke session keys from the connected Abstract Global Wallet, preventing the session keys from being able to execute any further transactions.
## Import
```tsx
import { useRevokeSessions } from "@abstract-foundation/agw-react";
```
## Usage
```tsx
import { useRevokeSessions } from "@abstract-foundation/agw-react";
import type { SessionConfig } from "@abstract-foundation/agw-client/sessions";
export default function RevokeSessionExample() {
const { revokeSessionsAsync } = useRevokeSessions();
async function handleRevokeSession() {
// Revoke a single session using its configuration
await revokeSessionsAsync({
sessions: existingSessionConfig,
});
// Revoke a single session using its creation transaction hash
await revokeSessionsAsync({
sessions: "0x1234...",
});
// Revoke multiple sessions
await revokeSessionsAsync({
sessions: [
existingSessionConfig,
"0x1234...",
anotherSessionConfig
],
});
}
return ;
}
```
## Returns
Function to revoke session keys. Accepts a `RevokeSessionsArgs` object containing:
The session(s) to revoke. Can be provided as an array of:
* Session configuration objects
* Transaction hashes of when the sessions were created
* A mix of both session configs and transaction hashes
Async function to revoke session keys. Takes the same parameters as `revokeSessions`.
Whether the session revocation is in progress.
Whether the session revocation resulted in an error.
Error object if the session revocation failed.
# useWriteContractSponsored
Source: https://docs.abs.xyz/abstract-global-wallet/agw-react/hooks/useWriteContractSponsored
Hook for interacting with smart contracts using paymasters to cover gas fees.
Use the `useWriteContractSponsored` hook to initiate transactions on smart contracts with the transaction gas fees sponsored by a
[paymaster](/how-abstract-works/native-account-abstraction/paymasters).
It uses the [useWriteContract](https://wagmi.sh/react/api/hooks/useWriteContract) hook from [wagmi](https://wagmi.sh/)
under the hood.
## Import
```tsx
import { useWriteContractSponsored } from "@abstract-foundation/agw-react";
```
## Usage
```tsx
import { useWriteContractSponsored } from "@abstract-foundation/agw-react";
import { getGeneralPaymasterInput } from "viem/zksync";
import type { Abi } from "viem";
const contractAbi: Abi = [
/* Your contract ABI here */
];
export default function App() {
const { writeContractSponsored, data, error, isSuccess, isPending } =
useWriteContractSponsored();
const handleWriteContract = () => {
writeContractSponsored({
abi: contractAbi,
address: "0xC4822AbB9F05646A9Ce44EFa6dDcda0Bf45595AA",
functionName: "mint",
args: ["0x273B3527BF5b607dE86F504fED49e1582dD2a1C6", BigInt(1)],
paymaster: "0x5407B5040dec3D339A9247f3654E59EEccbb6391",
paymasterInput: getGeneralPaymasterInput({
innerInput: "0x",
}),
});
};
return (
# useRevokeSessions
Source: https://docs.abs.xyz/abstract-global-wallet/agw-react/hooks/useRevokeSessions
Hook for revoking session keys.
Use the `useRevokeSessions` hook to revoke session keys from the connected Abstract Global Wallet, preventing the session keys from being able to execute any further transactions.
## Import
```tsx
import { useRevokeSessions } from "@abstract-foundation/agw-react";
```
## Usage
```tsx
import { useRevokeSessions } from "@abstract-foundation/agw-react";
import type { SessionConfig } from "@abstract-foundation/agw-client/sessions";
export default function RevokeSessionExample() {
const { revokeSessionsAsync } = useRevokeSessions();
async function handleRevokeSession() {
// Revoke a single session using its configuration
await revokeSessionsAsync({
sessions: existingSessionConfig,
});
// Revoke a single session using its creation transaction hash
await revokeSessionsAsync({
sessions: "0x1234...",
});
// Revoke multiple sessions
await revokeSessionsAsync({
sessions: [
existingSessionConfig,
"0x1234...",
anotherSessionConfig
],
});
}
return ;
}
```
## Returns
Function to revoke session keys. Accepts a `RevokeSessionsArgs` object containing:
The session(s) to revoke. Can be provided as an array of:
* Session configuration objects
* Transaction hashes of when the sessions were created
* A mix of both session configs and transaction hashes
Async function to revoke session keys. Takes the same parameters as `revokeSessions`.
Whether the session revocation is in progress.
Whether the session revocation resulted in an error.
Error object if the session revocation failed.
# useWriteContractSponsored
Source: https://docs.abs.xyz/abstract-global-wallet/agw-react/hooks/useWriteContractSponsored
Hook for interacting with smart contracts using paymasters to cover gas fees.
Use the `useWriteContractSponsored` hook to initiate transactions on smart contracts with the transaction gas fees sponsored by a
[paymaster](/how-abstract-works/native-account-abstraction/paymasters).
It uses the [useWriteContract](https://wagmi.sh/react/api/hooks/useWriteContract) hook from [wagmi](https://wagmi.sh/)
under the hood.
## Import
```tsx
import { useWriteContractSponsored } from "@abstract-foundation/agw-react";
```
## Usage
```tsx
import { useWriteContractSponsored } from "@abstract-foundation/agw-react";
import { getGeneralPaymasterInput } from "viem/zksync";
import type { Abi } from "viem";
const contractAbi: Abi = [
/* Your contract ABI here */
];
export default function App() {
const { writeContractSponsored, data, error, isSuccess, isPending } =
useWriteContractSponsored();
const handleWriteContract = () => {
writeContractSponsored({
abi: contractAbi,
address: "0xC4822AbB9F05646A9Ce44EFa6dDcda0Bf45595AA",
functionName: "mint",
args: ["0x273B3527BF5b607dE86F504fED49e1582dD2a1C6", BigInt(1)],
paymaster: "0x5407B5040dec3D339A9247f3654E59EEccbb6391",
paymasterInput: getGeneralPaymasterInput({
innerInput: "0x",
}),
});
};
return (
{isSuccess &&
Transaction Hash: {data}
}
{error &&
Error: {error.message}
}
);
}
```
## Returns
Returns a `UseWriteContractSponsoredReturnType`.
Synchronous function to submit a transaction to a smart contract with gas
fees sponsored by a paymaster.
Asynchronous function to submit a transaction to a smart contract with gas
fees sponsored by a paymaster.
The transaction hash of the sponsored transaction.
The error if the transaction failed.
Indicates if the transaction was successful.
Indicates if the transaction is currently pending.
Additional context information about the transaction.
The number of times the transaction has failed.
The reason for the transaction failure, if any.
Indicates if the transaction resulted in an error.
Indicates if the hook is in an idle state (no transaction has been initiated).
Indicates if the transaction processing is paused.
A function to clean the mutation internal state (i.e., it resets the mutation
to its initial state).
The current status of the transaction.
* `'idle'` initial status prior to the mutation function executing.
* `'pending'` if the mutation is currently executing.
* `'error'` if the last mutation attempt resulted in an error.
* `'success'` if the last mutation attempt was successful.
The timestamp when the transaction was submitted.
The submitted transaction details.
The variables used for the contract write operation.
# ConnectKit
Source: https://docs.abs.xyz/abstract-global-wallet/agw-react/integrating-with-connectkit
Learn how to integrate Abstract Global Wallet with ConnectKit.
The `agw-react` package includes an option to include Abstract Global Wallet as a connection option in the ConnectKit `ConnectKitButton` component.
Use our example repo to quickly get started with AGW and ConnectKit.
## Installation
Install the required dependencies:
```bash npm
npm install @abstract-foundation/agw-react @abstract-foundation/agw-client wagmi viem connectkit @tanstack/react-query @rainbow-me/rainbowkit
```
```bash yarn
yarn add @abstract-foundation/agw-react @abstract-foundation/agw-client wagmi viem connectkit @tanstack/react-query @rainbow-me/rainbowkit
```
```bash pnpm
pnpm add @abstract-foundation/agw-react @abstract-foundation/agw-client wagmi viem connectkit @tanstack/react-query @rainbow-me/rainbowkit
```
```bash bun
bun add @abstract-foundation/agw-react @abstract-foundation/agw-client wagmi viem connectkit @tanstack/react-query @rainbow-me/rainbowkit
```
## Usage
### 1. Configure the Providers
Wrap your application in the required providers:
```tsx Providers
import { QueryClient, QueryClientProvider } from "@tanstack/react-query";
import { WagmiProvider } from "wagmi";
import { ConnectKitProvider } from "connectkit";
const queryClient = new QueryClient();
export default function AbstractWalletWrapper({
children,
}: {
children: React.ReactNode;
}) {
return (
{/* Your application components */}
{children}
);
}
```
```tsx Wagmi Config
import { createConfig, http } from "wagmi";
import { abstractTestnet, abstract } from "viem/chains"; // Use abstract for mainnet
import { abstractWalletConnector } from "@abstract-foundation/agw-react/connectors";
export const config = createConfig({
connectors: [abstractWalletConnector()],
chains: [abstractTestnet],
transports: {
[abstractTestnet.id]: http(),
},
ssr: true,
});
```
### 2. Render the ConnectKitButton
Render the [ConnectKitButton](https://docs.family.co/connectkit/connect-button) component anywhere in your application:
```tsx
import { ConnectKitButton } from "connectkit";
export default function Home() {
return ;
}
```
# Dynamic
Source: https://docs.abs.xyz/abstract-global-wallet/agw-react/integrating-with-dynamic
Learn how to integrate Abstract Global Wallet with Dynamic.
The `agw-react` package includes an option to include Abstract Global Wallet as a connection option in the Dynamic `DynamicWidget` component.
Use our example repo to quickly get started with AGW and Dynamic.
## Installation
Install the required dependencies:
```bash npm
npm install @abstract-foundation/agw-react @abstract-foundation/agw-client @dynamic-labs/sdk-react-core @dynamic-labs/ethereum @dynamic-labs-connectors/abstract-global-wallet-evm viem
```
```bash yarn
yarn add @abstract-foundation/agw-react @abstract-foundation/agw-client @dynamic-labs/sdk-react-core @dynamic-labs/ethereum @dynamic-labs-connectors/abstract-global-wallet-evm viem
```
```bash pnpm
pnpm add @abstract-foundation/agw-react @abstract-foundation/agw-client @dynamic-labs/sdk-react-core @dynamic-labs/ethereum @dynamic-labs-connectors/abstract-global-wallet-evm viem
```
```bash bun
bun add @abstract-foundation/agw-react @abstract-foundation/agw-client @dynamic-labs/sdk-react-core @dynamic-labs/ethereum @dynamic-labs-connectors/abstract-global-wallet-evm viem
```
## Usage
### 1. Configure the DynamicContextProvider
Wrap your application in the [DynamicContextProvider](https://docs.dynamic.xyz/react-sdk/components/dynamiccontextprovider) component:
```tsx Providers
import { DynamicContextProvider } from "@dynamic-labs/sdk-react-core";
import { AbstractEvmWalletConnectors } from "@dynamic-labs-connectors/abstract-global-wallet-evm";
import { Chain } from "viem";
import { abstractTestnet, abstract } from "viem/chains"; // Use abstract for mainnet
export default function AbstractWalletWrapper({
children,
}: {
children: React.ReactNode;
}) {
return (
{children}
);
}
```
```tsx Config
import { EvmNetwork } from "@dynamic-labs/sdk-react-core";
import { Chain } from "viem";
import { abstractTestnet, abstract } from "viem/chains";
export function toDynamicChain(chain: Chain, iconUrl: string): EvmNetwork {
return {
...chain,
networkId: chain.id,
chainId: chain.id,
nativeCurrency: {
...chain.nativeCurrency,
iconUrl: "https://app.dynamic.xyz/assets/networks/eth.svg",
},
iconUrls: [iconUrl],
blockExplorerUrls: [chain.blockExplorers?.default?.url],
rpcUrls: [...chain.rpcUrls.default.http],
} as EvmNetwork;
}
```
**Next.js App Router:** If you are using [Next.js App
Router](https://nextjs.org/docs), create a new component and add the `use
client` directive at the top of your file ([see
example](https://github.com/Abstract-Foundation/examples/blob/main/agw-dynamic-nextjs/src/components/NextAbstractWalletProvider.tsx))
and wrap your application in this component.
### 2. Render the DynamicWidget
Render the [DynamicWidget](https://docs.dynamic.xyz/react-sdk/components/dynamicwidget) component anywhere in your application:
```tsx
import { DynamicWidget } from "@dynamic-labs/sdk-react-core";
export default function Home() {
return ;
}
```
# Privy
Source: https://docs.abs.xyz/abstract-global-wallet/agw-react/integrating-with-privy
Learn how to integrate Abstract Global Wallet into an existing Privy application
[Privy](https://docs.privy.io/guide/react/quickstart) powers the login screen and
[EOA creation](/abstract-global-wallet/architecture#eoa-creation)
of Abstract Global Wallet, meaning you can use Privy’s features and SDKs natively alongside AGW.
The `agw-react` package provides an `AbstractPrivyProvider` component,
which wraps your application with the [PrivyProvider](https://docs.privy.io/reference/sdk/react-auth/functions/PrivyProvider)
as well as the Wagmi and TanStack Query providers; allowing you to use the features of each library with Abstract Global Wallet.
Use our example repo to quickly get started with AGW and Privy.
## Installation
Install the required dependencies:
```bash npm
npm install @abstract-foundation/agw-react @abstract-foundation/agw-client wagmi viem @tanstack/react-query
```
```bash yarn
yarn add @abstract-foundation/agw-react @abstract-foundation/agw-client wagmi viem @tanstack/react-query
```
```bash pnpm
pnpm add @abstract-foundation/agw-react @abstract-foundation/agw-client wagmi viem @tanstack/react-query
```
```bash bun
bun add @abstract-foundation/agw-react @abstract-foundation/agw-client wagmi viem @tanstack/react-query
```
## Usage
This section assumes you have already created an app on the [Privy dashboard](https://docs.privy.io/guide/react/quickstart).
### 1. Enable Abstract Integration
From the [Privy dashboard](https://dashboard.privy.io/),
navigate to **Ecosystem** > **Integrations**.
Scroll down to find **Abstract** and toggle the switch to enable the integration.
 ### 2. Configure the AbstractPrivyProvider
Wrap your application in the `AbstractPrivyProvider` component, providing your
Privy app ID
as the `appId` prop.
```tsx {1,5,7}
import { AbstractPrivyProvider } from "@abstract-foundation/agw-react/privy";
const App = () => {
return (
{children}
);
};
```
**Next.js App Router:** If you are using [Next.js App
Router](https://nextjs.org/docs), create a new component and add the `use
client` directive at the top of your file ([see
example](https://github.com/Abstract-Foundation/examples/blob/main/agw-privy-nextjs/src/components/NextAbstractWalletProvider.tsx))
and wrap your application in this component.
### 3. Login users
Use the `useAbstractPrivyLogin` hook to prompt users to login with Abstract Global Wallet.
```tsx
import { useAbstractPrivyLogin } from "@abstract-foundation/agw-react/privy";
const LoginButton = () => {
const { login, link } = useAbstractPrivyLogin();
return ;
};
```
* The `login` function uses Privy's [loginWithCrossAppAccount](https://docs.privy.io/guide/react/cross-app/requester#login)
function to authenticate users with their Abstract Global Wallet account.
* The `link` function uses Privy's [linkCrossAppAccount](https://docs.privy.io/guide/react/cross-app/requester#linking)
function to allow authenticated users to link their existing account to an Abstract Global Wallet.
### 4. Use hooks and functions
Once the user has signed in, you can begin to use any of the `agw-react` hooks,
such as [useWriteContractSponsored](/abstract-global-wallet/agw-react/hooks/useWriteContractSponsored)
as well as all of the existing [wagmi hooks](https://wagmi.sh/react/api/hooks); such as [useAccount](https://wagmi.sh/react/api/hooks/useAccount),
[useBalance](https://wagmi.sh/react/api/hooks/useBalance), etc.
All transactions will be sent from the connected AGW smart contract wallet (i.e. the `tx.from` address will be the AGW smart contract wallet address).
```tsx
import { useAccount, useSendTransaction } from "wagmi";
export default function Example() {
const { address, status } = useAccount();
const { sendTransaction, isPending } = useSendTransaction();
return (
);
}
```
# RainbowKit
Source: https://docs.abs.xyz/abstract-global-wallet/agw-react/integrating-with-rainbowkit
Learn how to integrate Abstract Global Wallet with RainbowKit.
The `agw-react` package includes an option to include Abstract Global Wallet
as a connection option in your [RainbowKit ConnectButton](https://www.rainbowkit.com/docs/connect-button).
Use our example repo to quickly get started with AGW and RainbowKit.
## Installation
Install the required dependencies:
```bash npm
npm install @abstract-foundation/agw-react @abstract-foundation/agw-client @rainbow-me/rainbowkit wagmi viem@2.x @tanstack/react-query
```
```bash yarn
yarn add @abstract-foundation/agw-react @abstract-foundation/agw-client @rainbow-me/rainbowkit wagmi viem@2.x @tanstack/react-query
```
```bash pnpm
pnpm add @abstract-foundation/agw-react @abstract-foundation/agw-client @rainbow-me/rainbowkit wagmi viem@2.x @tanstack/react-query
```
```bash bun
bun add @abstract-foundation/agw-react @abstract-foundation/agw-client @rainbow-me/rainbowkit wagmi viem@2.x @tanstack/react-query
```
## Import
The `agw-react` package includes the `abstractWallet` connector you can use to add Abstract Global Wallet as a
connection option in your RainbowKit [ConnectButton](https://www.rainbowkit.com/docs/connect-button).
```tsx
import { abstractWallet } from "@abstract-foundation/agw-react/connectors";
```
## Usage
### 1. Configure the Providers
Wrap your application in the following providers:
* [WagmiProvider](https://wagmi.sh/react/api/WagmiProvider) from `wagmi`.
* [QueryClientProvider](https://tanstack.com/query/latest/docs/framework/react/reference/QueryClientProvider) from `@tanstack/react-query`.
* [RainbowKitProvider](https://www.rainbowkit.com/docs/custom-connect-button) from `@rainbow-me/rainbowkit`.
```tsx Providers
import { RainbowKitProvider, darkTheme } from "@rainbow-me/rainbowkit";
import { QueryClient, QueryClientProvider } from "@tanstack/react-query";
import { WagmiProvider } from "wagmi";
// + import config from your wagmi config
const client = new QueryClient();
export default function AbstractWalletWrapper() {
return (
{/* Your application components */}
);
}
```
```tsx RainbowKit Config
import { connectorsForWallets } from "@rainbow-me/rainbowkit";
import { abstractWallet } from "@abstract-foundation/agw-react/connectors";
export const connectors = connectorsForWallets(
[
{
groupName: "Abstract",
wallets: [abstractWallet],
},
],
{
appName: "Rainbowkit Test",
projectId: "",
appDescription: "",
appIcon: "",
appUrl: "",
}
);
```
```tsx Wagmi Config
import { createConfig } from "wagmi";
import { abstractTestnet, abstract } from "wagmi/chains"; // Use abstract for mainnet
import { createClient, http } from "viem";
import { eip712WalletActions } from "viem/zksync";
// + import connectors from your RainbowKit config
export const config = createConfig({
connectors,
chains: [abstractTestnet],
client({ chain }) {
return createClient({
chain,
transport: http(),
}).extend(eip712WalletActions());
},
ssr: true,
});
```
### 2. Render the ConnectButton
Render the `ConnectButton` from `@rainbow-me/rainbowkit` anywhere in your app.
```tsx
import { ConnectButton } from "@rainbow-me/rainbowkit";
export default function Home() {
return ;
}
```
# Reown
Source: https://docs.abs.xyz/abstract-global-wallet/agw-react/integrating-with-reown
Learn how to integrate Abstract Global Wallet with Reown.
Users can connect to AGW via Reown (prev. known as WalletConnect) and approve transactions from within the [Abstract Portal](https://portal.abs.xyz/profile).
Use our example repo to quickly get started with Reown AppKit and AGW.
## Installation
Follow the [Reown quickstart](https://docs.reown.com/appkit/overview#quickstart) for your preferred framework to install the necessary dependencies and initialize AppKit.
Configure `abstract` or `abstractTestnet` as the chain in your AppKit configuration.
```ts
import { abstract } from "@reown/appkit/networks";
```
# Thirdweb
Source: https://docs.abs.xyz/abstract-global-wallet/agw-react/integrating-with-thirdweb
Learn how to integrate Abstract Global Wallet with Thirdweb.
The `agw-react` package includes an option to include Abstract Global Wallet as a connection option in the thirdweb `ConnectButton` component.
Use our example repo to quickly get started with AGW and thirdweb.
## Installation
Install the required dependencies:
```bash npm
npm install @abstract-foundation/agw-react @abstract-foundation/agw-client wagmi viem thirdweb
```
```bash yarn
yarn add @abstract-foundation/agw-react @abstract-foundation/agw-client wagmi viem thirdweb
```
```bash pnpm
pnpm add @abstract-foundation/agw-react @abstract-foundation/agw-client wagmi viem thirdweb
```
```bash bun
bun add @abstract-foundation/agw-react @abstract-foundation/agw-client wagmi viem thirdweb
```
## Usage
### 1. Configure the ThirdwebProvider
Wrap your application in the [ThirdwebProvider](https://portal.thirdweb.com/react/v5/ThirdwebProvider) component.
```tsx {1,9,11}
import { ThirdwebProvider } from "thirdweb/react";
export default function AbstractWalletWrapper({
children,
}: {
children: React.ReactNode;
}) {
return (
{/* Your application components */}
);
}
```
**Next.js App Router:** If you are using [Next.js App
Router](https://nextjs.org/docs), create a new component and add the `use
client` directive at the top of your file ([see
example](https://github.com/Abstract-Foundation/examples/blob/main/agw-thirdweb-nextjs/src/components/NextAbstractWalletProvider.tsx))
and wrap your application in this component ([see
example](https://github.com/Abstract-Foundation/examples/blob/main/agw-thirdweb-nextjs/src/app/layout.tsx#L51)).
### 2. Render the ConnectButton
Render the [ConnectButton](https://portal.thirdweb.com/react/v5/ConnectButton) component anywhere in your application, and include `abstractWallet` in the `wallets` prop.
```tsx
import { abstractWallet } from "@abstract-foundation/agw-react/thirdweb";
import { createThirdwebClient } from "thirdweb";
import { abstractTestnet, abstract } from "thirdweb/chains"; // Use abstract for mainnet
import { ConnectButton } from "thirdweb/react";
export default function Home() {
const client = createThirdwebClient({
clientId: "your-thirdweb-client-id-here",
});
return (
);
}
```
# Native Integration
Source: https://docs.abs.xyz/abstract-global-wallet/agw-react/native-integration
Learn how to integrate Abstract Global Wallet with React.
Integrate AGW into an existing React application using the steps below, or
[ watch the video tutorial](https://youtu.be/P5lvuBcmisU) for a step-by-step walkthrough.
### 1. Install Abstract Global Wallet
Install the required dependencies:
```bash npm
npm install @abstract-foundation/agw-react @abstract-foundation/agw-client wagmi viem@2.x @tanstack/react-query
```
```bash yarn
yarn add @abstract-foundation/agw-react @abstract-foundation/agw-client wagmi viem@2.x @tanstack/react-query
```
```bash pnpm
pnpm add @abstract-foundation/agw-react @abstract-foundation/agw-client wagmi viem@2.x @tanstack/react-query
```
```bash bun
bun add @abstract-foundation/agw-react @abstract-foundation/agw-client wagmi viem@2.x @tanstack/react-query
```
### 2. Setup the AbstractWalletProvider
Wrap your application in the `AbstractWalletProvider` component to enable the use of the package's hooks and components
throughout your application.
```tsx
import { AbstractWalletProvider } from "@abstract-foundation/agw-react";
import { abstractTestnet, abstract } from "viem/chains"; // Use abstract for mainnet
const App = () => {
return (
{/* Your application components */}
);
};
```
**Next.js App Router:** If you are using [Next.js App
Router](https://nextjs.org/docs), create a new component and add the `use
client` directive at the top of your file ([see
example](https://github.com/Abstract-Foundation/examples/blob/main/agw-nextjs/src/components/NextAbstractWalletProvider.tsx))
and wrap your application in this component ([see
example](https://github.com/Abstract-Foundation/examples/blob/main/agw-nextjs/src/app/layout.tsx#L48-L54)).
The `AbstractWalletProvider` wraps your application in both the [WagmiProvider](https://wagmi.sh/react/api/WagmiProvider) and
[QueryClientProvider](https://tanstack.com/query/latest/docs/framework/react/reference/QueryClientProvider),
meaning you can use the hooks and features of these libraries within your application.
### 3. Login with AGW
With the provider setup, prompt users to sign in to your application with their Abstract Global Wallet using the
[useLoginWithAbstract](/abstract-global-wallet/agw-react/hooks/useLoginWithAbstract) hook.
```tsx
import { useLoginWithAbstract } from "@abstract-foundation/agw-react";
export default function SignIn() {
// login function to prompt the user to sign in with AGW.
const { login } = useLoginWithAbstract();
return ;
}
```
### 4. Use the Wallet
With the AGW connected, prompt the user to approve sending transactions from their wallet.
* Use the [Abstract Client](/abstract-global-wallet/agw-react/hooks/useAbstractClient) or Abstract hooks for:
* Wallet actions. e.g. [sendTransaction](/abstract-global-wallet/agw-client/actions/sendTransaction), [deployContract](/abstract-global-wallet/agw-client/actions/deployContract),
[writeContract](/abstract-global-wallet/agw-client/actions/writeContract) etc.
* Smart contract wallet features. e.g. [gas-sponsored transactions](/abstract-global-wallet/agw-react/hooks/useWriteContractSponsored), [session keys](/abstract-global-wallet/agw-client/session-keys/overview), [transaction batches](/abstract-global-wallet/agw-client/actions/sendTransactionBatch).
* Use [Wagmi](https://wagmi.sh/) hooks and [Viem](https://viem.sh/) functions for generic blockchain interactions, for example:
* Reading data, e.g. Wagmi’s [useAccount](https://wagmi.sh/react/api/hooks/useAccount) and [useBalance](https://wagmi.sh/react/api/hooks/useBalance) hooks.
* Writing data, e.g. Wagmi’s [useSignMessage](https://wagmi.sh/react/api/hooks/useSignMessage) and Viem’s [verifyMessage](https://viem.sh/docs/actions/public/verifyMessage.html).
```tsx Abstract Client
import { useAbstractClient } from "@abstract-foundation/agw-react";
export default function SendTransactionButton() {
// Option 1: Access and call methods directly
const { data: client } = useAbstractClient();
async function sendTransaction() {
if (!client) return;
// Submits a transaction from the connected AGW smart contract wallet.
const hash = await client.sendTransaction({
to: "0x273B3527BF5b607dE86F504fED49e1582dD2a1C6",
data: "0x69",
});
}
return ;
}
```
```tsx Abstract Hooks
import { useWriteContractSponsored } from "@abstract-foundation/agw-react";
import { parseAbi } from "viem";
import { getGeneralPaymasterInput } from "viem/zksync";
export default function SendTransaction() {
const { writeContractSponsoredAsync } = useWriteContractSponsored();
async function sendSponsoredTransaction() {
const hash = await writeContractSponsoredAsync({
abi: parseAbi(["function mint(address to, uint256 amount)"]),
address: "0xC4822AbB9F05646A9Ce44EFa6dDcda0Bf45595AA",
functionName: "mint",
args: ["0x273B3527BF5b607dE86F504fED49e1582dD2a1C6", BigInt(1)],
paymaster: "0x5407B5040dec3D339A9247f3654E59EEccbb6391",
paymasterInput: getGeneralPaymasterInput({
innerInput: "0x",
}),
});
}
return (
);
}
```
```tsx Wagmi Hooks
import { useAccount, useSendTransaction } from "wagmi";
export default function SendTransactionWithWagmi() {
const { address, status } = useAccount();
const { sendTransaction, isPending } = useSendTransaction();
return (
);
}
```
# How It Works
Source: https://docs.abs.xyz/abstract-global-wallet/architecture
Learn more about how Abstract Global Wallet works under the hood.
Abstract Global Wallet makes use of [native account abstraction](/how-abstract-works/native-account-abstraction),
by creating [smart contract wallets](/how-abstract-works/native-account-abstraction/smart-contract-wallets)
for users that have more security and flexibility than traditional EOAs.
Users can connect their Abstract Global Wallet to an application by logging in with their email, social account, or existing wallet.
Once connected, applications can begin prompting users to approve transactions, which are executed from the
user's smart contract wallet.
Try the live demo of Abstract Global Wallet to see it in action.
## How Abstract Global Wallet Works
Each AGW account must have at least one signer that is authorized to sign transactions on behalf of the
smart contract wallet.
For this reason, each AGW account is generated in a two-step process:
1. **EOA Creation**: An EOA wallet is created under the hood as the user signs up with their email, social account,
or other login methods.
2. **Smart Contract Wallet Creation**: the smart contract wallet is deployed and provided with the EOA address
(from the previous step) as an approved signer.
Once the smart contract is initialized, the user can freely add and remove signers to the wallets
and make use of the [other features](#smart-contract-wallet-features)
provided by the AGW.
### 2. Configure the AbstractPrivyProvider
Wrap your application in the `AbstractPrivyProvider` component, providing your
Privy app ID
as the `appId` prop.
```tsx {1,5,7}
import { AbstractPrivyProvider } from "@abstract-foundation/agw-react/privy";
const App = () => {
return (
{children}
);
};
```
**Next.js App Router:** If you are using [Next.js App
Router](https://nextjs.org/docs), create a new component and add the `use
client` directive at the top of your file ([see
example](https://github.com/Abstract-Foundation/examples/blob/main/agw-privy-nextjs/src/components/NextAbstractWalletProvider.tsx))
and wrap your application in this component.
### 3. Login users
Use the `useAbstractPrivyLogin` hook to prompt users to login with Abstract Global Wallet.
```tsx
import { useAbstractPrivyLogin } from "@abstract-foundation/agw-react/privy";
const LoginButton = () => {
const { login, link } = useAbstractPrivyLogin();
return ;
};
```
* The `login` function uses Privy's [loginWithCrossAppAccount](https://docs.privy.io/guide/react/cross-app/requester#login)
function to authenticate users with their Abstract Global Wallet account.
* The `link` function uses Privy's [linkCrossAppAccount](https://docs.privy.io/guide/react/cross-app/requester#linking)
function to allow authenticated users to link their existing account to an Abstract Global Wallet.
### 4. Use hooks and functions
Once the user has signed in, you can begin to use any of the `agw-react` hooks,
such as [useWriteContractSponsored](/abstract-global-wallet/agw-react/hooks/useWriteContractSponsored)
as well as all of the existing [wagmi hooks](https://wagmi.sh/react/api/hooks); such as [useAccount](https://wagmi.sh/react/api/hooks/useAccount),
[useBalance](https://wagmi.sh/react/api/hooks/useBalance), etc.
All transactions will be sent from the connected AGW smart contract wallet (i.e. the `tx.from` address will be the AGW smart contract wallet address).
```tsx
import { useAccount, useSendTransaction } from "wagmi";
export default function Example() {
const { address, status } = useAccount();
const { sendTransaction, isPending } = useSendTransaction();
return (
);
}
```
# RainbowKit
Source: https://docs.abs.xyz/abstract-global-wallet/agw-react/integrating-with-rainbowkit
Learn how to integrate Abstract Global Wallet with RainbowKit.
The `agw-react` package includes an option to include Abstract Global Wallet
as a connection option in your [RainbowKit ConnectButton](https://www.rainbowkit.com/docs/connect-button).
Use our example repo to quickly get started with AGW and RainbowKit.
## Installation
Install the required dependencies:
```bash npm
npm install @abstract-foundation/agw-react @abstract-foundation/agw-client @rainbow-me/rainbowkit wagmi viem@2.x @tanstack/react-query
```
```bash yarn
yarn add @abstract-foundation/agw-react @abstract-foundation/agw-client @rainbow-me/rainbowkit wagmi viem@2.x @tanstack/react-query
```
```bash pnpm
pnpm add @abstract-foundation/agw-react @abstract-foundation/agw-client @rainbow-me/rainbowkit wagmi viem@2.x @tanstack/react-query
```
```bash bun
bun add @abstract-foundation/agw-react @abstract-foundation/agw-client @rainbow-me/rainbowkit wagmi viem@2.x @tanstack/react-query
```
## Import
The `agw-react` package includes the `abstractWallet` connector you can use to add Abstract Global Wallet as a
connection option in your RainbowKit [ConnectButton](https://www.rainbowkit.com/docs/connect-button).
```tsx
import { abstractWallet } from "@abstract-foundation/agw-react/connectors";
```
## Usage
### 1. Configure the Providers
Wrap your application in the following providers:
* [WagmiProvider](https://wagmi.sh/react/api/WagmiProvider) from `wagmi`.
* [QueryClientProvider](https://tanstack.com/query/latest/docs/framework/react/reference/QueryClientProvider) from `@tanstack/react-query`.
* [RainbowKitProvider](https://www.rainbowkit.com/docs/custom-connect-button) from `@rainbow-me/rainbowkit`.
```tsx Providers
import { RainbowKitProvider, darkTheme } from "@rainbow-me/rainbowkit";
import { QueryClient, QueryClientProvider } from "@tanstack/react-query";
import { WagmiProvider } from "wagmi";
// + import config from your wagmi config
const client = new QueryClient();
export default function AbstractWalletWrapper() {
return (
{/* Your application components */}
);
}
```
```tsx RainbowKit Config
import { connectorsForWallets } from "@rainbow-me/rainbowkit";
import { abstractWallet } from "@abstract-foundation/agw-react/connectors";
export const connectors = connectorsForWallets(
[
{
groupName: "Abstract",
wallets: [abstractWallet],
},
],
{
appName: "Rainbowkit Test",
projectId: "",
appDescription: "",
appIcon: "",
appUrl: "",
}
);
```
```tsx Wagmi Config
import { createConfig } from "wagmi";
import { abstractTestnet, abstract } from "wagmi/chains"; // Use abstract for mainnet
import { createClient, http } from "viem";
import { eip712WalletActions } from "viem/zksync";
// + import connectors from your RainbowKit config
export const config = createConfig({
connectors,
chains: [abstractTestnet],
client({ chain }) {
return createClient({
chain,
transport: http(),
}).extend(eip712WalletActions());
},
ssr: true,
});
```
### 2. Render the ConnectButton
Render the `ConnectButton` from `@rainbow-me/rainbowkit` anywhere in your app.
```tsx
import { ConnectButton } from "@rainbow-me/rainbowkit";
export default function Home() {
return ;
}
```
# Reown
Source: https://docs.abs.xyz/abstract-global-wallet/agw-react/integrating-with-reown
Learn how to integrate Abstract Global Wallet with Reown.
Users can connect to AGW via Reown (prev. known as WalletConnect) and approve transactions from within the [Abstract Portal](https://portal.abs.xyz/profile).
Use our example repo to quickly get started with Reown AppKit and AGW.
## Installation
Follow the [Reown quickstart](https://docs.reown.com/appkit/overview#quickstart) for your preferred framework to install the necessary dependencies and initialize AppKit.
Configure `abstract` or `abstractTestnet` as the chain in your AppKit configuration.
```ts
import { abstract } from "@reown/appkit/networks";
```
# Thirdweb
Source: https://docs.abs.xyz/abstract-global-wallet/agw-react/integrating-with-thirdweb
Learn how to integrate Abstract Global Wallet with Thirdweb.
The `agw-react` package includes an option to include Abstract Global Wallet as a connection option in the thirdweb `ConnectButton` component.
Use our example repo to quickly get started with AGW and thirdweb.
## Installation
Install the required dependencies:
```bash npm
npm install @abstract-foundation/agw-react @abstract-foundation/agw-client wagmi viem thirdweb
```
```bash yarn
yarn add @abstract-foundation/agw-react @abstract-foundation/agw-client wagmi viem thirdweb
```
```bash pnpm
pnpm add @abstract-foundation/agw-react @abstract-foundation/agw-client wagmi viem thirdweb
```
```bash bun
bun add @abstract-foundation/agw-react @abstract-foundation/agw-client wagmi viem thirdweb
```
## Usage
### 1. Configure the ThirdwebProvider
Wrap your application in the [ThirdwebProvider](https://portal.thirdweb.com/react/v5/ThirdwebProvider) component.
```tsx {1,9,11}
import { ThirdwebProvider } from "thirdweb/react";
export default function AbstractWalletWrapper({
children,
}: {
children: React.ReactNode;
}) {
return (
{/* Your application components */}
);
}
```
**Next.js App Router:** If you are using [Next.js App
Router](https://nextjs.org/docs), create a new component and add the `use
client` directive at the top of your file ([see
example](https://github.com/Abstract-Foundation/examples/blob/main/agw-thirdweb-nextjs/src/components/NextAbstractWalletProvider.tsx))
and wrap your application in this component ([see
example](https://github.com/Abstract-Foundation/examples/blob/main/agw-thirdweb-nextjs/src/app/layout.tsx#L51)).
### 2. Render the ConnectButton
Render the [ConnectButton](https://portal.thirdweb.com/react/v5/ConnectButton) component anywhere in your application, and include `abstractWallet` in the `wallets` prop.
```tsx
import { abstractWallet } from "@abstract-foundation/agw-react/thirdweb";
import { createThirdwebClient } from "thirdweb";
import { abstractTestnet, abstract } from "thirdweb/chains"; // Use abstract for mainnet
import { ConnectButton } from "thirdweb/react";
export default function Home() {
const client = createThirdwebClient({
clientId: "your-thirdweb-client-id-here",
});
return (
);
}
```
# Native Integration
Source: https://docs.abs.xyz/abstract-global-wallet/agw-react/native-integration
Learn how to integrate Abstract Global Wallet with React.
Integrate AGW into an existing React application using the steps below, or
[ watch the video tutorial](https://youtu.be/P5lvuBcmisU) for a step-by-step walkthrough.
### 1. Install Abstract Global Wallet
Install the required dependencies:
```bash npm
npm install @abstract-foundation/agw-react @abstract-foundation/agw-client wagmi viem@2.x @tanstack/react-query
```
```bash yarn
yarn add @abstract-foundation/agw-react @abstract-foundation/agw-client wagmi viem@2.x @tanstack/react-query
```
```bash pnpm
pnpm add @abstract-foundation/agw-react @abstract-foundation/agw-client wagmi viem@2.x @tanstack/react-query
```
```bash bun
bun add @abstract-foundation/agw-react @abstract-foundation/agw-client wagmi viem@2.x @tanstack/react-query
```
### 2. Setup the AbstractWalletProvider
Wrap your application in the `AbstractWalletProvider` component to enable the use of the package's hooks and components
throughout your application.
```tsx
import { AbstractWalletProvider } from "@abstract-foundation/agw-react";
import { abstractTestnet, abstract } from "viem/chains"; // Use abstract for mainnet
const App = () => {
return (
{/* Your application components */}
);
};
```
**Next.js App Router:** If you are using [Next.js App
Router](https://nextjs.org/docs), create a new component and add the `use
client` directive at the top of your file ([see
example](https://github.com/Abstract-Foundation/examples/blob/main/agw-nextjs/src/components/NextAbstractWalletProvider.tsx))
and wrap your application in this component ([see
example](https://github.com/Abstract-Foundation/examples/blob/main/agw-nextjs/src/app/layout.tsx#L48-L54)).
The `AbstractWalletProvider` wraps your application in both the [WagmiProvider](https://wagmi.sh/react/api/WagmiProvider) and
[QueryClientProvider](https://tanstack.com/query/latest/docs/framework/react/reference/QueryClientProvider),
meaning you can use the hooks and features of these libraries within your application.
### 3. Login with AGW
With the provider setup, prompt users to sign in to your application with their Abstract Global Wallet using the
[useLoginWithAbstract](/abstract-global-wallet/agw-react/hooks/useLoginWithAbstract) hook.
```tsx
import { useLoginWithAbstract } from "@abstract-foundation/agw-react";
export default function SignIn() {
// login function to prompt the user to sign in with AGW.
const { login } = useLoginWithAbstract();
return ;
}
```
### 4. Use the Wallet
With the AGW connected, prompt the user to approve sending transactions from their wallet.
* Use the [Abstract Client](/abstract-global-wallet/agw-react/hooks/useAbstractClient) or Abstract hooks for:
* Wallet actions. e.g. [sendTransaction](/abstract-global-wallet/agw-client/actions/sendTransaction), [deployContract](/abstract-global-wallet/agw-client/actions/deployContract),
[writeContract](/abstract-global-wallet/agw-client/actions/writeContract) etc.
* Smart contract wallet features. e.g. [gas-sponsored transactions](/abstract-global-wallet/agw-react/hooks/useWriteContractSponsored), [session keys](/abstract-global-wallet/agw-client/session-keys/overview), [transaction batches](/abstract-global-wallet/agw-client/actions/sendTransactionBatch).
* Use [Wagmi](https://wagmi.sh/) hooks and [Viem](https://viem.sh/) functions for generic blockchain interactions, for example:
* Reading data, e.g. Wagmi’s [useAccount](https://wagmi.sh/react/api/hooks/useAccount) and [useBalance](https://wagmi.sh/react/api/hooks/useBalance) hooks.
* Writing data, e.g. Wagmi’s [useSignMessage](https://wagmi.sh/react/api/hooks/useSignMessage) and Viem’s [verifyMessage](https://viem.sh/docs/actions/public/verifyMessage.html).
```tsx Abstract Client
import { useAbstractClient } from "@abstract-foundation/agw-react";
export default function SendTransactionButton() {
// Option 1: Access and call methods directly
const { data: client } = useAbstractClient();
async function sendTransaction() {
if (!client) return;
// Submits a transaction from the connected AGW smart contract wallet.
const hash = await client.sendTransaction({
to: "0x273B3527BF5b607dE86F504fED49e1582dD2a1C6",
data: "0x69",
});
}
return ;
}
```
```tsx Abstract Hooks
import { useWriteContractSponsored } from "@abstract-foundation/agw-react";
import { parseAbi } from "viem";
import { getGeneralPaymasterInput } from "viem/zksync";
export default function SendTransaction() {
const { writeContractSponsoredAsync } = useWriteContractSponsored();
async function sendSponsoredTransaction() {
const hash = await writeContractSponsoredAsync({
abi: parseAbi(["function mint(address to, uint256 amount)"]),
address: "0xC4822AbB9F05646A9Ce44EFa6dDcda0Bf45595AA",
functionName: "mint",
args: ["0x273B3527BF5b607dE86F504fED49e1582dD2a1C6", BigInt(1)],
paymaster: "0x5407B5040dec3D339A9247f3654E59EEccbb6391",
paymasterInput: getGeneralPaymasterInput({
innerInput: "0x",
}),
});
}
return (
);
}
```
```tsx Wagmi Hooks
import { useAccount, useSendTransaction } from "wagmi";
export default function SendTransactionWithWagmi() {
const { address, status } = useAccount();
const { sendTransaction, isPending } = useSendTransaction();
return (
);
}
```
# How It Works
Source: https://docs.abs.xyz/abstract-global-wallet/architecture
Learn more about how Abstract Global Wallet works under the hood.
Abstract Global Wallet makes use of [native account abstraction](/how-abstract-works/native-account-abstraction),
by creating [smart contract wallets](/how-abstract-works/native-account-abstraction/smart-contract-wallets)
for users that have more security and flexibility than traditional EOAs.
Users can connect their Abstract Global Wallet to an application by logging in with their email, social account, or existing wallet.
Once connected, applications can begin prompting users to approve transactions, which are executed from the
user's smart contract wallet.
Try the live demo of Abstract Global Wallet to see it in action.
## How Abstract Global Wallet Works
Each AGW account must have at least one signer that is authorized to sign transactions on behalf of the
smart contract wallet.
For this reason, each AGW account is generated in a two-step process:
1. **EOA Creation**: An EOA wallet is created under the hood as the user signs up with their email, social account,
or other login methods.
2. **Smart Contract Wallet Creation**: the smart contract wallet is deployed and provided with the EOA address
(from the previous step) as an approved signer.
Once the smart contract is initialized, the user can freely add and remove signers to the wallets
and make use of the [other features](#smart-contract-wallet-features)
provided by the AGW.
 ### EOA Creation
First, the user authenticates with their email, social account, or other login method and
an EOA wallet (public-private key pair) tied to this login method is created under the hood.
This process is powered by
[Privy Embedded Wallets](https://docs.privy.io/guide/react/wallets/embedded/creation#automatic).
And occurs in a three step process:
A random 128-bit value is generated using a
[CSPRNG](https://en.wikipedia.org/wiki/Cryptographically_secure_pseudorandom_number_generator).
The 128-bit value is converted into a 12-word mnemonic phrase using
[BIP-39](https://github.com/bitcoin/bips/blob/master/bip-0039.mediawiki).
From this mnemonic phrase, a public-private key pair is derived.
The private key is sharded (split) into 3 parts and stored in 3 different
locations to ensure security and recovery mechanisms.
#### Private Key Sharding
The generated private key is split into 3 shards using
[Shamir's Secret Sharing](https://en.wikipedia.org/wiki/Shamir%27s_Secret_Sharing)
algorithm and stored in 3 different locations.
**2 out of 3** shards are required to reconstruct the private key.
The three shards are:
1. **Device Share**: This shard is stored on the user's device. In a browser environment,
it is stored inside the local storage of the Privy iframe.
2. **Auth Share**: This shard is encrypted and stored on Privy’s servers. It is retrieved
when the user logs in with their original login method.
3. **Recovery Share**: This shard is stored in a backup location of the user’s choice, typically
a cloud storage account such as Google Drive or iCloud.
#### How Shards are Combined
To reconstruct the private key, the user must have access to **two out of three** shards. This can be a combination of any two shards, with the most common being the **Device Share** and **Auth Share**.
* **Device Share** + **Auth Share**: This is the typical flow; the user authenticates with the Privy server
using their original login method (e.g. social account) on their device and the auth share is decrypted.
* **Device Share** + **Recovery Share**: If the Privy server is offline or the user has lost access to their
original login method (e.g. they no longer have access to their social account), they can use the recovery
share to reconstruct the private key.
* **Auth Share** + **Recovery Share**: If the user wants to access their account from a new device,
a new device share can be generated by combining the auth share and recovery share.
### Smart Contract Wallet Deployment
Once an EOA wallet is generated, the public key is provided to a
[smart contract wallet](/how-abstract-works/native-account-abstraction/smart-contract-wallets) deployment.
The smart contract wallet is deployed and the EOA wallet is added as an authorized signer to the wallet during
the initialization process.
As all accounts on Abstract are smart contract accounts,
(see [native account abstraction](/how-abstract-works/native-account-abstraction)),
the smart contract wallet is treated as a first-class citizen when interacting with the Abstract ecosystem.
The smart contract wallet that is deployed is a modified fork of
[Clave](https://github.com/getclave/clave-contracts) customized to have an `secp256k1`
signer by default to support the Privy Embedded Wallet *(as opposed to the default `secp256r1` signer in Clave)*
as well as custom validation logic to support [EIP-712](https://eips.ethereum.org/EIPS/eip-712) signatures.
#### Smart Contract Wallet Features
The smart contract wallet includes many modules to extend the functionality of the wallet, including:
* **Recovery Modules**: Allows the user to recover their account if they lose access to their login method via recovery methods
including email or guardian recovery.
* **Paymaster Support**: Transaction gas fees can be sponsored by [paymasters](/how-abstract-works/native-account-abstraction/paymasters).
* **Multiple Signers**: Users can add multiple signers to the wallet to allow for multiple different
accounts to sign transactions.
* **P256/secp256r1 Support**: Users can add signers generated from [passkeys](https://fidoalliance.org/passkeys/)
to authorize transactions.
# Frequently Asked Questions
Source: https://docs.abs.xyz/abstract-global-wallet/frequently-asked-questions
Answers to common questions about Abstract Global Wallet.
### Who holds the private keys to the AGW?
As described in the [how it works](/abstract-global-wallet/architecture) section, the
private key of the EOA that is the approved signer of the AGW smart contract
is generated and split into three shards.
* **Device Share**: This shard is stored on the user’s device. In a browser environment, it is stored inside the local storage of the Privy iframe.
* **Auth Share**: This shard is encrypted and stored on Privy’s servers. It is retrieved when the user logs in with their original login method.
* **Recovery Share**: This shard is stored in a backup location of the user’s choice, typically a cloud storage account such as Google Drive or iCloud.
### Does the user need to create their AGW on the Abstract website?
No, users don’t need to leave your application to create their AGW, any application that integrates the wallet connection flow
supports both creating a new AGW and connecting an existing AGW.
For example, the [live demo](https://sdk.demos.abs.xyz) showcases how both users without an existing AGW
can create one from within the application and existing AGW users can connect their AGW to the application and begin approving transactions.
### Who deploys the AGW smart contracts?
A factory smart contract deploys each AGW smart contract. The generated EOA sends the transaction to deploy the AGW smart contract via the factory,
and initializes the smart contract with itself as the approved signer.
Using the [SDK](/abstract-global-wallet/getting-started), this transaction is sponsored by a [paymaster](/how-abstract-works/native-account-abstraction/paymasters),
meaning users don’t need to load their EOA with any funds to deploy the AGW smart contract to get started.
### Does the AGW smart contract work on other chains?
Abstract Global Wallet is built on top of [native account abstraction](/how-abstract-works/native-account-abstraction/overview);
a feature unique to Abstract. While the smart contract code is EVM-compatible, the SDK is not chain-agnostic and only works on Abstract
due to the technical differences between Abstract and other EVM-compatible chains.
# Getting Started
Source: https://docs.abs.xyz/abstract-global-wallet/getting-started
Learn how to integrate Abstract Global Wallet into your application.
## New Projects
To kickstart a new project with AGW configured, use our CLI tool:
```bash
npx @abstract-foundation/create-abstract-app@latest my-app
```
## Existing Projects
Integrate Abstract Global Wallet into an existing project using one of our integration guides below:
}
>
Add AGW as the native wallet connection option to your React application.
}
>
Integrate AGW into an existing Privy application.
}
>
Integrate AGW as a wallet connection option to an existing ConnectKit
application.
}
>
Integrate AGW as a wallet connection option to an existing Dynamic
application.
}
>
Integrate AGW as a wallet connection option to an existing RainbowKit
application.
}
>
Integrate AGW as a wallet connection option to an existing thirdweb
application.
# Abstract Global Wallet
Source: https://docs.abs.xyz/abstract-global-wallet/overview
Discover Abstract Global Wallet, the smart contract wallet powering the Abstract ecosystem.
**Create a new application with Abstract Global Wallet configured:**
```bash
npx @abstract-foundation/create-abstract-app@latest my-app
```
## What is Abstract Global Wallet?
Abstract Global Wallet (AGW) is a cross-application
[smart contract wallet](/how-abstract-works/native-account-abstraction/smart-contract-wallets) that
users can create to interact with any application built on Abstract,
powered by [native account abstraction](/how-abstract-works/native-account-abstraction).
AGW provides a seamless and secure way to onboard users, in which
they sign up once using familiar login methods (such as email, social accounts,
passkeys and more), and can then use this account to interact with *any* application on Abstract.
Integrate Abstract Global Wallet into your application with our SDKs.
Learn more about how Abstract Global Wallet works under the hood.
**Check out the live demo to see Abstract Global Wallet in action:**
Try the live demo of Abstract Global Wallet to see it in action.
## Packages
Integrate Abstract Global Wallet (AGW) into your application using the packages below.
1. [agw-react](https://www.npmjs.com/package/@abstract-foundation/agw-react):
React hooks and components to prompt users to login with AGW and approve transactions.
Built on [Wagmi](https://github.com/wagmi-dev/wagmi).
2. [agw-client](https://www.npmjs.com/package/@abstract-foundation/agw-client):
Wallet actions and utility functions that complement the `agw-react` package.
Built on [Viem](https://github.com/wagmi-dev/viem).
# Going to Production
Source: https://docs.abs.xyz/abstract-global-wallet/session-keys/going-to-production
Learn how to use session keys in production on Abstract Mainnet.
While session keys unlock new ways to create engaging consumer experiences, improper or malicious implementations of session keys
create new ways for bad actors to steal assets from users.
Session keys are permissionless on **testnet**, however, **mainnet** enforces several security measures to protect users.
This document outlines the security restrictions and best practices for using session keys.
## Session Key Policy Registry
Session keys are restricted to a whitelist of allowed policies on Abstract Mainnet through the [Session Key Policy Registry contract](https://abscan.org/address/0xA146c7118A46b32aBD0e1ACA41DF4e61061b6b93#code), which manages a whitelist of approved session keys.
Applications must pass a security review before being added to the
registry to enable the use of session keys for their policies.
### Restricted Session Key Policies
Session key policies that request `approve` and/or `setApprovalForAll` functions *must* be passed with additional `constraints` that restrict the approval to a specific contract address.
For example, the following policy must include a `constraints` array that restricts the approval to a specific contract address,
or will be rejected with "Unconstrained token approval/transfer destination in call policy."
```typescript
{
target: "0x...",
selector: toFunctionSelector("approve(address, uint256)"),
// Must include a constraints array that restricts the approval to a specific contract address
constraints: [
{
condition: ConstraintCondition.Equal,
index: 0n,
limit: LimitType.Unlimited,
refValue: encodeAbiParameters(
[{ type: "address" }],
["0x-your-contract-address"]
),
},
],
}
```
## Session Key Signer Accounts
Session keys specify a **signer** account; an EOA that is permitted to perform the actions specified in the session configuration. Therefore, the private key of the signer(s) you create are **SENSITIVE VALUES**!
Exposing the signer private key enables attackers to execute any of the actions specified in a session configuration for any AGW that has approved a session key with that signer’s address.
```typescript
await agwClient.createSession({
session: {
signer: sessionSigner.address, // <--- The session key signer account
// ...
},
});
```
Below, we provide recommended approaches to implement secure session key signer storage.
### Privy Server Wallets
[Privy Server Wallets](https://docs.privy.io/guide/server-wallets/) provide a secure way to create and store signer account(s) for session keys using trusted execution environments (TEEs); ensuring private keys can only ever be reassembled within a secure enclave and never exposed to perform any malicious actions.
By using a Privy Server Wallet as the session key signer, attackers cannot compromise the TEE to access the signer account private key to perform any malicious actions.
View the example repository for a session key signer implementation using
Privy Server Wallets.
### Unique Signer Accounts per Config
If you want to store session signer accounts on the client, such as in the browser’s [local storage](https://developer.mozilla.org/en-US/docs/Web/API/Window/localStorage) or [IndexedDB](https://developer.mozilla.org/en-US/docs/Web/API/IndexedDB_API), you must create a new unique signer account for each session key to limit the impact of a compromised signer account.
If an attacker gains access to a signer account by compromising the user’s client, generating unique signer accounts isolates the attack to a single Abstract Global Wallet.
Browser storage methods are vulnerable to Cross-site scripting (XSS) attacks, which can expose the signer account private key to attackers. It is recommended to first **encrypt** the signer account private key before storing it on the client.
It is **not acceptable** to use a single signer account stored on the client for all session keys.
View the example repository for generating unique signer accounts and storing
them encrypted in the browser's local storage.
## Risks of Using Session Keys
Temporary keys enable transactions without owner signatures; this functionality introduces several legal risks that developers should be aware of, particularly around security and data management. These include:
* If session keys are compromised, they can be used for unauthorized transactions, potentially leading to financial losses.
* Failing to follow recommended practices, such as creating new keys per user or managing expiration, could result in security vulnerabilities.
* Storing session keys, even when encrypted, risks data breaches. You should comply with applicable data protection laws.
# Session keys
Source: https://docs.abs.xyz/abstract-global-wallet/session-keys/overview
Explore session keys, how to create them, and how to use them with the Abstract Global Wallet.
Session keys are temporary keys that are approved to execute a pre-defined set of actions on behalf of an Abstract Global Wallet without requiring the owner to sign each transaction.
They unlock seamless user experiences by executing transactions behind the scenes without interrupting the user with popups; powerful for games, mobile apps, and more.
## How session keys work
Applications can prompt users to approve the creation of a session key for their Abstract Global Wallet.
This session key specifies:
* A scoped set of actions that the session key is approved to execute.
* A specific EOA account, the **signer**, that is permitted to execute the scoped actions.
If the user approves the session key creation, the **signer** account can submit any of the actions within the defined scope without requiring user confirmation; until the session key expires or is revoked.
### EOA Creation
First, the user authenticates with their email, social account, or other login method and
an EOA wallet (public-private key pair) tied to this login method is created under the hood.
This process is powered by
[Privy Embedded Wallets](https://docs.privy.io/guide/react/wallets/embedded/creation#automatic).
And occurs in a three step process:
A random 128-bit value is generated using a
[CSPRNG](https://en.wikipedia.org/wiki/Cryptographically_secure_pseudorandom_number_generator).
The 128-bit value is converted into a 12-word mnemonic phrase using
[BIP-39](https://github.com/bitcoin/bips/blob/master/bip-0039.mediawiki).
From this mnemonic phrase, a public-private key pair is derived.
The private key is sharded (split) into 3 parts and stored in 3 different
locations to ensure security and recovery mechanisms.
#### Private Key Sharding
The generated private key is split into 3 shards using
[Shamir's Secret Sharing](https://en.wikipedia.org/wiki/Shamir%27s_Secret_Sharing)
algorithm and stored in 3 different locations.
**2 out of 3** shards are required to reconstruct the private key.
The three shards are:
1. **Device Share**: This shard is stored on the user's device. In a browser environment,
it is stored inside the local storage of the Privy iframe.
2. **Auth Share**: This shard is encrypted and stored on Privy’s servers. It is retrieved
when the user logs in with their original login method.
3. **Recovery Share**: This shard is stored in a backup location of the user’s choice, typically
a cloud storage account such as Google Drive or iCloud.
#### How Shards are Combined
To reconstruct the private key, the user must have access to **two out of three** shards. This can be a combination of any two shards, with the most common being the **Device Share** and **Auth Share**.
* **Device Share** + **Auth Share**: This is the typical flow; the user authenticates with the Privy server
using their original login method (e.g. social account) on their device and the auth share is decrypted.
* **Device Share** + **Recovery Share**: If the Privy server is offline or the user has lost access to their
original login method (e.g. they no longer have access to their social account), they can use the recovery
share to reconstruct the private key.
* **Auth Share** + **Recovery Share**: If the user wants to access their account from a new device,
a new device share can be generated by combining the auth share and recovery share.
### Smart Contract Wallet Deployment
Once an EOA wallet is generated, the public key is provided to a
[smart contract wallet](/how-abstract-works/native-account-abstraction/smart-contract-wallets) deployment.
The smart contract wallet is deployed and the EOA wallet is added as an authorized signer to the wallet during
the initialization process.
As all accounts on Abstract are smart contract accounts,
(see [native account abstraction](/how-abstract-works/native-account-abstraction)),
the smart contract wallet is treated as a first-class citizen when interacting with the Abstract ecosystem.
The smart contract wallet that is deployed is a modified fork of
[Clave](https://github.com/getclave/clave-contracts) customized to have an `secp256k1`
signer by default to support the Privy Embedded Wallet *(as opposed to the default `secp256r1` signer in Clave)*
as well as custom validation logic to support [EIP-712](https://eips.ethereum.org/EIPS/eip-712) signatures.
#### Smart Contract Wallet Features
The smart contract wallet includes many modules to extend the functionality of the wallet, including:
* **Recovery Modules**: Allows the user to recover their account if they lose access to their login method via recovery methods
including email or guardian recovery.
* **Paymaster Support**: Transaction gas fees can be sponsored by [paymasters](/how-abstract-works/native-account-abstraction/paymasters).
* **Multiple Signers**: Users can add multiple signers to the wallet to allow for multiple different
accounts to sign transactions.
* **P256/secp256r1 Support**: Users can add signers generated from [passkeys](https://fidoalliance.org/passkeys/)
to authorize transactions.
# Frequently Asked Questions
Source: https://docs.abs.xyz/abstract-global-wallet/frequently-asked-questions
Answers to common questions about Abstract Global Wallet.
### Who holds the private keys to the AGW?
As described in the [how it works](/abstract-global-wallet/architecture) section, the
private key of the EOA that is the approved signer of the AGW smart contract
is generated and split into three shards.
* **Device Share**: This shard is stored on the user’s device. In a browser environment, it is stored inside the local storage of the Privy iframe.
* **Auth Share**: This shard is encrypted and stored on Privy’s servers. It is retrieved when the user logs in with their original login method.
* **Recovery Share**: This shard is stored in a backup location of the user’s choice, typically a cloud storage account such as Google Drive or iCloud.
### Does the user need to create their AGW on the Abstract website?
No, users don’t need to leave your application to create their AGW, any application that integrates the wallet connection flow
supports both creating a new AGW and connecting an existing AGW.
For example, the [live demo](https://sdk.demos.abs.xyz) showcases how both users without an existing AGW
can create one from within the application and existing AGW users can connect their AGW to the application and begin approving transactions.
### Who deploys the AGW smart contracts?
A factory smart contract deploys each AGW smart contract. The generated EOA sends the transaction to deploy the AGW smart contract via the factory,
and initializes the smart contract with itself as the approved signer.
Using the [SDK](/abstract-global-wallet/getting-started), this transaction is sponsored by a [paymaster](/how-abstract-works/native-account-abstraction/paymasters),
meaning users don’t need to load their EOA with any funds to deploy the AGW smart contract to get started.
### Does the AGW smart contract work on other chains?
Abstract Global Wallet is built on top of [native account abstraction](/how-abstract-works/native-account-abstraction/overview);
a feature unique to Abstract. While the smart contract code is EVM-compatible, the SDK is not chain-agnostic and only works on Abstract
due to the technical differences between Abstract and other EVM-compatible chains.
# Getting Started
Source: https://docs.abs.xyz/abstract-global-wallet/getting-started
Learn how to integrate Abstract Global Wallet into your application.
## New Projects
To kickstart a new project with AGW configured, use our CLI tool:
```bash
npx @abstract-foundation/create-abstract-app@latest my-app
```
## Existing Projects
Integrate Abstract Global Wallet into an existing project using one of our integration guides below:
}
>
Add AGW as the native wallet connection option to your React application.
}
>
Integrate AGW into an existing Privy application.
}
>
Integrate AGW as a wallet connection option to an existing ConnectKit
application.
}
>
Integrate AGW as a wallet connection option to an existing Dynamic
application.
}
>
Integrate AGW as a wallet connection option to an existing RainbowKit
application.
}
>
Integrate AGW as a wallet connection option to an existing thirdweb
application.
# Abstract Global Wallet
Source: https://docs.abs.xyz/abstract-global-wallet/overview
Discover Abstract Global Wallet, the smart contract wallet powering the Abstract ecosystem.
**Create a new application with Abstract Global Wallet configured:**
```bash
npx @abstract-foundation/create-abstract-app@latest my-app
```
## What is Abstract Global Wallet?
Abstract Global Wallet (AGW) is a cross-application
[smart contract wallet](/how-abstract-works/native-account-abstraction/smart-contract-wallets) that
users can create to interact with any application built on Abstract,
powered by [native account abstraction](/how-abstract-works/native-account-abstraction).
AGW provides a seamless and secure way to onboard users, in which
they sign up once using familiar login methods (such as email, social accounts,
passkeys and more), and can then use this account to interact with *any* application on Abstract.
Integrate Abstract Global Wallet into your application with our SDKs.
Learn more about how Abstract Global Wallet works under the hood.
**Check out the live demo to see Abstract Global Wallet in action:**
Try the live demo of Abstract Global Wallet to see it in action.
## Packages
Integrate Abstract Global Wallet (AGW) into your application using the packages below.
1. [agw-react](https://www.npmjs.com/package/@abstract-foundation/agw-react):
React hooks and components to prompt users to login with AGW and approve transactions.
Built on [Wagmi](https://github.com/wagmi-dev/wagmi).
2. [agw-client](https://www.npmjs.com/package/@abstract-foundation/agw-client):
Wallet actions and utility functions that complement the `agw-react` package.
Built on [Viem](https://github.com/wagmi-dev/viem).
# Going to Production
Source: https://docs.abs.xyz/abstract-global-wallet/session-keys/going-to-production
Learn how to use session keys in production on Abstract Mainnet.
While session keys unlock new ways to create engaging consumer experiences, improper or malicious implementations of session keys
create new ways for bad actors to steal assets from users.
Session keys are permissionless on **testnet**, however, **mainnet** enforces several security measures to protect users.
This document outlines the security restrictions and best practices for using session keys.
## Session Key Policy Registry
Session keys are restricted to a whitelist of allowed policies on Abstract Mainnet through the [Session Key Policy Registry contract](https://abscan.org/address/0xA146c7118A46b32aBD0e1ACA41DF4e61061b6b93#code), which manages a whitelist of approved session keys.
Applications must pass a security review before being added to the
registry to enable the use of session keys for their policies.
### Restricted Session Key Policies
Session key policies that request `approve` and/or `setApprovalForAll` functions *must* be passed with additional `constraints` that restrict the approval to a specific contract address.
For example, the following policy must include a `constraints` array that restricts the approval to a specific contract address,
or will be rejected with "Unconstrained token approval/transfer destination in call policy."
```typescript
{
target: "0x...",
selector: toFunctionSelector("approve(address, uint256)"),
// Must include a constraints array that restricts the approval to a specific contract address
constraints: [
{
condition: ConstraintCondition.Equal,
index: 0n,
limit: LimitType.Unlimited,
refValue: encodeAbiParameters(
[{ type: "address" }],
["0x-your-contract-address"]
),
},
],
}
```
## Session Key Signer Accounts
Session keys specify a **signer** account; an EOA that is permitted to perform the actions specified in the session configuration. Therefore, the private key of the signer(s) you create are **SENSITIVE VALUES**!
Exposing the signer private key enables attackers to execute any of the actions specified in a session configuration for any AGW that has approved a session key with that signer’s address.
```typescript
await agwClient.createSession({
session: {
signer: sessionSigner.address, // <--- The session key signer account
// ...
},
});
```
Below, we provide recommended approaches to implement secure session key signer storage.
### Privy Server Wallets
[Privy Server Wallets](https://docs.privy.io/guide/server-wallets/) provide a secure way to create and store signer account(s) for session keys using trusted execution environments (TEEs); ensuring private keys can only ever be reassembled within a secure enclave and never exposed to perform any malicious actions.
By using a Privy Server Wallet as the session key signer, attackers cannot compromise the TEE to access the signer account private key to perform any malicious actions.
View the example repository for a session key signer implementation using
Privy Server Wallets.
### Unique Signer Accounts per Config
If you want to store session signer accounts on the client, such as in the browser’s [local storage](https://developer.mozilla.org/en-US/docs/Web/API/Window/localStorage) or [IndexedDB](https://developer.mozilla.org/en-US/docs/Web/API/IndexedDB_API), you must create a new unique signer account for each session key to limit the impact of a compromised signer account.
If an attacker gains access to a signer account by compromising the user’s client, generating unique signer accounts isolates the attack to a single Abstract Global Wallet.
Browser storage methods are vulnerable to Cross-site scripting (XSS) attacks, which can expose the signer account private key to attackers. It is recommended to first **encrypt** the signer account private key before storing it on the client.
It is **not acceptable** to use a single signer account stored on the client for all session keys.
View the example repository for generating unique signer accounts and storing
them encrypted in the browser's local storage.
## Risks of Using Session Keys
Temporary keys enable transactions without owner signatures; this functionality introduces several legal risks that developers should be aware of, particularly around security and data management. These include:
* If session keys are compromised, they can be used for unauthorized transactions, potentially leading to financial losses.
* Failing to follow recommended practices, such as creating new keys per user or managing expiration, could result in security vulnerabilities.
* Storing session keys, even when encrypted, risks data breaches. You should comply with applicable data protection laws.
# Session keys
Source: https://docs.abs.xyz/abstract-global-wallet/session-keys/overview
Explore session keys, how to create them, and how to use them with the Abstract Global Wallet.
Session keys are temporary keys that are approved to execute a pre-defined set of actions on behalf of an Abstract Global Wallet without requiring the owner to sign each transaction.
They unlock seamless user experiences by executing transactions behind the scenes without interrupting the user with popups; powerful for games, mobile apps, and more.
## How session keys work
Applications can prompt users to approve the creation of a session key for their Abstract Global Wallet.
This session key specifies:
* A scoped set of actions that the session key is approved to execute.
* A specific EOA account, the **signer**, that is permitted to execute the scoped actions.
If the user approves the session key creation, the **signer** account can submit any of the actions within the defined scope without requiring user confirmation; until the session key expires or is revoked.
## How to use session keys
Create a new session key that defines specific actions allowed to be executed on behalf of the Abstract Global Wallet using [createSession](/abstract-global-wallet/agw-client/session-keys/createSession) or [useCreateSession](/abstract-global-wallet/agw-react/hooks/useCreateSession).
This session key configuration defines a **signer account** that is approved to execute the actions defined in the session on behalf of the Abstract Global Wallet.
Session keys must be whitelisted on the [session key policy registry](/abstract-global-wallet/session-keys/going-to-production#session-key-policy-registry)
to be used on Abstract mainnet following a security review.
Store the session key securely using the guidelines outlined in [Going to Production](/abstract-global-wallet/session-keys/going-to-production#session-key-signer-accounts).
The session config is required for the session key to be used to execute actions on behalf of the Abstract Global Wallet.
The signer account(s) defined in the session configuration objects are **sensitive values** that must be stored securely.
Use the recommendations for [session key signer accounts](/abstract-global-wallet/session-keys/going-to-production#session-key-signer-accounts)
outlined in [Going to Production](/abstract-global-wallet/session-keys/going-to-production)
to ensure the signer account(s) are stored securely.
Create a `SessionClient` instance using either:
* [toSessionClient](/abstract-global-wallet/agw-client/session-keys/toSessionClient) if you have an existing [AbstractClient](/abstract-global-wallet/agw-client/createAbstractClient) available.
* [createSessionClient](/abstract-global-wallet/agw-client/session-keys/createSessionClient) if you don’t already have an [AbstractClient](/abstract-global-wallet/agw-client/createAbstractClient), such as from a backend environment.
Use the client to submit transactions and perform actions (e.g. [writeContract](/abstract-global-wallet/agw-client/actions/writeContract)) without requiring the user to approve each transaction. Transactions are signed by the session key account and are submitted `from` the Abstract Global Wallet.
Session keys naturally expire after the duration specified in the session configuration.
However, if you need to revoke a session key before it expires, you can do so using [revokeSessions](/abstract-global-wallet/agw-client/session-keys/revokeSessions).
# debug_traceBlockByHash
Source: https://docs.abs.xyz/api-reference/debug-api/debug_traceblockbyhash
api-reference/openapi.json post /debug_traceBlockByHash
Returns debug trace of all transactions in a block given block hash
# debug_traceBlockByNumber
Source: https://docs.abs.xyz/api-reference/debug-api/debug_traceblockbynumber
api-reference/openapi.json post /debug_traceBlockByNumber
Returns debug trace of all transactions in a block given block number
# debug_traceCall
Source: https://docs.abs.xyz/api-reference/debug-api/debug_tracecall
api-reference/openapi.json post /debug_traceCall
Returns debug trace of a call
# debug_traceTransaction
Source: https://docs.abs.xyz/api-reference/debug-api/debug_tracetransaction
api-reference/openapi.json post /debug_traceTransaction
Returns debug trace of a transaction
# eth_accounts
Source: https://docs.abs.xyz/api-reference/ethereum-api/eth_accounts
api-reference/openapi.json post /eth_accounts
Returns a list of addresses owned by the client
# eth_call
Source: https://docs.abs.xyz/api-reference/ethereum-api/eth_call
api-reference/openapi.json post /eth_call
Executes a new message call immediately without creating a transaction on the blockchain
# eth_chainId
Source: https://docs.abs.xyz/api-reference/ethereum-api/eth_chainid
api-reference/openapi.json post /eth_chainId
Gets the current chain ID
# eth_estimateGas
Source: https://docs.abs.xyz/api-reference/ethereum-api/eth_estimategas
api-reference/openapi.json post /eth_estimateGas
Estimates the amount of gas needed to execute a call
# eth_feeHistory
Source: https://docs.abs.xyz/api-reference/ethereum-api/eth_feehistory
api-reference/openapi.json post /eth_feeHistory
Returns fee data for historical blocks
# eth_gasPrice
Source: https://docs.abs.xyz/api-reference/ethereum-api/eth_gasprice
api-reference/openapi.json post /eth_gasPrice
Returns the current gas price in wei
# eth_getBalance
Source: https://docs.abs.xyz/api-reference/ethereum-api/eth_getbalance
api-reference/openapi.json post /eth_getBalance
Returns the balance of the given address
# eth_getBlockByHash
Source: https://docs.abs.xyz/api-reference/ethereum-api/eth_getblockbyhash
api-reference/openapi.json post /eth_getBlockByHash
Returns information about a block by hash
# eth_getBlockByNumber
Source: https://docs.abs.xyz/api-reference/ethereum-api/eth_getblockbynumber
api-reference/openapi.json post /eth_getBlockByNumber
Returns information about a block by number
# eth_getBlockReceipts
Source: https://docs.abs.xyz/api-reference/ethereum-api/eth_getblockreceipts
api-reference/openapi.json post /eth_getBlockReceipts
Returns all transaction receipts for a given block
# eth_getBlockTransactionCountByHash
Source: https://docs.abs.xyz/api-reference/ethereum-api/eth_getblocktransactioncountbyhash
api-reference/openapi.json post /eth_getBlockTransactionCountByHash
Returns the number of transactions in a block by block hash
# eth_getBlockTransactionCountByNumber
Source: https://docs.abs.xyz/api-reference/ethereum-api/eth_getblocktransactioncountbynumber
api-reference/openapi.json post /eth_getBlockTransactionCountByNumber
Returns the number of transactions in a block by block number
# eth_getCode
Source: https://docs.abs.xyz/api-reference/ethereum-api/eth_getcode
api-reference/openapi.json post /eth_getCode
Returns the code stored at the given address
# eth_getFilterChanges
Source: https://docs.abs.xyz/api-reference/ethereum-api/eth_getfilterchanges
api-reference/openapi.json post /eth_getFilterChanges
Returns filter changes since last poll
# eth_getFilterLogs
Source: https://docs.abs.xyz/api-reference/ethereum-api/eth_getfilterlogs
api-reference/openapi.json post /eth_getFilterLogs
Returns logs for the specified filter
# eth_getLogs
Source: https://docs.abs.xyz/api-reference/ethereum-api/eth_getlogs
api-reference/openapi.json post /eth_getLogs
Returns logs matching the filter criteria
# eth_getStorageAt
Source: https://docs.abs.xyz/api-reference/ethereum-api/eth_getstorageat
api-reference/openapi.json post /eth_getStorageAt
Returns the value from a storage position at a given address
# eth_getTransactionCount
Source: https://docs.abs.xyz/api-reference/ethereum-api/eth_gettransactioncount
api-reference/openapi.json post /eth_getTransactionCount
Returns the number of transactions sent from an address
# eth_newBlockFilter
Source: https://docs.abs.xyz/api-reference/ethereum-api/eth_newblockfilter
api-reference/openapi.json post /eth_newBlockFilter
Creates a filter to notify when a new block arrives
# eth_newFilter
Source: https://docs.abs.xyz/api-reference/ethereum-api/eth_newfilter
api-reference/openapi.json post /eth_newFilter
Creates a filter object to notify when the state changes
# eth_newPendingTransactionFilter
Source: https://docs.abs.xyz/api-reference/ethereum-api/eth_newpendingtransactionfilter
api-reference/openapi.json post /eth_newPendingTransactionFilter
Creates a filter to notify when new pending transactions arrive
# eth_sendRawTransaction
Source: https://docs.abs.xyz/api-reference/ethereum-api/eth_sendrawtransaction
api-reference/openapi.json post /eth_sendRawTransaction
Submits a pre-signed transaction for broadcast
# eth_uninstallFilter
Source: https://docs.abs.xyz/api-reference/ethereum-api/eth_uninstallfilter
api-reference/openapi.json post /eth_uninstallFilter
Uninstalls a filter with the given ID
# web3_clientVersion
Source: https://docs.abs.xyz/api-reference/ethereum-api/web3_clientversion
api-reference/openapi.json post /web3_clientVersion
Returns the current client version
# Abstract JSON-RPC API
Source: https://docs.abs.xyz/api-reference/overview/abstract-json-rpc-api
View the full reference for the Abstract JSON-RPC API.
Information about the state of Abstract such as the chain ID, block number, status of transactions and state changing operations
such as submitting transactions are executed via Abstract’s JSON RPC API.
The JSON RPC API has 4 namespaces:
| Namespace | Description | Example |
| --------- | -------------------------------------------------------------- | ----------------- |
| `eth_` | Standard Ethereum JSON-RPC methods. | `eth_chainId` |
| `zks_` | JSON-RPC methods specific to the ZKsync VM that Abstract uses. | `zks_estimateFee` |
| `debug_` | JSON-RPC methods useful for debugging purposes. | `debug_traceCall` |
| `pubsub_` | JSON-RPC methods for subscribing to events via WebSockets | `eth_subscribe` |
## RPC Namespaces
}
/>
# eth_subscribe
Source: https://docs.abs.xyz/api-reference/pubsub-api/eth_subscribe
api-reference/openapi.json post /eth_subscribe
Creates a new subscription for events.
# eth_unsubscribe
Source: https://docs.abs.xyz/api-reference/pubsub-api/eth_unsubscribe
api-reference/openapi.json post /eth_unsubscribe
Cancels an existing subscription.
# zks_estimateFee
Source: https://docs.abs.xyz/api-reference/zksync-api/zks_estimatefee
api-reference/openapi.json post /zks_estimateFee
Estimates the fee for a given call request
# zks_estimateGasL1ToL2
Source: https://docs.abs.xyz/api-reference/zksync-api/zks_estimategasl1tol2
api-reference/openapi.json post /zks_estimateGasL1ToL2
Estimates the gas required for an L1 to L2 transaction
# zks_getAllAccountBalances
Source: https://docs.abs.xyz/api-reference/zksync-api/zks_getallaccountbalances
api-reference/openapi.json post /zks_getAllAccountBalances
Gets all account balances for a given address. The method returns an object with token addresses as keys and their corresponding balances as values. Each key-value pair represents the balance of a specific token held by the account
# zks_getBaseTokenL1Address
Source: https://docs.abs.xyz/api-reference/zksync-api/zks_getbasetokenl1address
api-reference/openapi.json post /zks_getBaseTokenL1Address
Retrieves the L1 base token address
# zks_getBlockDetails
Source: https://docs.abs.xyz/api-reference/zksync-api/zks_getblockdetails
api-reference/openapi.json post /zks_getBlockDetails
Returns data about a specific block
# zks_getBridgeContracts
Source: https://docs.abs.xyz/api-reference/zksync-api/zks_getbridgecontracts
api-reference/openapi.json post /zks_getBridgeContracts
Returns the addresses of the bridge contracts on L1 and L2
# zks_getBridgehubContract
Source: https://docs.abs.xyz/api-reference/zksync-api/zks_getbridgehubcontract
api-reference/openapi.json post /zks_getBridgehubContract
Retrieves the bridge hub contract address
# zks_getBytecodeByHash
Source: https://docs.abs.xyz/api-reference/zksync-api/zks_getbytecodebyhash
api-reference/openapi.json post /zks_getBytecodeByHash
Retrieves the bytecode of a transaction by its hash
# zks_getConfirmedTokens
Source: https://docs.abs.xyz/api-reference/zksync-api/zks_getconfirmedtokens
api-reference/openapi.json post /zks_getConfirmedTokens
Lists confirmed tokens. Confirmed in the method name means any token bridged to Abstract via the official bridge. The tokens are returned in alphabetical order by their symbol. This means the token id is its position in an alphabetically sorted array of tokens.
# zks_getFeeParams
Source: https://docs.abs.xyz/api-reference/zksync-api/zks_getfeeparams
api-reference/openapi.json post /zks_getFeeParams
Retrieves the current fee parameters
# zks_getL1BatchBlockRange
Source: https://docs.abs.xyz/api-reference/zksync-api/zks_getl1batchblockrange
api-reference/openapi.json post /zks_getL1BatchBlockRange
Returns the range of blocks contained within a specified L1 batch. The range is provided by the beginning and end block numbers in hexadecimal.
# zks_getL1BatchDetails
Source: https://docs.abs.xyz/api-reference/zksync-api/zks_getl1batchdetails
api-reference/openapi.json post /zks_getL1BatchDetails
Returns data pertaining to a specific L1 batch
# zks_getL1GasPrice
Source: https://docs.abs.xyz/api-reference/zksync-api/zks_getl1gasprice
api-reference/openapi.json post /zks_getL1GasPrice
Retrieves the current L1 gas price
# zks_getL2ToL1LogProof
Source: https://docs.abs.xyz/api-reference/zksync-api/zks_getl2tol1logproof
api-reference/openapi.json post /zks_getL2ToL1LogProof
Retrieves the log proof for an L2 to L1 transaction
# zks_getL2ToL1MsgProof
Source: https://docs.abs.xyz/api-reference/zksync-api/zks_getl2tol1msgproof
api-reference/openapi.json post /zks_getL2ToL1MsgProof
Retrieves the proof for an L2 to L1 message
# zks_getMainContract
Source: https://docs.abs.xyz/api-reference/zksync-api/zks_getmaincontract
api-reference/openapi.json post /zks_getMainContract
Retrieves the main contract address, also known as the DiamondProxy
# zks_getProof
Source: https://docs.abs.xyz/api-reference/zksync-api/zks_getproof
api-reference/openapi.json post /zks_getProof
Generates Merkle proofs for one or more storage values associated with a specific account, accompanied by a proof of their authenticity
# zks_getProtocolVersion
Source: https://docs.abs.xyz/api-reference/zksync-api/zks_getprotocolversion
api-reference/openapi.json post /zks_getProtocolVersion
Gets the protocol version
# zks_getRawBlockTransactions
Source: https://docs.abs.xyz/api-reference/zksync-api/zks_getrawblocktransactions
api-reference/openapi.json post /zks_getRawBlockTransactions
Lists transactions in a block without processing them
# zks_getTestnetPaymaster
Source: https://docs.abs.xyz/api-reference/zksync-api/zks_gettestnetpaymaster
api-reference/openapi.json post /zks_getTestnetPaymaster
Retrieves the testnet paymaster address, specifically for interactions within the Abstract Sepolia Testnet environment. Note: This method is only applicable for Abstract Sepolia Testnet (i.e. not mainnet).
# zks_getTransactionDetails
Source: https://docs.abs.xyz/api-reference/zksync-api/zks_gettransactiondetails
api-reference/openapi.json post /zks_getTransactionDetails
Returns data from a specific transaction
# zks_L1BatchNumber
Source: https://docs.abs.xyz/api-reference/zksync-api/zks_l1batchnumber
api-reference/openapi.json post /zks_L1BatchNumber
Returns the latest L1 batch number
# zks_L1ChainId
Source: https://docs.abs.xyz/api-reference/zksync-api/zks_l1chainid
api-reference/openapi.json post /zks_L1ChainId
Returns the chain id of the underlying L1
# zks_sendRawTransactionWithDetailedOutput
Source: https://docs.abs.xyz/api-reference/zksync-api/zks_sendrawtransactionwithdetailedoutput
api-reference/openapi.json post /zks_sendRawTransactionWithDetailedOutput
Executes a transaction and returns its hash, storage logs, and events that would have been generated if the transaction had already been included in the block. The API has a similar behaviour to eth_sendRawTransaction but with some extra data returned from it. With this API Consumer apps can apply "optimistic" events in their applications instantly without having to wait for ZKsync block confirmation time. It's expected that the optimistic logs of two uncommitted transactions that modify the same state will not have causal relationships between each other.
# Ethers
Source: https://docs.abs.xyz/build-on-abstract/applications/ethers
Learn how to use zksync-ethers to build applications on Abstract.
To best utilize the features of Abstract, it is recommended to use
[zksync-ethers](https://sdk.zksync.io/js/ethers/why-zksync-ethers) library
alongside [ethers](https://docs.ethers.io/v6/).
Ensure you have the following installed on your machine: -
[Node.js](https://nodejs.org/en/download/) v18.0.0 or later.
## 1. Create a new project
Create a new directory and change directory into it.
```bash
mkdir my-abstract-app && cd my-abstract-app
```
Initialize a new Node.js project.
```bash
npm init -y
```
Install the `zksync-ethers` and `ethers` libraries.
```bash
npm install zksync-ethers@6 ethers@6
```
## 2. Connect to Abstract
```javascript Testnet
import { Provider, Wallet } from "zksync-ethers";
import { ethers } from "ethers";
// Read data from a provider
const provider = new Provider("https://api.testnet.abs.xyz");
const blockNumber = await provider.getBlockNumber();
// Submit transactions from a wallet
const wallet = new Wallet(ethers.Wallet.createRandom().privateKey, provider);
const tx = await wallet.sendTransaction({
to: wallet.getAddress(),
});
```
```javascript Mainnet
import { Provider, Wallet } from "zksync-ethers";
import { ethers } from "ethers";
// Read data from a provider
const provider = new Provider("https://api.mainnet.abs.xyz");
const blockNumber = await provider.getBlockNumber();
// Submit transactions from a wallet
const wallet = new Wallet(ethers.Wallet.createRandom().privateKey, provider);
const tx = await wallet.sendTransaction({
to: wallet.getAddress(),
});
```
Learn more about the features of `zksync-ethers` in the official documentation:
* [zksync-ethers features](https://sdk.zksync.io/js/ethers/guides/features)
* [ethers documentation](https://docs.ethers.io/v6/)
# Thirdweb
Source: https://docs.abs.xyz/build-on-abstract/applications/thirdweb
Learn how to use thirdweb to build applications on Abstract.
Ensure you have the following installed on your machine:
* [Node.js](https://nodejs.org/en/download/) v18.0.0 or later.
## 1. Create a new project
Create a new React or React Native project using the thirdweb CLI.
```bash
npx thirdweb create app --legacy-peer-deps
```
Select your preferences when prompted by the CLI, or use the recommended setup below.
We recommend selecting the following options when prompted by the thirdweb CLI:
```bash
✔ What type of project do you want to create? › App
✔ What is your project named? … my-abstract-app
✔ What framework do you want to use? › Next.js
```
Change directory into the newly created project:
```bash
cd my-abstract-app
```
(Replace `my-abstract-app` with your created project name.)
## 2. Set up a Thirdweb API key
On the [thirdweb dashboard](https://thirdweb.com/dashboard), create your
account (or sign in), and copy your project’s **Client ID** from the
**Settings** section. Ensure that `localhost` is included in the allowed domains.
Create an `.env.local` file and add your client ID as an environment variable:
```bash
NEXT_PUBLIC_TEMPLATE_CLIENT_ID=your-client-id-here
```
Start the development server and navigate to [`http://localhost:3000`](http://localhost:3000) in your browser to view the application.
```bash
npm run dev
```
## 3. Connect the app to Abstract
Import the Abstract chain from the `thirdweb/chains` package:
```javascript Testnet
import { abstractTestnet } from "thirdweb/chains";
```
```javascript Mainnet
import { abstract } from "thirdweb/chains";
```
Use the Abstract chain import as the value for the `chain` property wherever required.
```javascript
```
Learn more on the official [thirdweb documentation](https://portal.thirdweb.com/react/v5).
# Viem
Source: https://docs.abs.xyz/build-on-abstract/applications/viem
Learn how to use the Viem library to build applications on Abstract.
The Viem library has first-class support for Abstract by providing a set of
extensions to interact with [paymasters](/how-abstract-works/native-account-abstraction/paymasters),
[smart contract wallets](/how-abstract-works/native-account-abstraction/smart-contract-wallets), and more.
This page will walk through how to configure Viem to utilize Abstract’s features.
Ensure you have the following installed on your machine:
* [Node.js](https://nodejs.org/en/download/) v18.0.0 or later.
* You’ve already created a JavaScript project,
(e.g. using [CRA](https://create-react-app.dev/) or [Next.js](https://nextjs.org/)).
* Viem library version 2.21.25 or later installed.
## 1. Installation
Install the `viem` package.
```bash
npm install viem
```
## 2. Client Configuration
Configure your Viem [client](https://viem.sh/zksync/client) using `abstractTestnet`
as the [chain](https://viem.sh/zksync/chains) and extend it with
[eip712WalletActions](https://viem.sh/zksync/client#eip712walletactions).
```javascript Testnet
import { createPublicClient, createWalletClient, custom, http } from 'viem'
import { abstractTestnet } from 'viem/chains'
import { eip712WalletActions } from 'viem/zksync'
// Create a client from a wallet
const walletClient = createWalletClient({
chain: abstractTestnet,
transport: custom(window.ethereum!),
}).extend(eip712WalletActions()) ;
// Create a client without a wallet
const publicClient = createPublicClient({
chain: abstractTestnet,
transport: http()
}).extend(eip712WalletActions());
```
```javascript Mainnet
import { createPublicClient, createWalletClient, custom, http } from 'viem'
import { abstract } from 'viem/chains'
import { eip712WalletActions } from 'viem/zksync'
// Create a client from a wallet
const walletClient = createWalletClient({
chain: abstract,
transport: custom(window.ethereum!),
}).extend(eip712WalletActions()) ;
// Create a client without a wallet
const publicClient = createPublicClient({
chain: abstract,
transport: http()
}).extend(eip712WalletActions());
```
Learn more on the official [viem documentation](https://viem.sh/zksync).
### Reading Blockchain Data
Use a [public client](https://viem.sh/docs/clients/public)
to fetch data from the blockchain via an [RPC](/connect-to-abstract).
```javascript
const balance = await publicClient.getBalance({
address: "0x8e729E23CDc8bC21c37a73DA4bA9ebdddA3C8B6d",
});
```
### Sending Transactions
Use a [wallet client](https://viem.sh/docs/clients/wallet)
to send transactions to the blockchain.
```javascript
const transactionHash = await walletClient.sendTransaction({
to: "0x8e729E23CDc8bC21c37a73DA4bA9ebdddA3C8B6d",
data: "0x69",
});
```
#### Paymasters
Viem has native support for Abstract [paymasters](/how-abstract-works/native-account-abstraction/paymasters).
Provide the `paymaster` and `paymasterInput` fields when sending a transaction.
[View Viem documentation](https://viem.sh/zksync#2-use-actions).
```javascript
const hash = await walletClient.sendTransaction({
to: "0x8e729E23CDc8bC21c37a73DA4bA9ebdddA3C8B6d",
paymaster: "0x5407B5040dec3D339A9247f3654E59EEccbb6391", // Your paymaster contract address
paymasterInput: "0x", // Any additional data to be sent to the paymaster
});
```
#### Smart Contract Wallets
Viem also has native support for using [smart contract wallets](/how-abstract-works/native-account-abstraction/smart-contract-wallets).
This means you can submit transactions `from` a smart contract wallet by providing
a smart wallet account as the `account` field to the [client](#client-configuration).
[View Viem documentation](https://viem.sh/zksync/accounts/toSmartAccount).
```javascript Testnet
import { toSmartAccount, eip712WalletActions } from "viem/zksync";
import { createWalletClient, http } from "viem";
import { abstractTestnet } from "viem/chains";
const account = toSmartAccount({
address: CONTRACT_ADDRESS,
async sign({ hash }) {
// ... signing logic here for your smart contract account
},
});
// Create a client from a smart contract wallet
const walletClient = createWalletClient({
chain: abstractTestnet,
transport: http(),
account: account, // <-- Provide the smart contract wallet account
}).extend(eip712WalletActions());
// ... Continue using the wallet client as usual (will send transactions from the smart contract wallet)
```
```javascript Mainnet
import { toSmartAccount, eip712WalletActions } from "viem/zksync";
import { createWalletClient, http } from "viem";
import { abstract } from "viem/chains";
const account = toSmartAccount({
address: CONTRACT_ADDRESS,
async sign({ hash }) {
// ... signing logic here for your smart contract account
},
});
// Create a client from a smart contract wallet
const walletClient = createWalletClient({
chain: abstract,
transport: http(),
account: account, // <-- Provide the smart contract wallet account
}).extend(eip712WalletActions());
// ... Continue using the wallet client as usual (will send transactions from the smart contract wallet)
```
# Getting Started
Source: https://docs.abs.xyz/build-on-abstract/getting-started
Learn how to start developing smart contracts and applications on Abstract.
Abstract is EVM compatible; however, there are [differences](/how-abstract-works/evm-differences/overview)
between Abstract and Ethereum that enable more powerful user experiences. For developers, additional configuration may be required
to accommodate these changes and take full advantage of Abstract's capabilities.
Follow the guides below to learn how to best set up your environment for Abstract.
## Smart Contracts
Learn how to create a new smart contract project, compile your contracts, and deploy them to Abstract.
Learn how to set up a Hardhat plugin to compile smart contracts for Abstract
Learn how to use a Foundry fork to compile smart contracts for Abstract
## Applications
Learn how to build frontend applications to interact with smart contracts on Abstract.
Quick start guide for using Ethers v6 with Abstract
Set up a React + TypeScript app using the Viem library
Create a React + TypeScript app with the thirdweb SDK
Integrate Abstract Global Wallet, the smart contract wallet powering the Abstract ecosystem.
Learn how to integrate Abstract Global Wallet into your applications.
## Explore Abstract Resources
Use our starter repositories and tutorials to kickstart your development journey on Abstract.
Browse our collection of cloneable starter kits and example repositories on
GitHub.
Watch our video tutorials to learn more about building on Abstract.
# Foundry - Compiling Contracts
Source: https://docs.abs.xyz/build-on-abstract/smart-contracts/foundry/compiling-contracts
Learn how to compile your smart contracts using Foundry on Abstract.
Smart contracts must be compiled to [Zksync VM](https://docs.zksync.io/zksync-protocol/vm)-compatible bytecode using the [`zksolc`](https://matter-labs.github.io/era-compiler-solidity/latest/) compiler to prepare them for deployment on Abstract.
Update your `foundry.toml` file to include the following options:
```toml
[profile.default]
src = 'src'
libs = ['lib']
fallback_oz = true
is_system = false # Note: NonceHolder and the ContractDeployer system contracts can only be called with a special is_system flag as true
mode = "3"
[etherscan]
abstractTestnet = { chain = "11124", url = "", key = ""} # You can replace these values or leave them blank to override via CLI
abstractMainnet = { chain = "2741", url = "", key = ""} # You can replace these values or leave them blank to override via CLI
```
Compile your contracts using the following command:
```bash
forge build --zksync
```
This will generate the `zkout` directory containing the compiled smart contracts.
# Foundry - Deploying Contracts
Source: https://docs.abs.xyz/build-on-abstract/smart-contracts/foundry/deploying-contracts
Learn how to deploy smart contracts on Abstract using Foundry.
## Deploying Contracts
Create a new [wallet keystore](https://book.getfoundry.sh/reference/cast/cast-wallet-import) to securely store your deployer account's private key.
```bash
cast wallet import myKeystore --interactive
```
Enter your wallet's private key when prompted and provide a password to encrypt it.
The deployer account requires ETH to deploy a smart contract.
* **Testnet**: Claim ETH via a [faucet](/tooling/faucets), or
[bridge](/tooling/bridges) ETH from Sepolia.
* **Mainnet**: Use a [bridge](/tooling/bridges) to transfer ETH to Abstract mainnet.
Run the following command to deploy your smart contracts:
```bash Testnet
forge create src/Counter.sol:Counter \
--account myKeystore \
--rpc-url https://api.testnet.abs.xyz \
--chain 11124 \
--zksync \
--verify \
--verifier etherscan \
--verifier-url https://api-sepolia.abscan.org/api \
--etherscan-api-key TACK2D1RGYX9U7MC31SZWWQ7FCWRYQ96AD
```
```bash Mainnet
forge create src/Counter.sol:Counter \
--account myKeystore \
--rpc-url https://api.mainnet.abs.xyz \
--chain 2741 \
--zksync \
--verify \
--verifier etherscan \
--verifier-url https://api.abscan.org/api \
--etherscan-api-key
```
***Note**: Replace the contract path and Etherscan API key with your own.*
If successful, the output should look similar to the following:
```bash {2}
Deployer: 0x9C073184e74Af6D10DF575e724DC4712D98976aC
Deployed to: 0x85717893A18F255285AB48d7bE245ddcD047dEAE
Transaction hash: 0x2a4c7c32f26b078d080836b247db3e6c7d0216458a834cfb8362a2ac84e68d9f
```
## Providing Constructor Arguments
If your smart contract has a constructor with arguments, provide the arguments in the order they are defined in the constructor following the `--constructor-args` flag.
```bash Testnet
forge create src/Counter.sol:Counter \
--account myKeystore \
--rpc-url https://api.testnet.abs.xyz \
--chain 11124 \
--zksync \
--constructor-args 1000000000000000000 0x9C073184e74Af6D10DF575e724DC4712D98976aC \
--verify \
--verifier etherscan \
--verifier-url https://api-sepolia.abscan.org/api \
--etherscan-api-key TACK2D1RGYX9U7MC31SZWWQ7FCWRYQ96AD
```
```bash Mainnet
forge create src/Counter.sol:Counter \
--account myKeystore \
--rpc-url https://api.mainnet.abs.xyz \
--chain 2741 \
--zksync \
--constructor-args 1000000000000000000 0x9C073184e74Af6D10DF575e724DC4712D98976aC \
--verify \
--verifier etherscan \
--verifier-url https://api.abscan.org/api \
--etherscan-api-key
```
***Note**: Replace the contract path, constructor arguments, and Abscan API key with your own.*
# Foundry - Get Started
Source: https://docs.abs.xyz/build-on-abstract/smart-contracts/foundry/get-started
Get started with Abstract by deploying your first smart contract using Foundry.
To use Foundry to build smart contracts on Abstract, use the [foundry-zksync](https://github.com/matter-labs/foundry-zksync) fork.
Watch a step-by-step tutorial on how to get started with Foundry.
## 1. Install the foundry-zksync fork
This installation overrides any existing forge and cast binaries in
`~/.foundry`. To revert to the standard foundry installation, follow the
[Foundry installation
guide](https://book.getfoundry.sh/getting-started/installation#using-foundryup).
You can swap between the two installations at any time.
Install the `foundryup-zksync` fork:
```bash
curl -L https://raw.githubusercontent.com/matter-labs/foundry-zksync/main/install-foundry-zksync | bash
```
Run `foundryup-zksync` to install `forge`, `cast`, and `anvil`:
```bash
foundryup-zksync
```
You may need to restart your terminal session after installation to continue.
Restart your terminal session.
To add the `foundry` binary to your PATH, run the following command:
```
export PATH="$PATH:/Users//.foundry/bin"
```
Replace `` with the correct path to your home directory.
The [libusb](https://libusb.info/) library may need to be installed manually on macOS.
Run the following command to install the library:
```bash
brew install libusb
```
A helpful command to check if the installation was successful is:
```bash
forge build --help | grep -A 20 "ZKSync configuration:"
```
If installed successfully, 20 lines of `--zksync` options will be displayed.
## 2. Create a new project
Create a new project with `forge` and change directory into the project.
```bash
forge init my-abstract-project && cd my-abstract-project
```
## 3. Modify Foundry configuration
Update your `foundry.toml` file to include the following options:
```toml
[profile.default]
src = 'src'
libs = ['lib']
fallback_oz = true
[profile.default.zksync]
enable_eravm_extensions = true # Note: System contract calls (NonceHolder and ContractDeployer) can only be called with this set to true
[etherscan]
abstractTestnet = { chain = "11124", url = "", key = ""} # You can replace these values or leave them blank to override via CLI
abstractMainnet = { chain = "2741", url = "", key = ""} # You can replace these values or leave them blank to override via CLI
```
To use [system contracts](/how-abstract-works/system-contracts/overview),
set the `enable_eravm_extensions` flag in `[profile.default.zksync]` to **true**.
## 4. Write a smart contract
Modify the `src/Counter.sol` file to include the following smart contract:
```solidity
// SPDX-License-Identifier: MIT
pragma solidity ^0.8.24;
contract Counter {
uint256 public number;
function setNumber(uint256 newNumber) public {
number = newNumber;
}
function increment() public {
number++;
}
}
```
## 5. Compile the smart contract
Use the [zksolc compiler](https://docs.zksync.io/zk-stack/components/compiler/toolchain/solidity)
(installed in the above steps) to compile smart contracts for Abstract:
```bash
forge build --zksync
```
You should now see the compiled smart contracts in the generated `zkout` directory.
## 6. Deploy the smart contract
Create a new [wallet keystore](https://book.getfoundry.sh/reference/cast/cast-wallet-import).
```bash
cast wallet import myKeystore --interactive
```
Enter your wallet's private key when prompted and provide a password to encrypt it.
We recommend not to use a private key associated with real funds. Create a new wallet for this step.
The deployer account requires ETH to deploy a smart contract.
* **Testnet**: Claim ETH via a [faucet](/tooling/faucets), or
[bridge](/tooling/bridges) ETH from Sepolia.
* **Mainnet**: Use a [bridge](/tooling/bridges) to transfer ETH to Abstract mainnet.
Follow the [Abscan documentation](https://docs.abscan.org/getting-started/viewing-api-usage-statistics) to get an API key to verify your smart contracts on the block explorer.
This is recommended; but not required.
Run the following command to deploy your smart contracts:
```bash Testnet
forge create src/Counter.sol:Counter \
--account myKeystore \
--rpc-url https://api.testnet.abs.xyz \
--chain 11124 \
--zksync \
--verify \
--verifier etherscan \
--verifier-url https://api-sepolia.abscan.org/api \
--etherscan-api-key TACK2D1RGYX9U7MC31SZWWQ7FCWRYQ96AD
```
```bash Mainnet
forge create src/Counter.sol:Counter \
--account myKeystore \
--rpc-url https://api.mainnet.abs.xyz \
--chain 2741 \
--zksync \
--verify \
--verifier etherscan \
--verifier-url https://api.abscan.org/api \
--etherscan-api-key
```
***Note**: Replace the contract path, address, and Abscan API key with your own.*
If successful, the output should look similar to the below output, and you can view your contract on a [block explorer](/tooling/block-explorers).
```bash {2}
Deployer: 0x9C073184e74Af6D10DF575e724DC4712D98976aC
Deployed to: 0x85717893A18F255285AB48d7bE245ddcD047dEAE
Transaction hash: 0x2a4c7c32f26b078d080836b247db3e6c7d0216458a834cfb8362a2ac84e68d9f
Contract successfully verified
```
# Foundry - Installation
Source: https://docs.abs.xyz/build-on-abstract/smart-contracts/foundry/installation
Learn how to setup a new Foundry project on Abstract using foundry-zksync.
[Foundry-zksync](https://foundry-book.zksync.io/) is a fork of the Foundry toolchain built for the ZKsync VM that Abstract uses.
View the full documentation for foundry-zksync.
Get started with Foundry-zksync by following the steps below.
Install the `foundryup-zksync` fork:
```bash
curl -L https://raw.githubusercontent.com/matter-labs/foundry-zksync/main/install-foundry-zksync | bash
```
Run `foundryup-zksync` to install `forge`, `cast`, and `anvil`:
```bash
foundryup-zksync
```
You may need to restart your terminal session after installation to continue.
Restart your terminal session.
To add the `foundry` binary to your PATH, run the following command:
```
export PATH="$PATH:/Users//.foundry/bin"
```
Replace `` with the correct path to your home directory.
The [libusb](https://libusb.info/) library may need to be installed manually on macOS.
Run the following command to install the library:
```bash
brew install libusb
```
A helpful command to check if the installation was successful is:
```bash
forge build --help | grep -A 20 "ZKSync configuration:"
```
If installed successfully, 20 lines of `--zksync` options will be displayed.
Create a new project with `forge` and change directory into the project.
```bash
forge init my-abstract-project && cd my-abstract-project
```
# Foundry - Testing Contracts
Source: https://docs.abs.xyz/build-on-abstract/smart-contracts/foundry/testing-contracts
Learn how to test your smart contracts using Foundry.
Verify your smart contracts work as intended before you deploy them by writing [tests](https://foundry-book.zksync.io/forge/tests).
## Testing Smart Contracts
Write test definitions inside the `/test` directory, for example, `test/HelloWorld.t.sol`.
```solidity test/HelloWorld.t.sol
// SPDX-License-Identifier: MIT
pragma solidity ^0.8.0;
import { Test } from "forge-std/Test.sol";
contract HelloWorldTest is Test {
function setUp() public {
owner = makeAddr("owner");
vm.prank(owner);
helloWorld = new HelloWorld();
}
function test_HelloWorld() public {
helloWorld.setMessage("Hello, World!");
assertEq(helloWorld.getMessage(), "Hello, World!");
}
}
```
```solidity src/HelloWorld.sol
// SPDX-License-Identifier: MIT
pragma solidity ^0.8.0;
contract HelloWorld {
string public message = "Hello, World!";
function setMessage(string memory newMessage) public {
message = newMessage;
}
function getMessage() public view returns (string memory) {
return message;
}
}
```
Run the tests by running the following command:
```bash
forge test --zksync
```
## Cheatcodes
[Cheatcodes](https://foundry-book.zksync.io/forge/cheatcodes) allow you to manipulate the state of the blockchain during testing, allowing you to change the block number, your identity, and more.
Reference for all cheatcodes available in Foundry.
### Cheatcode Limitations
When testing on Abstract, cheatcodes have important [limitations](https://foundry-book.zksync.io/zksync-specifics/limitations/cheatcodes) due to how the underlying ZKsync VM executes transactions. Cheatcodes can only be used at the root level of your test contract - they cannot be accessed from within any contract being tested.
```solidity
// This works ✅
function testCheatcodeAtRootLevel() public {
vm.roll(10); // Valid: called directly from test
vm.prank(someAddress); // Valid: called directly from test
MyContract testContract = new MyContract();
testContract.someFunction(); // Cheatcodes not available inside this call
}
// This won't work as expected ❌
contract MyContract {
function someFunction() public {
vm.warp(1000); // Invalid: called from within a contract
}
}
```
### ZKsync VM Cheatcodes
Abstract's underlying ZKsync VM provides additional cheatcodes for testing Abstract-specific functionality:
| Cheatcode | Description |
| ------------------------------------------------------------------------------------------------------- | ------------------------------------------------------------------------------------------------------------------------------------- |
| [`zkVm`](https://foundry-book.zksync.io/zksync-specifics/cheatcodes/zk-vm) | Enables/disables ZKsync context for transactions. Switches between EVM and zkEVM execution environments. |
| [`zkVmSkip`](https://foundry-book.zksync.io/zksync-specifics/cheatcodes/zk-vm-skip) | When running in zkEVM context, skips the next `CREATE` or `CALL`, executing it on the EVM instead. |
| [`zkRegisterContract`](https://foundry-book.zksync.io/zksync-specifics/cheatcodes/zk-register-contract) | Registers bytecodes for ZK-VM for transact/call and create instructions. Useful for testing with contracts already deployed on-chain. |
| [`zkUsePaymaster`](https://foundry-book.zksync.io/zksync-specifics/cheatcodes/zk-use-paymaster) | Configures a paymaster for the next transaction. Enables testing paymasters for gasless transactions. |
| [`zkUseFactoryDep`](https://foundry-book.zksync.io/zksync-specifics/cheatcodes/zk-use-factory-dep) | Registers a factory dependency for the next transaction. Useful for testing complex contract deployments. |
## Fork Testing
Running your tests against a fork of Abstract testnet or mainnet allows you to test your contracts in a real environment before deploying to Abstract.
This is especially useful for testing contracts that interact with other contracts on Abstract such as those listed on the [Deployed Contracts](https://docs.abstract.xyz/tooling/deployed-contracts) page.
To run your tests against a fork of Abstract testnet or mainnet, you can use the following command:
```bash Testnet
forge test --zksync --fork-url https://api.testnet.abs.xyz
```
```bash Mainnet
forge test --zksync --fork-url https://api.mainnet.abs.xyz
```
## Local Node Testing
[Anvil-zksync](https://foundry-book.zksync.io/anvil-zksync/) comes installed with Foundry, and is a tool that allows you
to instantiate a local node for testing purposes.
Run the following command to start the local node:
```bash
anvil-zksync
```
Then run your tests on the local node by running the following command:
```bash
forge test --zksync --fork-url http://localhost:8011
```
[View all available options ↗](https://docs.zksync.io/zksync-era/tooling/local-setup/anvil-zksync-node).
## Advanced Testing
View further documentation on advanced testing with Foundry-zksync:
* [Fuzz testing](https://foundry-book.zksync.io/forge/fuzz-testing)
* [Invariant testing](https://foundry-book.zksync.io/forge/invariant-testing)
* [Differential testing](https://foundry-book.zksync.io/forge/differential-ffi-testing)
# Foundry - Verifying Contracts
Source: https://docs.abs.xyz/build-on-abstract/smart-contracts/foundry/verifying-contracts
Learn how to verify smart contracts on Abstract using Foundry.
## Verifying Contracts
Contracts can be verified as they are deployed as described in [Deploying Contracts](/build-on-abstract/smart-contracts/foundry/deploying-contracts). This page outlines how to verify contracts that have already been deployed on Abstract.
Follow the [Abscan documentation](https://docs.abscan.org/getting-started/viewing-api-usage-statistics) to get an API key.
Verify an existing contract by running the following command:
```bash Testnet
forge verify-contract 0x85717893A18F255285AB48d7bE245ddcD047dEAE \
src/Counter.sol:Counter \
--verifier etherscan \
--verifier-url https://api-sepolia.abscan.org/api \
--etherscan-api-key TACK2D1RGYX9U7MC31SZWWQ7FCWRYQ96AD \
--zksync
```
```bash Mainnet
forge verify-contract 0x85717893A18F255285AB48d7bE245ddcD047dEAE \
src/Counter.sol:Counter \
--verifier etherscan \
--verifier-url https://api.abscan.org/api \
--etherscan-api-key \
--zksync
```
***Note**: Replace the contract path, address, and API key with your own.*
# Hardhat - Compiling Contracts
Source: https://docs.abs.xyz/build-on-abstract/smart-contracts/hardhat/compiling-contracts
Learn how to compile your smart contracts using Hardhat on Abstract.
Smart contracts must be compiled to [Zksync VM](https://docs.zksync.io/zksync-protocol/vm)-compatible bytecode using the [`zksolc`](https://matter-labs.github.io/era-compiler-solidity/latest/) compiler to prepare them for deployment on Abstract.
Ensure your Hardhat configuration file is configured to use `zksolc`, as outlined in the [installation guide](/build-on-abstract/smart-contracts/hardhat/installation#update-hardhat-configuration):
```typescript hardhat.config.ts [expandable]
import { HardhatUserConfig } from "hardhat/config";
import "@matterlabs/hardhat-zksync";
const config: HardhatUserConfig = {
zksolc: {
version: "latest",
settings: {
// find all available options in the official documentation
// https://docs.zksync.io/build/tooling/hardhat/hardhat-zksync-solc#configuration
},
},
defaultNetwork: "abstractTestnet",
networks: {
abstractTestnet: {
url: "https://api.testnet.abs.xyz",
ethNetwork: "sepolia",
zksync: true,
chainId: 11124,
},
abstractMainnet: {
url: "https://api.mainnet.abs.xyz",
ethNetwork: "mainnet",
zksync: true,
chainId: 2741,
},
},
solidity: {
version: "0.8.24",
},
};
export default config;
```
Compile your contracts with **zksolc**:
```bash Testnet
npx hardhat clean && npx hardhat compile --network abstractTestnet
```
```bash Mainnet
npx hardhat clean && npx hardhat compile --network abstractMainnet
```
This will generate the `artifacts-zk` and `cache-zk` directories containing the compilation artifacts (including contract ABIs) and compiler cache files respectively.
# Hardhat - Deploying Contracts
Source: https://docs.abs.xyz/build-on-abstract/smart-contracts/hardhat/deploying-contracts
Learn how to deploy smart contracts on Abstract using Hardhat.
## Deploying Contract
The [zksync-ethers](https://sdk.zksync.io/js/ethers/why-zksync-ethers) package provides a modified version of the ethers library that is compatible with Abstract and the ZKsync VM. Install the package by running the following command:
```bash npm
npm install -D zksync-ethers
```
```bash yarn
yarn add -D zksync-ethers
```
```bash pnpm
pnpm add -D zksync-ethers
```
```bash bun
bun add -D zksync-ethers
```
Create a new [configuration variable](https://hardhat.org/hardhat-runner/docs/guides/configuration-variables)
called `DEPLOYER_PRIVATE_KEY`.
```bash
npx hardhat vars set DEPLOYER_PRIVATE_KEY
```
Enter the private key of a new wallet you created for this step.
```bash
✔ Enter value: · ****************************************************************
```
Do NOT use a private key associated with real funds. Create a new wallet for this step.
The deployer account requires ETH to deploy a smart contract.
* **Testnet**: Claim ETH via a [faucet](/tooling/faucets), or
[bridge](/tooling/bridges) ETH from Sepolia.
* **Mainnet**: Use a [bridge](/tooling/bridges) to transfer ETH to Abstract mainnet.
Create a new [Hardhat script](https://hardhat.org/hardhat-runner/docs/advanced/scripts) located at `/deploy/deploy.ts`:
```bash
mkdir deploy && touch deploy/deploy.ts
```
Add the following code to the `deploy.ts` file:
```typescript
import { Wallet } from "zksync-ethers";
import { HardhatRuntimeEnvironment } from "hardhat/types";
import { Deployer } from "@matterlabs/hardhat-zksync";
import { vars } from "hardhat/config";
// An example of a deploy script that will deploy and call a simple contract.
export default async function (hre: HardhatRuntimeEnvironment) {
console.log(`Running deploy script`);
// Initialize the wallet using your private key.
const wallet = new Wallet(vars.get("DEPLOYER_PRIVATE_KEY"));
// Create deployer object and load the artifact of the contract we want to deploy.
const deployer = new Deployer(hre, wallet);
// Load contract
const artifact = await deployer.loadArtifact("HelloAbstract");
// Deploy this contract. The returned object will be of a `Contract` type,
// similar to the ones in `ethers`.
const tokenContract = await deployer.deploy(artifact);
console.log(
`${
artifact.contractName
} was deployed to ${await tokenContract.getAddress()}`
);
}
```
Run the following command to deploy your smart contracts:
```bash Testnet
npx hardhat deploy-zksync --script deploy.ts --network abstractTestnet
```
```bash Mainnet
npx hardhat deploy-zksync --script deploy.ts --network abstractMainnet
```
If successful, your output should look similar to the following:
```bash {2}
Running deploy script
HelloAbstract was deployed to YOUR_CONTRACT_ADDRESS
```
## Providing constructor arguments
The second argument to the `deploy` function is an array of constructor arguments.
To deploy your smart contract with constructor arguments, provide an array containing your constructor arguments as the second argument to the `deploy` function.
```typescript [expandable] {12-15}
import { Wallet } from "zksync-ethers";
import { HardhatRuntimeEnvironment } from "hardhat/types";
import { Deployer } from "@matterlabs/hardhat-zksync";
import { vars } from "hardhat/config";
// An example of a deploy script that will deploy and call a simple contract.
export default async function (hre: HardhatRuntimeEnvironment) {
const wallet = new Wallet(vars.get("DEPLOYER_PRIVATE_KEY"));
const deployer = new Deployer(hre, wallet);
const artifact = await deployer.loadArtifact("HelloAbstract");
// Provide the constructor arguments
const constructorArgs = ["Hello, Abstract!"];
const tokenContract = await deployer.deploy(artifact, constructorArgs);
console.log(
`${
artifact.contractName
} was deployed to ${await tokenContract.getAddress()}`
);
}
```
## Create2 & Smart Wallet Deployments
Specify different deployment types through using the third `deploymentType` parameter:
* **create**: Standard contract deployment (default)
* **create2**: Deterministic deployment using CREATE2
* **createAccount**: Deploy a [smart contract wallet](/how-abstract-works/native-account-abstraction/smart-contract-wallets).
* **create2Account**: Deterministic deployment of a [smart contract wallet](/how-abstract-works/native-account-abstraction/smart-contract-wallets).
```typescript [expandable] {11}
import { Wallet } from "zksync-ethers";
import { HardhatRuntimeEnvironment } from "hardhat/types";
import { Deployer } from "@matterlabs/hardhat-zksync";
import { vars } from "hardhat/config";
export default async function (hre: HardhatRuntimeEnvironment) {
const wallet = new Wallet(vars.get("DEPLOYER_PRIVATE_KEY"));
const deployer = new Deployer(hre, wallet);
const artifact = await deployer.loadArtifact("HelloAbstract");
const deploymentType = "create2";
const tokenContract = await deployer.deploy(artifact, [], deploymentType);
console.log(
`${
artifact.contractName
} was deployed to ${await tokenContract.getAddress()}`
);
}
```
## Additional Factory Dependencies
Factory smart contracts (contracts that can deploy other contracts) require the bytecode of the contracts they can deploy
to be provided within the factory dependencies array.
[Learn more about factory dependencies](/how-abstract-works/evm-differences/contract-deployment).
```typescript [expandable] {5-6,16}
import { Wallet } from "zksync-ethers";
import { HardhatRuntimeEnvironment } from "hardhat/types";
import { Deployer } from "@matterlabs/hardhat-zksync";
// Additional bytecode dependencies (typically imported from artifacts)
const contractBytecode = "0x..."; // Your contract bytecode
const wallet = new Wallet(vars.get("DEPLOYER_PRIVATE_KEY"));
const deployer = new Deployer(hre, wallet);
const artifact = await deployer.loadArtifact("FactoryContract");
const contract = await deployer.deploy(
artifact,
["Hello world!"],
"create",
{},
[contractBytecode]
);
```
# Hardhat - Get Started
Source: https://docs.abs.xyz/build-on-abstract/smart-contracts/hardhat/get-started
Get started with Abstract by deploying your first smart contract using Hardhat.
This document outlines the end-to-end process of deploying a smart contract on Abstract using Hardhat.
It’s the ideal guide if you’re building a new project from scratch.
Watch a step-by-step tutorial on how to get started with Hardhat.
## 1. Create a new project
Ensure you have the following installed on your machine:
* [Node.js](https://nodejs.org/en/download/) v18.0.0 or later.
* If you are on Windows, we strongly recommend using [WSL 2](https://learn.microsoft.com/en-us/windows/wsl/about) to follow this guide.
Inside an empty directory, initialize a new Hardhat project using
the [Hardhat CLI](https://hardhat.org/getting-started/):
Create a new directory and navigate into it:
```bash
mkdir my-abstract-project && cd my-abstract-project
```
Initialize a new Hardhat project within the directory:
```bash
npx hardhat init
```
Select your preferences when prompted by the CLI, or use the recommended setup below.
We recommend selecting the following options when prompted by the Hardhat CLI:
```bash
✔ What do you want to do? · Create a TypeScript project
✔ Hardhat project root: · /path/to/my-abstract-project
✔ Do you want to add a .gitignore? (Y/n) · y
✔ Do you ... install ... dependencies with npm ... · y
```
## 2. Install the required dependencies
Abstract smart contracts use [different bytecode](/how-abstract-works/evm-differences/overview)
than the Ethereum Virtual Machine (EVM).
Install the required dependencies to compile, deploy and interact with smart contracts on Abstract:
* [@matterlabs/hardhat-zksync](https://github.com/matter-labs/hardhat-zksync):
A suite of Hardhat plugins for working with Abstract.
* [zksync-ethers](/build-on-abstract/applications/ethers):
Recommended package for writing [Hardhat scripts](https://hardhat.org/hardhat-runner/docs/advanced/scripts)
to interact with your smart contracts.
```bash
npm install -D @matterlabs/hardhat-zksync zksync-ethers@6 ethers@6
```
## 3. Modify the Hardhat configuration
Update your `hardhat.config.ts` file to include the following options:
```typescript [expandable]
import { HardhatUserConfig } from "hardhat/config";
import "@matterlabs/hardhat-zksync";
const config: HardhatUserConfig = {
zksolc: {
version: "latest",
settings: {
// find all available options in the official documentation
// https://docs.zksync.io/build/tooling/hardhat/hardhat-zksync-solc#configuration
},
},
defaultNetwork: "abstractTestnet",
networks: {
abstractTestnet: {
url: "https://api.testnet.abs.xyz",
ethNetwork: "sepolia",
zksync: true,
chainId: 11124,
},
abstractMainnet: {
url: "https://api.mainnet.abs.xyz",
ethNetwork: "mainnet",
zksync: true,
chainId: 2741,
},
},
etherscan: {
apiKey: {
abstractTestnet: "TACK2D1RGYX9U7MC31SZWWQ7FCWRYQ96AD",
abstractMainnet: "IEYKU3EEM5XCD76N7Y7HF9HG7M9ARZ2H4A",
},
customChains: [
{
network: "abstractTestnet",
chainId: 11124,
urls: {
apiURL: "https://api-sepolia.abscan.org/api",
browserURL: "https://sepolia.abscan.org/",
},
},
{
network: "abstractMainnet",
chainId: 2741,
urls: {
apiURL: "https://api.abscan.org/api",
browserURL: "https://abscan.org/",
},
},
],
},
solidity: {
version: "0.8.24",
},
};
export default config;
```
## 4. Write a smart contract
Rename the existing `contracts/Lock.sol` file to `contracts/HelloAbstract.sol`:
```bash
mv contracts/Lock.sol contracts/HelloAbstract.sol
```
Write a new smart contract in the `contracts/HelloAbstract.sol` file, or use the example smart contract below:
```solidity
// SPDX-License-Identifier: MIT
pragma solidity ^0.8.24;
contract HelloAbstract {
function sayHello() public pure virtual returns (string memory) {
return "Hello, World!";
}
}
```
## 5. Compile the smart contract
Clear any existing artifacts:
```bash
npx hardhat clean
```
Use the [zksolc compiler](https://docs.zksync.io/zk-stack/components/compiler/toolchain/solidity)
(installed in the above steps) to compile smart contracts for Abstract:
```bash Testnet
npx hardhat compile --network abstractTestnet
```
```bash Mainnet
npx hardhat compile --network abstractMainnet
```
You should now see the compiled smart contracts in the generated `artifacts-zk` directory.
## 6. Deploy the smart contract
Create a new [configuration variable](https://hardhat.org/hardhat-runner/docs/guides/configuration-variables)
called `DEPLOYER_PRIVATE_KEY`.
```bash
npx hardhat vars set DEPLOYER_PRIVATE_KEY
```
Enter the private key of a new wallet you created for this step.
```bash
✔ Enter value: · ****************************************************************
```
Do NOT use a private key associated with real funds. Create a new wallet for this step.
The deployer account requires ETH to deploy a smart contract.
* **Testnet**: Claim ETH via a [faucet](/tooling/faucets), or
[bridge](/tooling/bridges) ETH from Sepolia.
* **Mainnet**: Use a [bridge](/tooling/bridges) to transfer ETH to Abstract mainnet.
Create a new [Hardhat script](https://hardhat.org/hardhat-runner/docs/advanced/scripts) located at `/deploy/deploy.ts`:
```bash
mkdir deploy && touch deploy/deploy.ts
```
Add the following code to the `deploy.ts` file:
```typescript
import { Wallet } from "zksync-ethers";
import { HardhatRuntimeEnvironment } from "hardhat/types";
import { Deployer } from "@matterlabs/hardhat-zksync";
import { vars } from "hardhat/config";
// An example of a deploy script that will deploy and call a simple contract.
export default async function (hre: HardhatRuntimeEnvironment) {
console.log(`Running deploy script`);
// Initialize the wallet using your private key.
const wallet = new Wallet(vars.get("DEPLOYER_PRIVATE_KEY"));
// Create deployer object and load the artifact of the contract we want to deploy.
const deployer = new Deployer(hre, wallet);
// Load contract
const artifact = await deployer.loadArtifact("HelloAbstract");
// Deploy this contract. The returned object will be of a `Contract` type,
// similar to the ones in `ethers`.
const tokenContract = await deployer.deploy(artifact);
console.log(
`${
artifact.contractName
} was deployed to ${await tokenContract.getAddress()}`
);
}
```
Run the following command to deploy your smart contracts:
```bash Testnet
npx hardhat deploy-zksync --script deploy.ts --network abstractTestnet
```
```bash Mainnet
npx hardhat deploy-zksync --script deploy.ts --network abstractMainnet
```
If successful, your output should look similar to the following:
```bash {2}
Running deploy script
HelloAbstract was deployed to YOUR_CONTRACT_ADDRESS
```
Verifying your smart contract is helpful for others to view the code and
interact with it from a [block explorer](/tooling/block-explorers).
To verify your smart contract, run the following command:
```bash Testnet
npx hardhat verify --network abstractTestnet YOUR_CONTRACT_ADDRESS
```
```bash Mainnet
npx hardhat verify --network abstractMainnet YOUR_CONTRACT_ADDRESS
```
**Note**: Replace `YOUR_CONTRACT_ADDRESS` with the address of your deployed smart contract.
# Hardhat - Installation
Source: https://docs.abs.xyz/build-on-abstract/smart-contracts/hardhat/installation
Learn how to setup a new Hardhat project on Abstract using hardhat-zksync.
This page assumes you already have a Hardhat project setup. If you don’t, follow the steps in the [Getting Started](/build-on-abstract/smart-contracts/hardhat/get-started) guide to create a new project.
Abstract uses the [ZKsync VM](https://docs.zksync.io/zksync-protocol/vm), which expects [different bytecode](/how-abstract-works/evm-differences/overview)
than the Ethereum Virtual Machine (EVM).
The [`hardhat-zksync`](https://docs.zksync.io/zksync-era/tooling/hardhat/plugins/hardhat-zksync) library includes several plugins to help you compile, deploy and verify smart contracts for the Zksync VM on Abstract.
Install the `@matter-labs/hardhat-zksync` package:
```bash npm
npm install -D @matterlabs/hardhat-zksync
```
```bash yarn
yarn add -D @matterlabs/hardhat-zksync
```
```bash pnpm
pnpm add -D @matterlabs/hardhat-zksync
```
```bash bun
bun add -D @matterlabs/hardhat-zksync
```
Modify your `hardhat.config.ts` file to include the following options:
```ts
import { HardhatUserConfig } from "hardhat/config";
import "@matterlabs/hardhat-zksync";
const config: HardhatUserConfig = {
zksolc: {
version: "latest",
settings: {
// find all available options in the official documentation
// https://docs.zksync.io/build/tooling/hardhat/hardhat-zksync-solc#configuration
},
},
defaultNetwork: "abstractTestnet",
networks: {
abstractTestnet: {
url: "https://api.testnet.abs.xyz",
ethNetwork: "sepolia",
zksync: true,
chainId: 11124,
},
abstractMainnet: {
url: "https://api.mainnet.abs.xyz",
ethNetwork: "mainnet",
zksync: true,
chainId: 2741,
},
},
solidity: {
version: "0.8.24",
},
};
export default config;
```
Provide the `--network` flag to specify the Abstract network you want to use.
```bash
# e.g. Compile the network using the zksolc compiler
npx hardhat compile --network abstractTestnet
```
# Hardhat - Testing Contracts
Source: https://docs.abs.xyz/build-on-abstract/smart-contracts/hardhat/testing-contracts
Learn how to test your smart contracts using Hardhat.
Verify your smart contracts work as intended before you deploy them by writing [tests](https://hardhat.org/hardhat-runner/docs/guides/test-contracts).
## Testing Smart Contracts
Ensure your Hardhat configuration file is configured to use `zksolc`, as outlined in the [installation guide](/build-on-abstract/smart-contracts/hardhat/installation#update-hardhat-configuration):
```typescript hardhat.config.ts [expandable]
import { HardhatUserConfig } from "hardhat/config";
import "@matterlabs/hardhat-zksync";
const config: HardhatUserConfig = {
zksolc: {
version: "latest",
settings: {
// find all available options in the official documentation
// https://docs.zksync.io/build/tooling/hardhat/hardhat-zksync-solc#configuration
},
},
defaultNetwork: "abstractTestnet",
networks: {
abstractTestnet: {
url: "https://api.testnet.abs.xyz",
ethNetwork: "sepolia",
zksync: true,
chainId: 11124,
},
abstractMainnet: {
url: "https://api.mainnet.abs.xyz",
ethNetwork: "mainnet",
zksync: true,
chainId: 2741,
},
},
solidity: {
version: "0.8.24",
},
};
export default config;
```
The [zksync-ethers](https://sdk.zksync.io/js/ethers/why-zksync-ethers) package provides a modified version of the ethers library that is compatible with Abstract and the ZKsync VM. Install the package by running the following command:
```bash npm
npm install -D zksync-ethers
```
```bash yarn
yarn add -D zksync-ethers
```
```bash pnpm
pnpm add -D zksync-ethers
```
```bash bun
bun add -D zksync-ethers
```
Write test definitions inside the `/test` directory, for example, `test/HelloWorld.test.ts`.
```typescript test/HelloWorld.test.ts [expandable]
import * as hre from "hardhat";
import { expect } from "chai";
import { Deployer } from "@matterlabs/hardhat-zksync";
import { Wallet, Provider, Contract } from "zksync-ethers";
import { vars } from "hardhat/config";
describe("HelloWorld", function () {
let helloWorld: Contract;
beforeEach(async function () {
const provider = new Provider(hre.network.config.url);
const wallet = new Wallet(vars.get("DEPLOYER_PRIVATE_KEY"), provider);
const deployer = new Deployer(hre, wallet);
const artifact = await hre.deployer.loadArtifact("HelloWorld");
helloWorld = await deployer.deploy(artifact);
});
it("Should return the correct initial message", async function () {
expect(await helloWorld.getMessage()).to.equal("Hello World");
});
it("Should set a new message correctly", async function () {
await helloWorld.setMessage("Hello Abstract!");
expect(await helloWorld.getMessage()).to.equal("Hello Abstract!");
});
});
```
Create a new [configuration variable](https://hardhat.org/hardhat-runner/docs/guides/configuration-variables) called `DEPLOYER_PRIVATE_KEY` that contains the private key of a wallet you want to deploy the contract from.
```bash
npx hardhat vars set DEPLOYER_PRIVATE_KEY
```
Enter the private key of a new wallet you created for this step.
```bash
✔ Enter value: · ****************************************************************
```
Use one of the **rich wallets** as the `DEPLOYER_PRIVATE_KEY` when using a [local node](#running-a-local-node).
The deployer account requires ETH to deploy a smart contract.
* **Testnet**: Claim ETH via a [faucet](/tooling/faucets), or
[bridge](/tooling/bridges) ETH from Sepolia.
* **Mainnet**: Use a [bridge](/tooling/bridges) to transfer ETH to Abstract mainnet.
Run the tests by running the following command:
```bash
npx hardhat test --network abstractTestnet
```
## Running a local node
The [zksync-cli](https://github.com/matter-labs/zksync-cli) package provides a command-line interface for instantiating local nodes.
Run a local node as your test environment is beneficial for many reasons:
* **Speed**: Local nodes are faster than testnet/mainnet, increasing iteration speed.
* **Rich wallets**: Local nodes come with "rich wallets" pre-funded with ETH.
* **Isolation**: Local nodes are separate environments with no existing state.
[Docker](https://www.docker.com/) is required to run a local node. [Installation guide ↗](https://docs.docker.com/get-docker/)
Run a local node by running the following command:
```bash
npx zksync-cli dev start
```
Select the `anvil-zksync` option when prompted:
```bash {1}
❯ anvil-zksync - Quick startup, no persisted state, only L2 node - zkcli-in-memory-node
Dockerized node - Persistent state, includes L1 and L2 nodes - zkcli-dockerized-node
```
This will start a local node and a development wallet for you to use:
```bash
anvil-zksync started v0.3.2:
- ZKsync Node (L2):
- Chain ID: 260
- RPC URL: http://127.0.0.1:8011
- Rich accounts: https://docs.zksync.io/zksync-era/tooling/local-setup/anvil-zksync-node#pre-configured-rich-wallets
```
Add the local node as a network in your Hardhat configuration file:
```typescript hardhat.config.ts
networks: {
// ... Existing Abstract networks
inMemoryNode: {
url: "http://127.0.0.1:8011",
ethNetwork: "localhost", // in-memory node doesn't support eth node; removing this line will cause an error
zksync: true,
},
},
```
Update the `DEPLOYER_PRIVATE_KEY` configuration variable to use one of the [pre-funded rich wallet](#rich-wallets) private keys.
```bash
npx hardhat vars set DEPLOYER_PRIVATE_KEY
```
Enter the private key of one of the [rich wallets](#rich-wallets).
```bash
✔ Enter value: · ****************************************************************
```
Use one of the **rich wallets** as the `DEPLOYER_PRIVATE_KEY` when using a [local node](#running-a-local-node).
Run the tests on the local node using the following command:
```bash
npx hardhat test --network inMemoryNode
```
### Rich Wallets
The local node includes pre-configured "rich" accounts for testing:
```text [expandable]
Address #0: 0xBC989fDe9e54cAd2aB4392Af6dF60f04873A033A
Private Key: 0x3d3cbc973389cb26f657686445bcc75662b415b656078503592ac8c1abb8810e
Mnemonic: mass wild lava ripple clog cabbage witness shell unable tribe rubber enter
---
Address #1: 0x55bE1B079b53962746B2e86d12f158a41DF294A6
Private Key: 0x509ca2e9e6acf0ba086477910950125e698d4ea70fa6f63e000c5a22bda9361c
Mnemonic: crumble clutch mammal lecture lazy broken nominee visit gentle gather gym erupt
---
Address #2: 0xCE9e6063674DC585F6F3c7eaBe82B9936143Ba6C
Private Key: 0x71781d3a358e7a65150e894264ccc594993fbc0ea12d69508a340bc1d4f5bfbc
Mnemonic: illegal okay stereo tattoo between alien road nuclear blind wolf champion regular
---
Address #3: 0xd986b0cB0D1Ad4CCCF0C4947554003fC0Be548E9
Private Key: 0x379d31d4a7031ead87397f332aab69ef5cd843ba3898249ca1046633c0c7eefe
Mnemonic: point donor practice wear alien abandon frozen glow they practice raven shiver
---
Address #4: 0x87d6ab9fE5Adef46228fB490810f0F5CB16D6d04
Private Key: 0x105de4e75fe465d075e1daae5647a02e3aad54b8d23cf1f70ba382b9f9bee839
Mnemonic: giraffe organ club limb install nest journey client chunk settle slush copy
---
Address #5: 0x78cAD996530109838eb016619f5931a03250489A
Private Key: 0x7becc4a46e0c3b512d380ca73a4c868f790d1055a7698f38fb3ca2b2ac97efbb
Mnemonic: awful organ version habit giraffe amused wire table begin gym pistol clean
---
Address #6: 0xc981b213603171963F81C687B9fC880d33CaeD16
Private Key: 0xe0415469c10f3b1142ce0262497fe5c7a0795f0cbfd466a6bfa31968d0f70841
Mnemonic: exotic someone fall kitten salute nerve chimney enlist pair display over inside
---
Address #7: 0x42F3dc38Da81e984B92A95CBdAAA5fA2bd5cb1Ba
Private Key: 0x4d91647d0a8429ac4433c83254fb9625332693c848e578062fe96362f32bfe91
Mnemonic: catch tragic rib twelve buffalo also gorilla toward cost enforce artefact slab
---
Address #8: 0x64F47EeD3dC749d13e49291d46Ea8378755fB6DF
Private Key: 0x41c9f9518aa07b50cb1c0cc160d45547f57638dd824a8d85b5eb3bf99ed2bdeb
Mnemonic: arrange price fragile dinner device general vital excite penalty monkey major faculty
---
Address #9: 0xe2b8Cb53a43a56d4d2AB6131C81Bd76B86D3AFe5
Private Key: 0xb0680d66303a0163a19294f1ef8c95cd69a9d7902a4aca99c05f3e134e68a11a
Mnemonic: increase pulp sing wood guilt cement satoshi tiny forum nuclear sudden thank
---
```
**Same mnemonic rich wallets**
Mnemonic: `stuff slice staff easily soup parent arm payment cotton trade scatter struggle`
```text [expandable]
Address #10: 0x36615Cf349d7F6344891B1e7CA7C72883F5dc049
Private Key: 0x7726827caac94a7f9e1b160f7ea819f172f7b6f9d2a97f992c38edeab82d4110
---
Address #11: 0xa61464658AfeAf65CccaaFD3a512b69A83B77618
Private Key: 0xac1e735be8536c6534bb4f17f06f6afc73b2b5ba84ac2cfb12f7461b20c0bbe3
---
Address #12: 0x0D43eB5B8a47bA8900d84AA36656c92024e9772e
Private Key: 0xd293c684d884d56f8d6abd64fc76757d3664904e309a0645baf8522ab6366d9e
---
Address #13: 0xA13c10C0D5bd6f79041B9835c63f91de35A15883
Private Key: 0x850683b40d4a740aa6e745f889a6fdc8327be76e122f5aba645a5b02d0248db8
---
Address #14: 0x8002cD98Cfb563492A6fB3E7C8243b7B9Ad4cc92
Private Key: 0xf12e28c0eb1ef4ff90478f6805b68d63737b7f33abfa091601140805da450d93
---
Address #15: 0x4F9133D1d3F50011A6859807C837bdCB31Aaab13
Private Key: 0xe667e57a9b8aaa6709e51ff7d093f1c5b73b63f9987e4ab4aa9a5c699e024ee8
---
Address #16: 0xbd29A1B981925B94eEc5c4F1125AF02a2Ec4d1cA
Private Key: 0x28a574ab2de8a00364d5dd4b07c4f2f574ef7fcc2a86a197f65abaec836d1959
---
Address #17: 0xedB6F5B4aab3dD95C7806Af42881FF12BE7e9daa
Private Key: 0x74d8b3a188f7260f67698eb44da07397a298df5427df681ef68c45b34b61f998
---
Address #18: 0xe706e60ab5Dc512C36A4646D719b889F398cbBcB
Private Key: 0xbe79721778b48bcc679b78edac0ce48306a8578186ffcb9f2ee455ae6efeace1
---
Address #19: 0xE90E12261CCb0F3F7976Ae611A29e84a6A85f424
Private Key: 0x3eb15da85647edd9a1159a4a13b9e7c56877c4eb33f614546d4db06a51868b1c
---
```
# Hardhat - Verifying Contracts
Source: https://docs.abs.xyz/build-on-abstract/smart-contracts/hardhat/verifying-contracts
Learn how to verify smart contracts on Abstract using Hardhat.
## Verifying Contracts
Follow the [Abscan documentation](https://docs.abscan.org/getting-started/viewing-api-usage-statistics) to get an API key.
Add the below `etherscan` configuration object to your Hardhat configuration file.
Replace `` with your Abscan API key from the previous step.
```typescript hardhat.config.ts {8}
import { HardhatUserConfig } from "hardhat/config";
import "@matterlabs/hardhat-zksync";
const config: HardhatUserConfig = {
etherscan: {
apiKey: {
abstractTestnet: "TACK2D1RGYX9U7MC31SZWWQ7FCWRYQ96AD",
abstractMainnet: "your-abscan-api-key-here",
},
customChains: [
{
network: "abstractTestnet",
chainId: 11124,
urls: {
apiURL: "https://api-sepolia.abscan.org/api",
browserURL: "https://sepolia.abscan.org/",
},
},
{
network: "abstractMainnet",
chainId: 2741,
urls: {
apiURL: "https://api.abscan.org/api",
browserURL: "https://abscan.org/",
},
},
],
},
};
export default config;
```
Run the following command to verify a contract:
```bash
npx hardhat verify --network abstractTestnet
```
Replace `` with the address of the contract you want to verify.
## Constructor Arguments
To verify a contract with constructor arguments, pass the constructor arguments to the `verify` command after the contract address.
```bash
npx hardhat verify --network abstractTestnet
```
# ZKsync CLI
Source: https://docs.abs.xyz/build-on-abstract/zksync-cli
Learn how to use the ZKsync CLI to interact with Abstract or a local Abstract node.
As Abstract is built on the [ZK Stack](https://docs.zksync.io/zk-stack), you can use the
[ZKsync CLI](https://docs.zksync.io/build/zksync-cli) to interact with Abstract directly, or run your own local Abstract node.
The ZKsync CLI helps simplify the setup, development, testing and deployment of contracts on Abstract.
Ensure you have the following installed on your machine:
* [Node.js](https://nodejs.org/en/download/) v18.0.0 or later.
* [Docker](https://docs.docker.com/get-docker/) for running a local Abstract
node.
## Install ZKsync CLI
To install the ZKsync CLI, run the following command:
```bash
npm install -g zksync-cli
```
## Available Commands
Run any of the below commands with the `zksync-cli` prefix:
```bash
# For example, to create a new project:
zksync-cli create
```
| Command | Description |
| --------------- | ----------------------------------------------------------------------------- |
| `dev` | Start a local development environment with Abstract and Ethereum nodes. |
| `create` | Scaffold new projects using templates for frontend, contracts, and scripting. |
| `contract` | Read and write data to Abstract contracts without building UI. |
| `transaction` | Fetch and display detailed information about a specific transaction. |
| `wallet` | Manage Abstract wallet assets, including transfers and balance checks. |
| `bridge` | Perform deposits and withdrawals between Ethereum and Abstract. |
| `config chains` | Add or edit custom chains for flexible testing and development. |
Learn more on the official [ZKsync CLI documentation](https://docs.zksync.io/build/zksync-cli).
# Connect to Abstract
Source: https://docs.abs.xyz/connect-to-abstract
Add Abstract to your wallet or development environment to get started.
Use the information below to connect and submit transactions to Abstract.
| Property | Mainnet | Testnet |
| ------------------- | ------------------------------ | ------------------------------------ |
| Name | Abstract | Abstract Testnet |
| Description | The mainnet for Abstract. | The public testnet for Abstract. |
| Chain ID | `2741` | `11124` |
| RPC URL | `https://api.mainnet.abs.xyz` | `https://api.testnet.abs.xyz` |
| RPC URL (Websocket) | `wss://api.mainnet.abs.xyz/ws` | `wss://api.testnet.abs.xyz/ws` |
| Explorer | `https://abscan.org/` | `https://sepolia.abscan.org/` |
| Verify URL | `https://api.abscan.org/api` | `https://api-sepolia.abscan.org/api` |
| Currency Symbol | ETH | ETH |
# Automation
Source: https://docs.abs.xyz/ecosystem/automation
View the automation solutions available on Abstract.
# Bridges
Source: https://docs.abs.xyz/ecosystem/bridges
Move funds from other chains to Abstract and vice versa.
# Data & Indexing
Source: https://docs.abs.xyz/ecosystem/indexers
View the indexers and APIs available on Abstract.
# Interoperability
Source: https://docs.abs.xyz/ecosystem/interoperability
Discover the interoperability solutions available on Abstract.
# Multi-Sig Wallets
Source: https://docs.abs.xyz/ecosystem/multi-sig-wallets
Use multi-signature (multi-sig) wallets on Abstract
# Oracles
Source: https://docs.abs.xyz/ecosystem/oracles
Discover the Oracle and VRF services available on Abstract.
# Paymasters
Source: https://docs.abs.xyz/ecosystem/paymasters
Discover the paymasters solutions available on Abstract.
Zyfi is a native Account Abstraction provider focused on flexibility and ease of integration.
# Relayers
Source: https://docs.abs.xyz/ecosystem/relayers
Discover the relayer solutions available on Abstract.
# RPC Providers
Source: https://docs.abs.xyz/ecosystem/rpc-providers
Discover the RPC providers available on Abstract.
# Token Distribution
Source: https://docs.abs.xyz/ecosystem/token-distribution
Discover providers for Token Distribution available on Abstract.
Infrastructure for onchain token distribution. DAOs and businesses use Sablier for vesting, payroll, airdrops, and more.
# L1 Rollup Contracts
Source: https://docs.abs.xyz/how-abstract-works/architecture/components/l1-rollup-contracts
Learn more about the smart contracts deployed on L1 that enable Abstract to inherit the security properties of Ethereum.
An essential part of Abstract as a [ZK rollup](/how-abstract-works/architecture/layer-2s#what-is-a-zk-rollup)
is the smart contracts deployed to Ethereum (L1) that store and verify information about the
state of the L2.
By having these smart contracts deployed and performing these essential
roles on the L1, Abstract inherits the security properties of Ethereum.
These smart contracts work together to:
* Store the state diffs and compressed contract bytecode published from the L2 using [blobs](https://info.etherscan.com/what-is-a-blob/).
* Receive and verify the validity proofs posted by the L2.
* Facilitate communication between L1 and L2 to enable cross-chain messaging and bridging.
## List of Abstract Contracts
Below is a list of the smart contracts that Abstract uses.
### L1 Contracts
#### Mainnet
| **Contract** | **Address** |
| ---------------------------------------------------- | --------------------------------------------------------------------------------------------------------------------- |
| L2 Operator (collects fees) | [0x459a5f1d4cfb01876d5022ae362c104034aabff9](https://etherscan.io/address/0x459a5f1d4cfb01876d5022ae362c104034aabff9) |
| L1 ETH Sender / Operator (Commits batches) | [0x11805594be0229ef08429d775af0c55f7c4535de](https://etherscan.io/address/0x11805594be0229ef08429d775af0c55f7c4535de) |
| L1 ETH Sender / Operator (Prove and Execute batches) | [0x54ab716d465be3d5eeca64e63ac0048d7a81659a](https://etherscan.io/address/0x54ab716d465be3d5eeca64e63ac0048d7a81659a) |
| Governor Address (ChainAdmin owner) | [0x7F3EaB9ccf1d8B9705F7ede895d3b4aC1b631063](https://etherscan.io/address/0x7F3EaB9ccf1d8B9705F7ede895d3b4aC1b631063) |
| create2\_factory\_addr | [0xce0042b868300000d44a59004da54a005ffdcf9f](https://etherscan.io/address/0xce0042b868300000d44a59004da54a005ffdcf9f) |
| create2\_factory\_salt | `0x8c8c6108a96a14b59963a18367250dc2042dfe62da8767d72ffddb03f269ffcc` |
| BridgeHub Proxy Address | [0x303a465b659cbb0ab36ee643ea362c509eeb5213](https://etherscan.io/address/0x303a465b659cbb0ab36ee643ea362c509eeb5213) |
| State Transition Proxy Address | [0xc2ee6b6af7d616f6e27ce7f4a451aedc2b0f5f5c](https://etherscan.io/address/0xc2ee6b6af7d616f6e27ce7f4a451aedc2b0f5f5c) |
| Transparent Proxy Admin Address | [0xc2a36181fb524a6befe639afed37a67e77d62cf1](https://etherscan.io/address/0xc2a36181fb524a6befe639afed37a67e77d62cf1) |
| Validator Timelock Address | [0x5d8ba173dc6c3c90c8f7c04c9288bef5fdbad06e](https://etherscan.io/address/0x5d8ba173dc6c3c90c8f7c04c9288bef5fdbad06e) |
| ERC20 Bridge L1 Address | [0x57891966931eb4bb6fb81430e6ce0a03aabde063](https://etherscan.io/address/0x57891966931eb4bb6fb81430e6ce0a03aabde063) |
| Shared Bridge L1 Address | [0xd7f9f54194c633f36ccd5f3da84ad4a1c38cb2cb](https://etherscan.io/address/0xd7f9f54194c633f36ccd5f3da84ad4a1c38cb2cb) |
| Default Upgrade Address | [0x4d376798ba8f69ced59642c3ae8687c7457e855d](https://etherscan.io/address/0x4d376798ba8f69ced59642c3ae8687c7457e855d) |
| Diamond Proxy Address | [0x2EDc71E9991A962c7FE172212d1aA9E50480fBb9](https://etherscan.io/address/0x2EDc71E9991A962c7FE172212d1aA9E50480fBb9) |
| Multicall3 Address | [0xca11bde05977b3631167028862be2a173976ca11](https://etherscan.io/address/0xca11bde05977b3631167028862be2a173976ca11) |
| Verifier Address | [0x70f3fbf8a427155185ec90bed8a3434203de9604](https://etherscan.io/address/0x70f3fbf8a427155185ec90bed8a3434203de9604) |
| Chain Admin Address | [0xA1f75f491f630037C4Ccaa2bFA22363CEC05a661](https://etherscan.io/address/0xA1f75f491f630037C4Ccaa2bFA22363CEC05a661) |
#### Testnet
| **Contract** | **Address** |
| ---------------------------------------------------- | ----------------------------------------------------------------------------------------------------------------------------- |
| L1 ETH Sender / Operator (Commits batches) | [0x564D33DE40b1af31aAa2B726Eaf9Dafbaf763577](https://sepolia.etherscan.io/address/0x564D33DE40b1af31aAa2B726Eaf9Dafbaf763577) |
| L1 ETH Sender / Operator (Prove and Execute batches) | [0xcf43bdB3115547833FFe4D33d864d25135012648](https://sepolia.etherscan.io/address/0xcf43bdB3115547833FFe4D33d864d25135012648) |
| Governor Address (ChainAdmin owner) | [0x397aa1340B514cB3EF8F474db72B7e62C9159C63](https://sepolia.etherscan.io/address/0x397aa1340B514cB3EF8F474db72B7e62C9159C63) |
| create2\_factory\_addr | [0xce0042b868300000d44a59004da54a005ffdcf9f](https://sepolia.etherscan.io/address/0xce0042b868300000d44a59004da54a005ffdcf9f) |
| create2\_factory\_salt | `0x8c8c6108a96a14b59963a18367250dc2042dfe62da8767d72ffddb03f269ffcc` |
| BridgeHub Proxy Address | [0x35a54c8c757806eb6820629bc82d90e056394c92](https://sepolia.etherscan.io/address/0x35a54c8c757806eb6820629bc82d90e056394c92) |
| State Transition Proxy Address | [0x4e39e90746a9ee410a8ce173c7b96d3afed444a5](https://sepolia.etherscan.io/address/0x4e39e90746a9ee410a8ce173c7b96d3afed444a5) |
| Transparent Proxy Admin Address | [0x0358baca94dcd7931b7ba7aaf8a5ac6090e143a5](https://sepolia.etherscan.io/address/0x0358baca94dcd7931b7ba7aaf8a5ac6090e143a5) |
| Validator Timelock Address | [0xd3876643180a79d0a56d0900c060528395f34453](https://sepolia.etherscan.io/address/0xd3876643180a79d0a56d0900c060528395f34453) |
| ERC20 Bridge L1 Address | [0x2ae09702f77a4940621572fbcdae2382d44a2cba](https://sepolia.etherscan.io/address/0x2ae09702f77a4940621572fbcdae2382d44a2cba) |
| Shared Bridge L1 Address | [0x3e8b2fe58675126ed30d0d12dea2a9bda72d18ae](https://sepolia.etherscan.io/address/0x3e8b2fe58675126ed30d0d12dea2a9bda72d18ae) |
| Default Upgrade Address | [0x27a7f18106281fe53d371958e8bc3f833694d24a](https://sepolia.etherscan.io/address/0x27a7f18106281fe53d371958e8bc3f833694d24a) |
| Diamond Proxy Address | [0x8ad52ff836a30f063df51a00c99518880b8b36ac](https://sepolia.etherscan.io/address/0x8ad52ff836a30f063df51a00c99518880b8b36ac) |
| Governance Address | [0x15d049e3d24fbcd53129bf7781a0c6a506690ff2](https://sepolia.etherscan.io/address/0x15d049e3d24fbcd53129bf7781a0c6a506690ff2) |
| Multicall3 Address | [0xca11bde05977b3631167028862be2a173976ca11](https://sepolia.etherscan.io/address/0xca11bde05977b3631167028862be2a173976ca11) |
| Verifier Address | [0xac3a2dc46cea843f0a9d6554f8804aed18ff0795](https://sepolia.etherscan.io/address/0xac3a2dc46cea843f0a9d6554f8804aed18ff0795) |
| Chain Admin Address | [0xEec1E1cFaaF993B3AbE9D5e78954f5691e719838](https://sepolia.etherscan.io/address/0xEec1E1cFaaF993B3AbE9D5e78954f5691e719838) |
### L2 Contracts
#### Mainnet
| **Contract** | **Address** |
| ------------------------ | ------------------------------------------------------------------------------------------------------------------- |
| ERC20 Bridge L2 Address | [0x954ba8223a6BFEC1Cc3867139243A02BA0Bc66e4](https://abscan.org/address/0x954ba8223a6BFEC1Cc3867139243A02BA0Bc66e4) |
| Shared Bridge L2 Address | [0x954ba8223a6BFEC1Cc3867139243A02BA0Bc66e4](https://abscan.org/address/0x954ba8223a6BFEC1Cc3867139243A02BA0Bc66e4) |
| Default L2 Upgrader | [0xd3A8626C3caf69e3287D94D43700DB25EEaCccf1](https://abscan.org/address/0xd3A8626C3caf69e3287D94D43700DB25EEaCccf1) |
#### Testnet
| **Contract** | **Address** |
| ------------------------ | --------------------------------------------------------------------------------------------------------------------------- |
| ERC20 Bridge L2 Address | [0xec089e40c40b12dd4577e0c5381d877b613040ec](https://sepolia.abscan.org/address/0xec089e40c40b12dd4577e0c5381d877b613040ec) |
| Shared Bridge L2 Address | [0xec089e40c40b12dd4577e0c5381d877b613040ec](https://sepolia.abscan.org/address/0xec089e40c40b12dd4577e0c5381d877b613040ec) |
# Prover & Verifier
Source: https://docs.abs.xyz/how-abstract-works/architecture/components/prover-and-verifier
Learn more about the prover and verifier components of Abstract.
The batches of transactions submitted to Ethereum by the [sequencer](/how-abstract-works/architecture/components/sequencer)
are not necessarily valid (i.e. they have not been proven to be correct) until a ZK proof is generated
and verified by the [L1 rollup contract](/how-abstract-works/architecture/components/l1-rollup-contracts).
ZK proofs are used in a two-step process to ensure the correctness of batches:
1. **[Proof generation](#proof-generation)**: An **off-chain** prover generates a ZK proof that a batch of transactions is valid.
2. **[Proof verification](#proof-verification)**: The proof is submitted to the [L1 rollup contract](/how-abstract-works/architecture/components/l1-rollup-contracts) and verified by the **on-chain** verifier.
Since the proof verification is performed on Ethereum, Abstract inherits the security guarantees of the Ethereum L1.
## Proof Generation
The proof generation process is composed of three main steps:
A **witness** is the cryptographic term for the knowledge
that the prover wishes to demonstrate is true.
In the context of Abstract, the witness is the data that the prover uses to claim a transaction is valid without disclosing any transaction details.
Witnesses are collected in batches and processed together.
View the source code on GitHub for the witness generator.
Circuits are executed by the prover and the verifier, where the prover uses
the witness to generate a proof, and the verifier checks this proof against the
circuit to confirm its validity.
[View the full list of circuits on the ZK Stack documentation](https://docs.zksync.io/zk-stack/components/prover/circuits).
The goal of these circuits is to ensure the correct execution of the VM,
covering every [opcode](/how-abstract-works/evm-differences/evm-opcodes),
storage interaction, and the integration of [precompiled contracts](/how-abstract-works/evm-differences/precompiles).
The ZK-proving circuit iterates over the entire transaction batch,
verifying the sequence of updates that result in a final state root after the last transaction is executed.
Abstract uses [Boojum](https://docs.zksync.io/zk-stack/components/prover/boojum-gadgets)
to prove and verify the circuit functionality, along with operating the backend components necessary for circuit construction.
View the source code on GitHub for the zkEVM circuits.
View the source code on GitHub for Boojum.
The circuit outputs a
[ZK-STARK](https://ethereum.org/en/developers/docs/scaling/zk-rollups/#validity-proofs);
a type of validity proof that is relatively large and therefore would be more costly
to post on Ethereum to be verified.
For this reason, a final compression step is performed to generate a succinct validity proof
called a [ZK-SNARK](https://ethereum.org/en/developers/docs/scaling/zk-rollups/#validity-proofs)
that can be [verified](#proof-verification) quickly and cheaply on Ethereum.
View the source code on GitHub for the FRI compressor.
## Proof Verification
The final ZK-SNARK generated from the proof generation phase is
submitted with the `proveBatches` function call to the
[L1 rollup contract](/how-abstract-works/architecture/components/l1-rollup-contracts) as outlined in the
[transaction lifecycle](/how-abstract-works/architecture/transaction-lifecycle) section.
The ZK proof is then verified by the verifier smart contract on Ethereum by calling
its `verify` function and providing the proof as an argument.
```solidity
// Returns a boolean value indicating whether the zk-SNARK proof is valid.
function verify(
uint256[] calldata _publicInputs,
uint256[] calldata _proof,
uint256[] calldata _recursiveAggregationInput
) external view returns (bool);
```
View the source code for the IVerifier interface
View the source code for the Verifier implementation smart contract
# Sequencer
Source: https://docs.abs.xyz/how-abstract-works/architecture/components/sequencer
Learn more about the sequencer component of Abstract.
The sequencer is composed of several services that work together
to receive and process transactions on the L2,
organize them into blocks, create transaction batches, and send these batches to Ethereum.
It is composed of the following components:
1. [RPC](#rpc): provides an API for the clients to interact with the chain (i.e. send transactions, query the state, etc).
2. [Sequencer](#sequencer): processes L2 transactions, organizes them into blocks, and ensures they comply with the constraints of the proving system.
3. [ETH Operator](#eth-operator): batches L2 transactions together and dispatches them to the L1.
View the repositories for each component on the ZK stack docs.
### RPC
A [JSON-RPC](https://ethereum.org/en/developers/docs/apis/json-rpc/) API is exposed for clients (such as applications)
to provide a set of methods that can be used to interact with Abstract.
There are two types of APIs exposed:
1. **HTTP API**: This API is used to interact with the chain using traditional HTTP requests.
2. **WebSocket API**: This API is used to subscribe to events and receive real-time updates from the chain including PubSub events.
### Sequencer
Once transactions are received through the RPC API, the sequencer processes them,
organizes them into blocks, and ensures they comply with the constraints of the proving system.
### ETH Operator
The ETH Operator module interfaces directly with the L1, responsible for:
* Monitoring the L1 for specific events (such as deposits and system upgrades) and
ensuring the sequencer remains in sync with the L1.
* Batching multiple L2 transactions together and dispatching them to the L1.
# Layer 2s
Source: https://docs.abs.xyz/how-abstract-works/architecture/layer-2s
Learn what a layer 2 is and how Abstract is built as a layer 2 blockchain to inherit the security properties of Ethereum.
Abstract is a [layer 2](#what-is-a-layer-2) (L2) blockchain that creates batches of transactions and posts them to Ethereum to inherit
Ethereum’s security properties. Specifically, Abstract
is a [ZK Rollup](#what-is-a-zk-rollup) built with the [ZK stack](#what-is-the-zk-stack).
By posting and verifying batches of transactions on Ethereum,
Abstract provides strong security guarantees while also enabling fast and cheap transactions.
## What is a Layer 2?
A layer 2 (L2) is a collective term that refers to a set of
blockchains that are built to scale Ethereum.
Since Ethereum is only able to process roughly 15 transactions per second (TPS), often with
expensive gas fees, it is not feasible for consumer applications to run on Ethereum directly.
The main goal of an L2 is therefore to both increase the transaction throughput
*(i.e. how many transactions can be processed per second)*, and reduce the
cost of gas fees for those transactions, **without** sacrificing decentralization or security.
Start developing smart contracts or applications on Abstract
## What is a ZK Rollup?
A ZK (Zero-Knowledge) Rollup is a type of L2 that uses zero-knowledge proofs to
verify the validity of batches of transactions that are posted to Ethereum.
As the L2 posts batches of transactions to Ethereum, it is important to ensure that the
transactions are valid and the state of the L2 is correct. This is done by using
zero-knowledge proofs (called [validity proofs](https://ethereum.org/en/developers/docs/scaling/zk-rollups/#validity-proofs))
to confirm the correctness of the state transitions in the batch
without having to re-execute the transactions on Ethereum.
Start developing smart contracts or applications on Abstract
## What is the ZK Stack?
Abstract uses the [ZK stack](https://zkstack.io/components);
an open-source framework for building sovereign ZK rollups.
Start developing smart contracts or applications on Abstract
# Transaction Lifecycle
Source: https://docs.abs.xyz/how-abstract-works/architecture/transaction-lifecycle
Learn how transactions are processed on Abstract and finalized on Ethereum.
As explained in the [layer 2s](/how-abstract-works/architecture/layer-2s)
section, Abstract inherits the security properties of Ethereum by posting
batches of L2 transactions to the L1 and using ZK proofs to ensure their correctness.
This relationship is implemented using both off-chain components as well
as multiple smart contracts *(on both L1 and L2)* to transfer batches of
transactions, enforce [data availability](https://ethereum.org/en/developers/docs/data-availability/),
ensure the validity of the ZK proofs, and more.
Each transaction goes through a flow that can broadly be separated into four phases,
which can be seen for each transaction on our [block explorers](/tooling/block-explorers):
The transaction is executed and soft confirmation is
provided back to the user about the execution of their transaction (i.e. if their transaction succeeded or not).
After execution, the sequencer both forwards the block to the prover and creates a
batch containing transactions from multiple blocks.
[Example batch ↗](https://sepolia.abscan.org/batch/3678).
Multiple batches are committed to Ethereum in a
single transaction
in the form of an optimized data submission that only details the changes
in blockchain state; called a
**state diff**.
This step is one of the roles of the [sequencer](/how-abstract-works/architecture/components/sequencer);
calling the `commitBatches` function on the [L1 rollup contract](/how-abstract-works/architecture/components/l1-rollup-contracts) and
ensuring the [data availability](https://ethereum.org/en/developers/docs/data-availability/) of these batches.
The batches are stored on Ethereum using [blobs](https://info.etherscan.com/what-is-a-blob/) following the [EIP-4844](https://www.eip4844.com/) standard.
[Example transaction ↗](https://sepolia.abscan.org/tx/0x2163e8fba4c8b3779e266b8c3c4e51eab4107ad9b77d0c65cdc8e168eb14fd4d)
A ZK proof that validates the batches is generated and submitted to the
L1 rollup contract for verification by calling the contract’s
`proveBatches` function.
This process involves both the [prover](/how-abstract-works/architecture/components/prover-and-verifier), which is responsible for
generating the ZK proof off-chain in the form of a [ZK-SNARK](https://ethereum.org/en/developers/docs/scaling/zk-rollups/#validity-proofs)
& submitting it to the L1 rollup contract as well as the [verifier](/how-abstract-works/architecture/components/prover-and-verifier), which
is responsible for confirming the validity of the proof on-chain.
[Example transaction ↗](https://sepolia.etherscan.io/tx/0x3a30e04284fa52c002e6d7ff3b61e6d3b09d4c56c740162140687edb6405e38c)
Shortly after validation is complete, the state is finalized and the Merkle tree with L2 logs is saved
by calling the `executeBatches` function on the L1 rollup contract. [Learn more about state commitments](https://ethereum.org/en/developers/docs/scaling/zk-rollups/#state-commitments).
[Example transaction ↗](https://sepolia.etherscan.io/tx/0x16891b5227e7ee040aab79e2b8d74289ea6b9b65c83680d533f03508758576e6)
# Best Practices
Source: https://docs.abs.xyz/how-abstract-works/evm-differences/best-practices
Learn the best practices for building smart contracts on Abstract.
This page outlines the best practices to follow in order to best utilize Abstract's
features and optimize your smart contracts for deployment on Abstract.
## Do not rely on EVM gas logic
Abstract has different gas logic than Ethereum, mainly:
1. The price for transaction execution fluctuates as it depends on the price of L1 gas price.
2. The price for opcode execution is different on Abstract than Ethereum.
### Use `call` instead of `.send` or `.transfer`
Each opcode in the EVM has an associated gas cost. The `send` and `transfer` functions have a `2300` gas stipend.
If the address you call is a smart contract (which all accounts on Abstract are),
the recipient contract may have some custom logic that requires more than 2300 gas to execute upon receiving the funds,
causing the call to fail.
For this reason, it is strongly recommended to use `call` instead of `.send` or `.transfer` when sending funds to a smart contract.
```solidity
// Before:
payable(addr).send(x)
payable(addr).transfer(x)
// After:
(bool success, ) = addr.call{value: x}("");
require(success, "Transfer failed.");
```
**Important:** Using `call` does not
provide the same level of protection against [reentrancy attacks](https://blog.openzeppelin.com/reentrancy-after-istanbul).
Some additional changes may be required in your contract. [Learn more in this security report ↗](https://consensys.io/diligence/blog/2019/09/stop-using-soliditys-transfer-now/).
### Consider `gasPerPubdataByte`
[EIP-712](https://eips.ethereum.org/EIPS/eip-712) transactions have a `gasPerPubdataByte`
field that can be set to control the amount of gas that is charged for each byte of data sent to L1
(see [transaction lifecycle](/how-abstract-works/architecture/transaction-lifecycle)). [Learn more ↗](https://docs.zksync.io/build/developer-reference/era-contracts/pubdata-post-4844).
When calculating how much gas is remaining using `gasleft()`, consider that the
`gasPerPubdataByte` also needs to be accounted for.
While the [system contracts](/how-abstract-works/system-contracts/overview)
currently have control over this value, this may become decentralized
in the future; therefore it’s important to consider that the
operator can choose any value up to the upper bound submitted in the signed transaction.
## Address recovery with `ecrecover`
Review the recommendations in the [signature validation](/how-abstract-works/native-account-abstraction/signature-validation)
section when recovering the address from a signature, as the sender of a transaction may not use [ECDSA](https://en.wikipedia.org/wiki/Elliptic_Curve_Digital_Signature_Algorithm)
(i.e. it is not an EOA).
# Contract Deployment
Source: https://docs.abs.xyz/how-abstract-works/evm-differences/contract-deployment
Learn how to deploy smart contracts on Abstract.
Unlike Ethereum, Abstract does not store the bytecode of smart contracts directly;
instead, it stores a hash of the bytecode and publishes the bytecode itself to Ethereum.
This adds several benefits to smart contract deployments on Abstract, including:
* **Inherited L1 Security**: Smart contract bytecode is stored directly on Ethereum.
* **Increased Gas efficiency**: Only *unique* contract bytecode needs to be published on Ethereum.
If you deploy the same contract more than once *(such as when using a factory)*, subsequent contract deployments are substantially cheaper.
## How Contract Deployment Works
**Contracts cannot be deployed on Abstract unless the bytecode of the smart contract to be deployed is published on Ethereum.**
If the bytecode of the contract has not been published, the deployment transaction will fail with the error `the code hash is not known`.
To publish bytecode before deployment, all contract deployments on Abstract are performed by calling the
[ContractDeployer](/how-abstract-works/system-contracts/list-of-system-contracts#contractdeployer) system contract
using one of its
[create](#create),
[create2](#create2),
[createAccount](#createaccount), or
[create2Account](#create2account) functions.
The bytecode of your smart contract and any other smart contracts that it can deploy *(such as when using a factory)*
must be included inside the factory dependencies (`factoryDeps`) of the deployment transaction.
Typically, this process occurs under the hood and is performed by the compiler and client libraries.
This page will show you how to deploy smart contracts on Abstract by interacting with the
[ContractDeployer](/how-abstract-works/system-contracts/list-of-system-contracts#contractdeployer) system contract.
## Get Started Deploying Smart Contracts
Use the [example repository](https://github.com/Abstract-Foundation/examples/tree/main/contract-deployment)
below as a reference for creating smart contracts and scripts that can deploy smart contracts on Abstract using various libraries.
See example code on how to build factory contracts and deployment scripts
using Hardhat, Ethers, Viem, and more.
## Deploying Smart Contracts
When building smart contracts, the [zksolc](https://github.com/matter-labs/zksolc-bin) and [zkvyper](https://github.com/matter-labs/zkvyper-bin)
compilers transform calls to the `CREATE` and `CREATE2` opcodes into calls to the `create` and `create2` functions on the `ContractDeployer` system contract.
In addition, when you call either of these opcodes, the compiler automatically detects what other contracts
your contract is capable of deploying and includes them in the `factoryDeps` field
of the generated artifacts.
### Solidity
No Solidity changes are required to deploy smart contracts, as the compiler handles the transformation automatically.
*Note*: address derivation via
`CREATE` and `CREATE2` is different from Ethereum.
[Learn more](/how-abstract-works/evm-differences/evm-opcodes#address-derivation).
#### create
Below are examples of how to write a smart contract that deploys other smart contracts
using the `CREATE` opcode. The compiler will automatically transform these calls
into calls to the `create` function on the `ContractDeployer` system contract.
```solidity MyContractFactory.sol
import "./MyContract.sol";
contract MyContractFactory {
function createMyContract() public {
MyContract myContract = new MyContract();
}
}
```
```solidity MyContract.sol
contract MyContract {
function sayHello() public pure returns (string memory) {
return "Hello World!";
}
}
```
```solidity MyContractFactory.sol
import "./MyContract.sol";
contract MyContractFactory {
function createMyContractAssembly() public {
bytes memory bytecode = type(MyContract).creationCode;
address myContract;
assembly {
myContract := create(0, add(bytecode, 32), mload(bytecode))
}
}
}
```
```solidity MyContract.sol
contract MyContract {
function sayHello() public pure returns (string memory) {
return "Hello World!";
}
}
```
#### create2
Below are examples of how to write a smart contract that deploys other smart contracts
using the `CREATE2` opcode. The compiler will automatically transform these calls
into calls to the `create2` function on the `ContractDeployer` system contract.
```solidity MyContractFactory.sol
import "./MyContract.sol";
contract MyContractFactory {
function create2MyContract(bytes32 salt) public {
MyContract myContract = new MyContract{salt: salt}();
}
}
```
```solidity MyContract.sol
contract MyContract {
function sayHello() public pure returns (string memory) {
return "Hello World!";
}
}
```
```solidity MyContractFactory.sol
import "./MyContract.sol";
contract MyContractFactory {
function create2MyContractAssembly(bytes32 salt) public {
bytes memory bytecode = type(MyContract).creationCode;
address myContract;
assembly {
myContract := create2(0, add(bytecode, 32), mload(bytecode), salt)
}
}
}
```
```solidity MyContract.sol
contract MyContract {
function sayHello() public pure returns (string memory) {
return "Hello World!";
}
}
```
#### createAccount
When deploying [smart contract wallets](/how-abstract-works/native-account-abstraction/smart-contract-wallets) on Abstract,
manually call the `createAccount` or `create2Account` function on the `ContractDeployer` system contract.
This is required because the contract needs to be flagged as a smart contract wallet by setting
the fourth argument of the `createAccount` function to the account abstraction version.
See an example of a factory contract that deploys smart contract wallets using createAccount.
#### create2Account
Similar to the `createAccount` function, the `create2Account` function on the `ContractDeployer` system contract must be
called manually when deploying smart contract wallets on Abstract to
flag the contract as a smart contract wallet by setting the fourth argument of the `create2Account` function to the account abstraction version.
See an example of a factory contract that deploys smart contract wallets using create2Account.
### EIP-712 Transactions via Clients
Once your smart contracts are compiled and you have the bytecode(s),
you can use various client libraries to deploy your smart contracts by creating
[EIP-712](https://eips.ethereum.org/EIPS/eip-712) transactions that:
* Have the transaction type set to `113` (to indicate an EIP-712 transaction).
* Call the `create`, `create2`, `createAccount`, or `create2Account` function `to` the
`ContractDeployer` system contract address (`0x0000000000000000000000000000000000008006`).
* Include the bytecode of the smart contract and any other contracts it can deploy in the `customData.factoryDeps`
field of the transaction.
#### hardhat-zksync
Since the compiler automatically generates the `factoryDeps` field for you in the contract artifact *(unless you are manually
calling the `ContractDeployer` via `createAccount` or `create2Account` functions)*,
load the artifact of the contract and use the [Deployer](https://docs.zksync.io/zksync-era/tooling/hardhat/plugins/hardhat-zksync-deploy#deployer-export)
class from the `hardhat-zksync` plugin to deploy the contract.
#### zksync-ethers
Use the [ContractFactory](https://sdk.zksync.io/js/ethers/api/v6/contract/contract-factory)
class from the [zksync-ethers](https://sdk.zksync.io/js/ethers/api/v6/contract/contract-factory) library to deploy your smart contracts.
#### viem
Use Viem’s [deployContract](https://viem.sh/zksync/actions/deployContract) method
to deploy your smart contracts.
## How Bytecode Publishing Works
When a contract is deployed on Abstract, multiple [system contracts](/how-abstract-works/system-contracts)
work together to compress and publish the contract bytecode to Ethereum before the contract is deployed.
Once the bytecode is published, the hash of the bytecode is set to "known"; meaning
the contract can be deployed on Abstract without needing to publish the bytecode again.
The process can be broken down into the following steps:
The [bootloader](/how-abstract-works/system-contracts/bootloader) receives
an [EIP-712](https://eips.ethereum.org/EIPS/eip-712) transaction that defines
a contract deployment. This transaction must:
1. Call the `create` or `create2` function on the `ContractDeployer` system contract.
2. Provide a salt, the formatted hash of the contract bytecode, and the constructor calldata as arguments.
3. Inside the `factory_deps` field of the transaction, include the bytecode of the smart contract being deployed
as well as the bytecodes of any other contracts that this contract can deploy (such as if it is a factory contract).
```solidity
/// @notice Deploys a contract with similar address derivation rules to the EVM's `CREATE` opcode.
/// @param _bytecodeHash The correctly formatted hash of the bytecode.
/// @param _input The constructor calldata
/// @dev This method also accepts nonce as one of its parameters.
/// It is not used anywhere and it needed simply for the consistency for the compiler
/// Note: this method may be callable only in system mode,
/// that is checked in the `createAccount` by `onlySystemCall` modifier.
function create(
bytes32 _salt,
bytes32 _bytecodeHash,
bytes calldata _input
) external payable override returns (address) {
// ...
}
```
Under the hood, the bootloader informs the
[KnownCodesStorage](/how-abstract-works/system-contracts/list-of-system-contracts#knowncodesstorage) system contract
about the contract code hash.
This is required for all contract deployments on Abstract.
The `KnownCodesStorage` then calls the
[Compressor](/how-abstract-works/system-contracts/list-of-system-contracts#compressor), which subsequently calls the
[L1Messenger](/how-abstract-works/system-contracts/list-of-system-contracts#l1messenger)
system contract to publish the hash of the compressed contract bytecode to
Ethereum (assuming this contract code has not been deployed before).
Once the bootloader finishes calling the other system contracts to ensure the contract code hash is known,
and the contract code is published to Ethereum,
it continues executing the transaction as described in the
[transaction flow](/how-abstract-works/native-account-abstraction/transaction-flow) section.
This flow includes invoking the contract deployer account’s `validateTransaction` and `executeTransaction` functions; which
will determine whether to deploy the contract and how to execute the deployment transaction respectively.
Learn more about these functions on the [smart contract wallets](/how-abstract-works/native-account-abstraction/smart-contract-wallets) section, or
view an example implementation in the [DefaultAccount](/how-abstract-works/system-contracts/list-of-system-contracts#defaultaccount).
# EVM Interpreter
Source: https://docs.abs.xyz/how-abstract-works/evm-differences/evm-interpreter
Learn how to deploy EVM equivalent smart contracts on Abstract.
Abstract natively uses the [ZKsync VM](https://docs.zksync.io/zksync-protocol/vm) to execute smart contract instructions,
however an **EVM bytecode interpreter** system is also available to enable the deployment of unmodified EVM bytecode,
commonly referred to as "EVM equivalent" smart contracts.
This enables smart contracts that rely on EVM logic (such as consistent address derivation)
to be deployed on Abstract without modification. However, this approach is not recommended for most use cases
due to comparatively higher gas fees.
## How It Works
There are two ways to deploy smart contracts on Abstract:
* **ZKsync VM Bytecode**: Compile contracts into ZK-EVM bytecode using ZK specific tooling and deploy to Abstract. These contracts are executed natively by Abstract’s ZKsync VM.
* Recommended for most use cases.
* **EVM Bytecode**: Compile contracts into EVM bytecode using existing EVM tooling and deploy to Abstract.
* Contracts deployed this way are flagged as EVM bytecode and are executed via the EVM interpreter. During execution, the contract’s EVM opcodes are translated into the ZKsync VM's instruction set and executed by the ZKsync VM.
* Gas fees are 150-400% higher than contracts deployed using native ZKsync VM bytecode due to the translation process.
* Recommended only for use cases that require specific EVM features not supported by the ZKsync VM (see [EVM differences](/how-abstract-works/evm-differences/overview)).
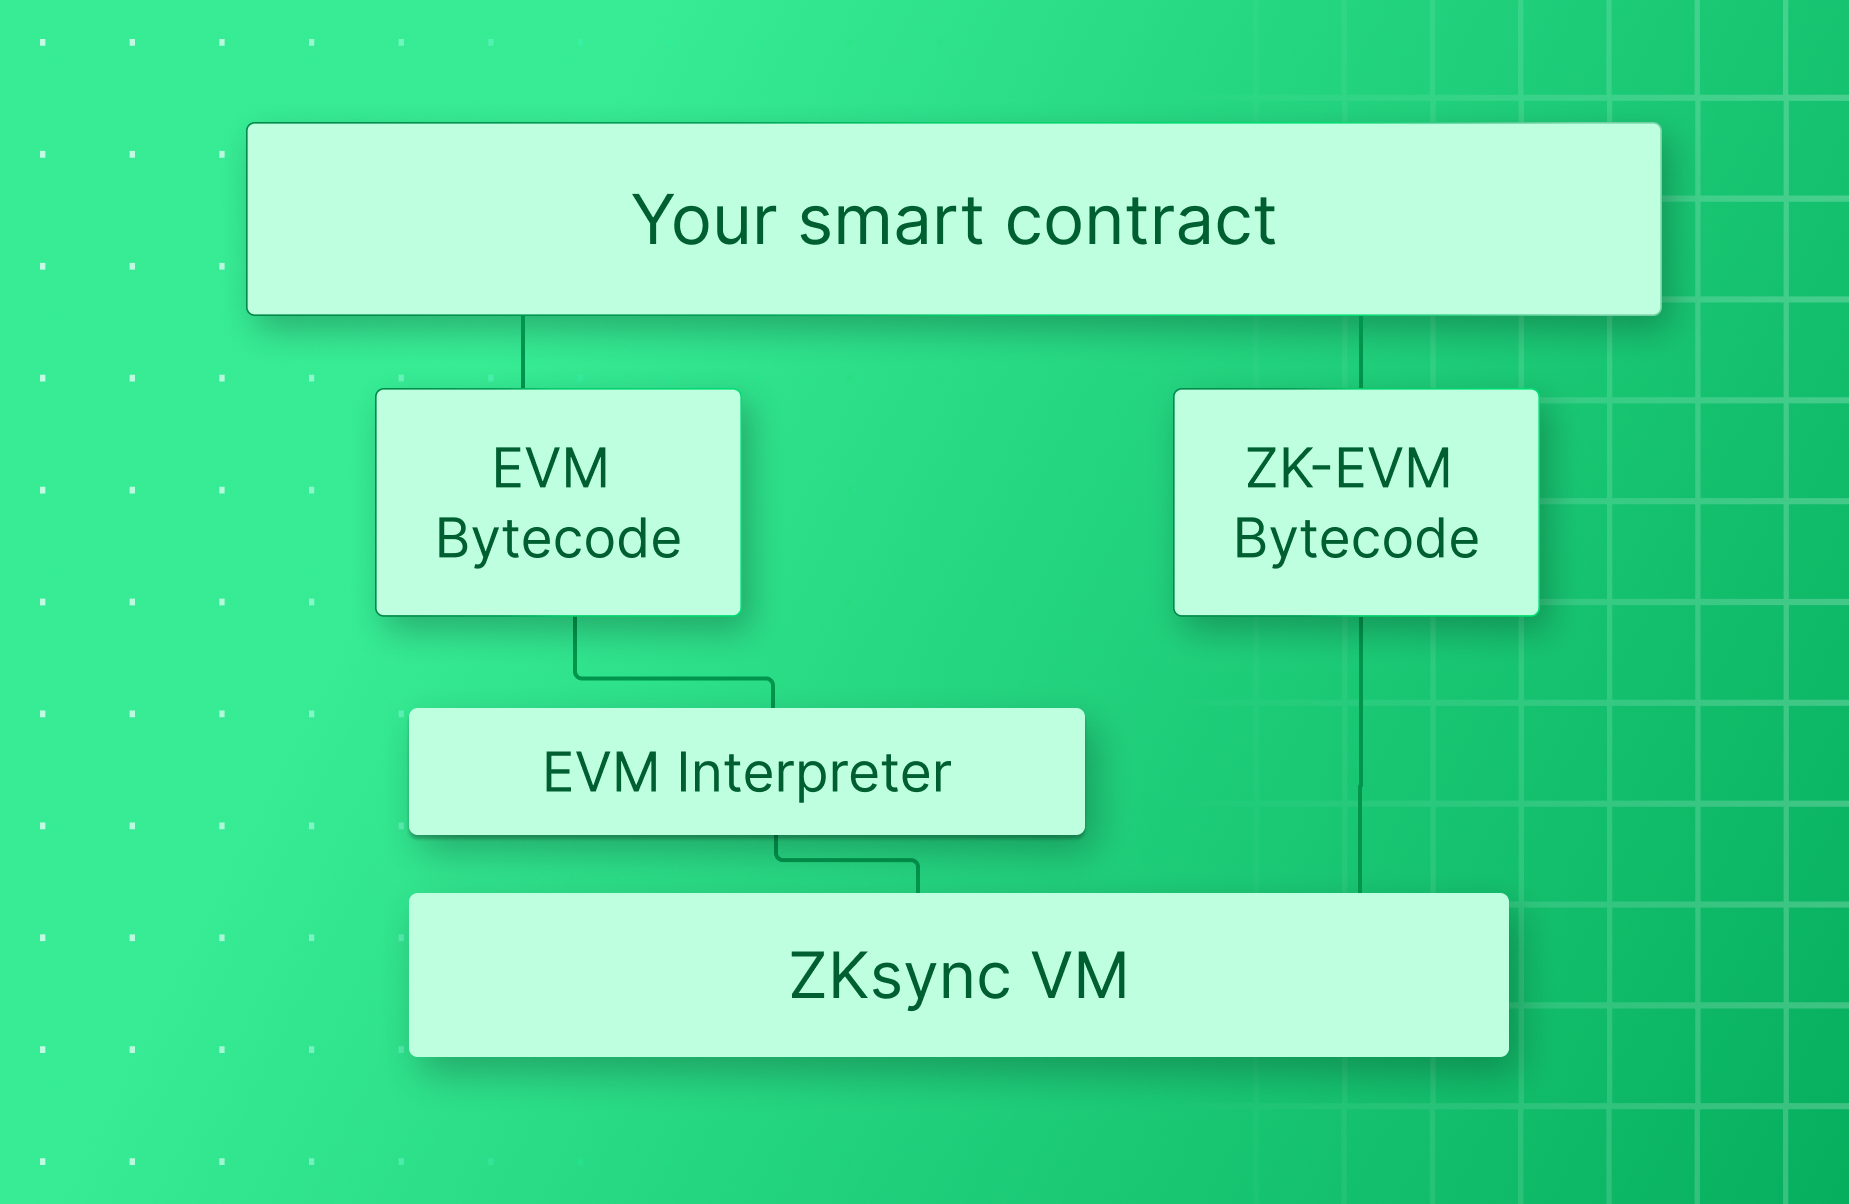
### Opcode Translation & Gas Fees
The EVM interpreter functions as a translation layer that converts
EVM opcodes into ZKsync VM operations at runtime as part of the smart contract execution process.
As a consequence of this translation process, contracts deployed with EVM bytecode experience **increased gas fees of between 150-400%**
compared to contracts deployed using the native ZKsync VM bytecode.
### Execution Flow
The code hash of smart contracts are stored in the [AccountCodeStorage](https://docs.abs.xyz/how-abstract-works/system-contracts/list-of-system-contracts#accountcodestorage)
system contract, and upon deployment, are pre-fixed with either:
* `0x01`: Flag for Native ZKsync VM bytecode.
* `0x02`: Flag for EVM bytecode (i.e. EVM equivalent smart contracts).
When a contract function is called, the following steps occur:
To determine the type of bytecode that this contract was deployed with,
first, a check is made to see if it is prefixed with `0x01` or `0x02`.
If the contract is native ZKsync VM bytecode (prefix `0x01`), this step is skipped.
Otherwise, the EVM interpreter interprets and executes opcodes in a loop; translating EVM opcodes into ZKsync VM instructions;
execution continues until completion, error, or out-of-ergs condition.
### Limitations
* `DELEGATECALL` between EVM and native ZKsync VM contracts will be reverted.
* Calls to empty addresses in kernel space (address \< 2^16) will fail.
* `GASLIMIT` opcode returns the same fixed constant as ZKsync VM and should not be used.
The following opcodes are not supported due to underlying limitations of ZKsync VM:
* `CALLCODE`
* `SELFDESTRUCT`
* `BLOBHASH`
* `BLOBBASEFEE`
# EVM Opcodes
Source: https://docs.abs.xyz/how-abstract-works/evm-differences/evm-opcodes
Learn how Abstract differs from Ethereum's EVM opcodes.
This page outlines what opcodes differ in behavior between Abstract and Ethereum.
It is a fork of the [ZKsync EVM Instructions](https://docs.zksync.io/build/developer-reference/ethereum-differences/evm-instructions) page.
## `CREATE` & `CREATE2`
Deploying smart contracts on Abstract is different than
Ethereum (see [contract deployment](/how-abstract-works/evm-differences/contract-deployment)).
To guarantee that `create` & `create2` functions operate correctly,
the compiler must be aware of the bytecode of the deployed contract in advance.
```solidity
// Works as expected ✅
MyContract a = new MyContract();
MyContract a = new MyContract{salt: ...}();
// Works as expected ✅
bytes memory bytecode = type(MyContract).creationCode;
assembly {
addr := create2(0, add(bytecode, 32), mload(bytecode), salt)
}
// Will not work because the compiler is not aware of the bytecode beforehand ❌
function myFactory(bytes memory bytecode) public {
assembly {
addr := create(0, add(bytecode, 0x20), mload(bytecode))
}
}
```
For this reason:
* We strongly recommend including tests for any factory that deploys contracts using `type(T).creationCode`.
* Using `type(T).runtimeCode` will always produce a compile-time error.
### Address Derivation
The addresses of smart contracts deployed using `create` and `create2` will be different on Abstract
than Ethereum as they use different bytecode. This means the same bytecode deployed on Ethereum
will have a different contract address on Abstract.
```typescript
export function create2Address(sender: Address, bytecodeHash: BytesLike, salt: BytesLike, input: BytesLike) {
const prefix = ethers.utils.keccak256(ethers.utils.toUtf8Bytes("zksyncCreate2"));
const inputHash = ethers.utils.keccak256(input);
const addressBytes = ethers.utils.keccak256(ethers.utils.concat([prefix, ethers.utils.zeroPad(sender, 32), salt, bytecodeHash, inputHash])).slice(26);
return ethers.utils.getAddress(addressBytes);
}
export function createAddress(sender: Address, senderNonce: BigNumberish) {
const prefix = ethers.utils.keccak256(ethers.utils.toUtf8Bytes("zksyncCreate"));
const addressBytes = ethers.utils
.keccak256(ethers.utils.concat([prefix, ethers.utils.zeroPad(sender, 32), ethers.utils.zeroPad(ethers.utils.hexlify(senderNonce), 32)]))
.slice(26);
return ethers.utils.getAddress(addressBytes);
}
```
## `CALL`, `STATICCALL`, `DELEGATECALL`
For calls, you specify a memory slice to write the return data to, e.g. `out` and `outsize` arguments for
`call(g, a, v, in, insize, out, outsize)`. In EVM, if `outsize != 0`, the allocated memory will grow to `out + outsize`
(rounded up to the words) regardless of the `returndatasize`. On Abstract, `returndatacopy`, similar to `calldatacopy`,
is implemented as a cycle iterating over return data with a few additional checks and triggering a panic if
`out + outsize > returndatasize` to simulate the same behavior as in EVM.
Thus, unlike EVM where memory growth occurs before the call itself, on Abstract, the necessary copying of return data
happens only after the call has ended, leading to a difference in `msize()` and sometimes Abstract not panicking where
EVM would panic due to the difference in memory growth.
```solidity
success := call(gas(), target, 0, in, insize, out, outsize) // grows to 'min(returndatasize(), out + outsize)'
```
```solidity
success := call(gas(), target, 0, in, insize, out, 0) // memory untouched
returndatacopy(out, 0, returndatasize()) // grows to 'out + returndatasize()'
```
Additionally, there is no native support for passing Ether on Abstract, so it is handled by a special system contract
called `MsgValueSimulator`. The simulator receives the callee address and Ether amount, performs all necessary balance
changes, and then calls the callee.
## `MSTORE`, `MLOAD`
Unlike EVM, where the memory growth is in words, on zkEVM the memory growth is counted in bytes. For example, if you write
`mstore(100, 0)` the `msize` on zkEVM will be `132`, but on the EVM it will be `160`. Note, that also unlike EVM which
has quadratic growth for memory payments, on zkEVM the fees are charged linearly at a rate of `1` erg per byte.
The other thing is that our compiler can sometimes optimize unused memory reads/writes. This can lead to different `msize`
compared to Ethereum since fewer bytes have been allocated, leading to cases where EVM panics, but zkEVM will not due to
the difference in memory growth.
## `CALLDATALOAD`, `CALLDATACOPY`
If the `offset` for `calldataload(offset)` is greater than `2^32-33` then execution will panic.
Internally on zkEVM, `calldatacopy(to, offset, len)` there is just a loop with the `calldataload` and `mstore` on each iteration.
That means that the code will panic if `2^32-32 + offset % 32 < offset + len`.
## `RETURN`, `STOP`
Constructors return the array of immutable values. If you use `RETURN` or `STOP` in an
assembly block in the constructor on Abstract,
it will leave the immutable variables uninitialized.
```solidity
contract Example {
uint immutable x;
constructor() {
x = 45;
assembly {
// The statements below are overridden by the zkEVM compiler to return
// the array of immutables.
// The statement below leaves the variable x uninitialized.
// return(0, 32)
// The statement below leaves the variable x uninitialized.
// stop()
}
}
function getData() external pure returns (string memory) {
assembly {
return(0, 32) // works as expected
}
}
}
```
## `TIMESTAMP`, `NUMBER`
For more information about blocks on Abstract, including the differences between `block.timestamp` and `block.number`,
check out the [blocks on ZKsync Documentation](https://docs.zksync.io/zk-stack).
## `COINBASE`
Returns the address of the `Bootloader` contract, which is `0x8001` on Abstract.
## `DIFFICULTY`, `PREVRANDAO`
Returns a constant value of `2500000000000000` on Abstract.
## `BASEFEE`
This is not a constant on Abstract and is instead defined by the fee model. Most
of the time it is 0.25 gwei, but under very high L1 gas prices it may rise.
## `SELFDESTRUCT`
Considered harmful and deprecated in [EIP-6049](https://eips.ethereum.org/EIPS/eip-6049).
Always produces a compile-time error with the zkEVM compiler.
## `CALLCODE`
Deprecated in [EIP-2488](https://eips.ethereum.org/EIPS/eip-2488) in favor of `DELEGATECALL`.
Always produces a compile-time error with the zkEVM compiler.
## `PC`
Inaccessible in Yul and Solidity `>=0.7.0`, but accessible in Solidity `0.6`.
Always produces a compile-time error with the zkEVM compiler.
## `CODESIZE`
| Deploy code | Runtime code |
| --------------------------------- | ------------- |
| Size of the constructor arguments | Contract size |
Yul uses a special instruction `datasize` to distinguish the contract code and constructor arguments, so we
substitute `datasize` with 0 and `codesize` with `calldatasize` in Abstract deployment code. This way when Yul calculates the
calldata size as `sub(codesize, datasize)`, the result is the size of the constructor arguments.
```solidity
contract Example {
uint256 public deployTimeCodeSize;
uint256 public runTimeCodeSize;
constructor() {
assembly {
deployTimeCodeSize := codesize() // return the size of the constructor arguments
}
}
function getRunTimeCodeSize() external {
assembly {
runTimeCodeSize := codesize() // works as expected
}
}
}
```
## `CODECOPY`
| Deploy code | Runtime code (old EVM codegen) | Runtime code (new Yul codegen) |
| -------------------------------- | ------------------------------ | ------------------------------ |
| Copies the constructor arguments | Zeroes memory out | Compile-time error |
```solidity
contract Example {
constructor() {
assembly {
codecopy(0, 0, 32) // behaves as CALLDATACOPY
}
}
function getRunTimeCodeSegment() external {
assembly {
// Behaves as 'memzero' if the compiler is run with the old (EVM assembly) codegen,
// since it is how solc performs this operation there. On the new (Yul) codegen
// `CALLDATACOPY(dest, calldatasize(), 32)` would be generated by solc instead, and
// `CODECOPY` is safe to prohibit in runtime code.
// Produces a compile-time error on the new codegen, as it is not required anywhere else,
// so it is safe to assume that the user wants to read the contract bytecode which is not
// available on zkEVM.
codecopy(0, 0, 32)
}
}
}
```
## `EXTCODECOPY`
Contract bytecode cannot be accessed on zkEVM architecture. Only its size is accessible with both `CODESIZE` and `EXTCODESIZE`.
`EXTCODECOPY` always produces a compile-time error with the zkEVM compiler.
## `DATASIZE`, `DATAOFFSET`, `DATACOPY`
Contract deployment is handled by two parts of the zkEVM protocol: the compiler front end and the system contract called `ContractDeployer`.
On the compiler front-end the code of the deployed contract is substituted with its hash. The hash is returned by the `dataoffset`
Yul instruction or the `PUSH [$]` EVM legacy assembly instruction. The hash is then passed to the `datacopy` Yul instruction or
the `CODECOPY` EVM legacy instruction, which writes the hash to the correct position of the calldata of the call to `ContractDeployer`.
The deployer calldata consists of several elements:
| Element | Offset | Size |
| --------------------------- | ------ | ---- |
| Deployer method signature | 0 | 4 |
| Salt | 4 | 32 |
| Contract hash | 36 | 32 |
| Constructor calldata offset | 68 | 32 |
| Constructor calldata length | 100 | 32 |
| Constructor calldata | 132 | N |
The data can be logically split into header (first 132 bytes) and constructor calldata (the rest).
The header replaces the contract code in the EVM pipeline, whereas the constructor calldata remains unchanged.
For this reason, `datasize` and `PUSH [$]` return the header size (132), and the space for constructor arguments is allocated by **solc** on top of it.
Finally, the `CREATE` or `CREATE2` instructions pass 132+N bytes to the `ContractDeployer` contract, which makes all
the necessary changes to the state and returns the contract address or zero if there has been an error.
If some Ether is passed, the call to the `ContractDeployer` also goes through the `MsgValueSimulator` just like ordinary calls.
We do not recommend using `CREATE` for anything other than creating contracts with the `new` operator. However, a lot of contracts create contracts
in assembly blocks instead, so authors must ensure that the behavior is compatible with the logic described above.
```solidity
let _1 := 128 // the deployer calldata offset
let _2 := datasize("Callable_50") // returns the header size (132)
let _3 := add(_1, _2) // the constructor arguments begin offset
let _4 := add(_3, args_size) // the constructor arguments end offset
datacopy(_1, dataoffset("Callable_50"), _2) // dataoffset returns the contract hash, which is written according to the offset in the 1st argument
let address_or_zero := create(0, _1, sub(_4, _1)) // the header and constructor arguments are passed to the ContractDeployer system contract
```
```solidity
010 PUSH #[$] tests/solidity/complex/create/create/callable.sol:Callable // returns the header size (132), equivalent to Yul's datasize
011 DUP1
012 PUSH [$] tests/solidity/complex/create/create/callable.sol:Callable // returns the contract hash, equivalent to Yul's dataoffset
013 DUP4
014 CODECOPY // CODECOPY statically detects the special arguments above and behaves like the Yul's datacopy
...
146 CREATE // accepts the same data as in the Yul example above
```
## `SETIMMUTABLE`, `LOADIMMUTABLE`
zkEVM does not provide any access to the contract bytecode, so the behavior of immutable values is simulated with the system contracts.
1. The deploy code, also known as the constructor, assembles the array of immutables in the auxiliary heap. Each array element
consists of an index and a value. Indexes are allocated sequentially by `zksolc` for each string literal identifier allocated by `solc`.
2. The constructor returns the array as the return data to the contract deployer.
3. The array is passed to a special system contract called `ImmutableSimulator`, where it is stored in a mapping with
the contract address as the key.
4. In order to access immutables from the runtime code, contracts call the `ImmutableSimulator` to fetch a value using
the address and value index. In the deploy code, immutable values are read from the auxiliary heap, where they are still available.
The element of the array of immutable values:
```solidity
struct Immutable {
uint256 index;
uint256 value;
}
```
Yul example:
```solidity
mstore(128, 1) // write the 1st value to the heap
mstore(160, 2) // write the 2nd value to the heap
let _2 := mload(64)
let _3 := datasize("X_21_deployed") // returns 0 in the deploy code
codecopy(_2, dataoffset("X_21_deployed"), _3) // no effect, because the length is 0
// the 1st argument is ignored
setimmutable(_2, "3", mload(128)) // write the 1st value to the auxiliary heap array at index 0
setimmutable(_2, "5", mload(160)) // write the 2nd value to the auxiliary heap array at index 32
return(_2, _3) // returns the auxiliary heap array instead
```
```solidity
053 PUSH #[$] // returns 0 in the deploy code
054 PUSH [$]
055 PUSH 0
056 CODECOPY // no effect, because the length is 0
057 ASSIGNIMMUTABLE 5 // write the 1st value to the auxiliary heap array at index 0
058 ASSIGNIMMUTABLE 3 // write the 2nd value to the auxiliary heap array at index 32
059 PUSH #[$]
060 PUSH 0
061 RETURN // returns the auxiliary heap array instead
```
# Gas Fees
Source: https://docs.abs.xyz/how-abstract-works/evm-differences/gas-fees
Learn how Abstract differs from Ethereum's EVM opcodes.
Abstract’s gas fees depend on the fluctuating
[gas prices](https://ethereum.org/en/developers/docs/gas/) on Ethereum. As mentioned in
the [transaction lifecycle](/how-abstract-works/architecture/transaction-lifecycle)
section, Abstract posts state diffs *(as well as compressed contract bytecode)* to Ethereum
in the form of [blobs](https://www.eip4844.com/).
In addition to the cost of posting blobs, there are costs associated with generating
ZK proofs for batches and committing & verifying these proofs on Ethereum.
To fairly distribute
these costs among L2 transactions, gas fees on Abstract are charged proportionally
to how close a transaction brought a batch to being **sealed** (i.e. full).
## Components
Fees on Abstract therefore consist of both **off-chain** and **onchain** components:
1. **Offchain Fee**:
* Fixed cost (approximately \$0.001 per transaction).
* Covers L2 state storage and zero-knowledge [proof generation](/how-abstract-works/architecture/components/prover-and-verifier#proof-generation).
* Independent of transaction complexity.
2. **Onchain Fee**:
* Variable cost (influenced by Ethereum gas prices).
* Covers [proof verification](/how-abstract-works/architecture/components/prover-and-verifier#proof-verification) and [publishing state](/how-abstract-works/architecture/transaction-lifecycle) on Ethereum.
## Differences from Ethereum
| Aspect | Ethereum | Abstract |
| ----------------------- | ---------------------------------------------------------- | ---------------------------------------------------------------------------------------- |
| **Fee Composition** | Entirely onchain, consisting of base fee and priority fee. | Split between offchain (fixed) and onchain (variable) components. |
| **Pricing Model** | Dynamic, congestion-based model for base fee. | Fixed offchain component with a variable onchain part influenced by Ethereum gas prices. |
| **Data Efficiency** | Publishes full transaction data. | Publishes only state deltas, significantly reducing onchain data and costs. |
| **Resource Allocation** | Each transaction independently consumes gas. | Transactions share batch overhead, potentially leading to cost optimizations. |
| **Opcode Pricing** | Each opcode has a specific gas cost. | Most opcodes have similar gas costs, simplifying estimation. |
| **Refund Handling** | Limited refund capabilities. | Smarter refund system for unused resources and overpayments. |
## Gas Refunds
You may notice that a portion of gas fees are **refunded** for transactions on Abstract. This
is because accounts don’t have access to the `block.baseFee` context variable;
and have no way to know the exact fee to pay for a transaction.
Instead, the following steps occur to refund accounts for any excess funds spent on a transaction:
Upfront, the block’s processing overhead cost is deducted.
The gas price for the transaction is then calculated according to the
[EIP-1559](https://github.com/ethereum/EIPs/blob/master/EIPS/eip-1559.md)
rules.
The **maximum** amount of gas (gas limit) for the transaction is deducted from
the account by having the account typically send `tx.maxFeePerGas *
tx.gasLimit`. The transaction is then executed (see [transaction
flow](/how-abstract-works/native-account-abstraction/transaction-flow)).
Since the account may have overpaid for the transaction (as they are sending the maximum fee possible), the bootloader
**refunds** the account any excess funds that were not spent on the transaction.
## Transaction Gas Fields
When creating a transaction on Abstract, you can set the `gas_per_pubdata_limit` value
to configure the maximum gas price that can be charged per byte of pubdata (data posted to Ethereum in the form of blobs).
The default value for this parameter is `50000`.
## Calculate Gas Fees
1. **Base Fee Determination**: When a batch opens, Abstract calculates the FAIR\_GAS\_PER\_PUBDATA\_BYTE (EPf):
```
EPf = ⌈(Ef) / (L1_P * L1_PUB)⌉
```
* Ef is the "fair" gas price in ETH
* L1\_P is the price for L1 gas in ETH
* L1\_PUB is the number of L1 gas needed for a single pubdata byte
2. **Overhead Calculation**: For each transaction, Abstract calculates several types of overhead:
The total overhead is the maximum of these:
* Slot overhead (SO)
* Memory overhead (MO)
* Execution overhead (EAO)
* `O(tx) = max(SO, MO(tx), EAO(tx))`
3. **Gas Limit Estimation**: When estimating a transaction, the server returns:
```
tx.gasLimit = tx.actualGasLimit + overhead_gas(tx)
```
4. **Actual Fee Calculation**: The actual fee a user pays is:
```
ActualFee = gasSpent * gasPrice
```
5. **Fair Fee Calculation**: Abstract calculates a "fair fee":
```
FairFee = Ef * tx.computationalGas + EPf * pubdataUsed
```
6. **Refund Calculation**: If the actual fee exceeds the fair fee, a refund is issued:
```
Refund = (ActualFee - FairFee) / Base
```
# Libraries
Source: https://docs.abs.xyz/how-abstract-works/evm-differences/libraries
Learn the differences between Abstract and Ethereum libraries.
The addresses of deployed libraries must be set in the project configuration.
These addresses then replace their placeholders in
IRs: `linkersymbol` in Yul and `PUSHLIB` in EVM legacy assembly.
A library may only be used without deployment if it has been inlined by the optimizer.
View the ZK Stack docs to learn how to compile non-inlinable libraries.
# Nonces
Source: https://docs.abs.xyz/how-abstract-works/evm-differences/nonces
Learn how Abstract differs from Ethereum's nonces.
Unlike Ethereum, where each account has a single nonce that increments every transaction,
accounts on Abstract maintain two different nonces:
1. **Transaction nonce**: Used for transaction validation.
2. **Deployment nonce**: Incremented when a contract is deployed.
In addition, nonces are not restricted to increment once per transaction
like on Ethereum due to Abstract’s [native account abstraction](/how-abstract-works/native-account-abstraction/overview).
Learn how to build smart contract wallets that interact with the NonceHolder
system contract.
There are also other minor differences between Abstract and Ethereum nonce management:
* Newly created contracts begin with a deployment nonce value of `0` (as opposed to `1`).
* The deployment nonce is only incremented if the deployment succeeds
(as opposed to Ethereum, where the nonce is incremented regardless of the deployment outcome).
# EVM Differences
Source: https://docs.abs.xyz/how-abstract-works/evm-differences/overview
Learn the differences between Abstract and Ethereum.
While Abstract is EVM compatible and you can use familiar development
tools from the Ethereum ecosystem, the bytecode that Abstract’s VM
(the [ZKsync VM](https://docs.zksync.io/build/developer-reference/era-vm)) understands
is different than what Ethereum’s [EVM](https://ethereum.org/en/developers/docs/evm/) understands.
These differences exist to both optimize the VM to perform efficiently with ZK proofs
and to provide more powerful ways for developers to build consumer-facing applications.
When building smart contracts on Abstract, it’s helpful to understand what the differences
are between Abstract and Ethereum, and how best to leverage these differences to
create the best experience for your users.
## Recommended Best Practices
Learn more about best practices for building and deploying smart contracts on Abstract.
Recommended changes to make to your smart contracts when deploying on
Abstract.
See how contract deployment differs on Abstract compared to Ethereum.
## Differences in EVM Instructions
See how Abstract’s VM differs from the EVM’s opcodes and precompiled contracts.
See what opcodes are supported natively or supplemented with system
contracts.
See what precompiled smart contracts are supported by Abstract.
## Other Differences
Learn the nuances of other differences between Abstract and Ethereum.
Learn how gas fees and gas refunds work with the bootloader on Abstract.
Explore how nonces are stored on Abstract’s smart contract accounts.
Learn how the compiler handles libraries on Abstract.
# Precompiles
Source: https://docs.abs.xyz/how-abstract-works/evm-differences/precompiles
Learn how Abstract differs from Ethereum's precompiled smart contracts.
On Ethereum, [precompiled smart contracts](https://www.evm.codes/)
are contracts embedded into the EVM at predetermined addresses
that typically perform computationally expensive operations
that are not already included in EVM opcodes.
Abstract has support for these EVM precompiles and more, however some
have different behavior than on Ethereum.
## CodeOracle
Emulates EVM’s [extcodecopy](https://www.evm.codes/#3c?fork=cancun) opcode.
View the source code for the CodeOracle precompile on GitHub.
## SHA256
Emulates the EVM’s [sha256](https://www.evm.codes/precompiled#0x02?fork=cancun) precompile.
View the source code for the SHA256 precompile on GitHub.
## KECCAK256
Emulates the EVM’s [keccak256](https://www.evm.codes/#20?fork=cancun) opcode.
View the source code for the KECCAK256 precompile on GitHub.
## Elliptic Curve Precompiles
Precompiled smart contracts for elliptic curve operations are required to perform zkSNARK verification.
### EcAdd
Precompile for computing elliptic curve point addition.
The points are represented in affine form, given by a pair of coordinates (x,y).
Emulates the EVM’s [ecadd](https://www.evm.codes/precompiled#0x06?fork=cancun) precompile.
View the source code for the EcAdd precompile on GitHub.
### EcMul
Precompile for computing elliptic curve point scalar multiplication.
The points are represented in homogeneous projective coordinates, given by the coordinates (x,y,z).
Emulates the EVM’s [ecmul](https://www.evm.codes/precompiled#0x07?fork=cancun) precompile.
View the source code for the EcMul precompile on GitHub.
### EcPairing
Precompile for computing bilinear pairings on elliptic curve groups.
Emulates the EVM’s [ecpairing](https://www.evm.codes/precompiled#0x08?fork=cancun) precompile.
View the source code for the EcPairing precompile on GitHub.
### Ecrecover
Emulates the EVM’s [ecrecover](https://www.evm.codes/precompiled#0x01?fork=cancun) precompile.
View the source code for the Ecrecover precompile on GitHub.
### P256Verify (secp256r1 / RIP-7212)
The contract that emulates [RIP-7212’s](https://github.com/ethereum/RIPs/blob/master/RIPS/rip-7212.md) P256VERIFY precompile.
This adds a precompiled contract which is similar to [ecrecover](#ecrecover)
to provide signature verifications using the “secp256r1” elliptic curve.
View the source code for the P256Verify precompile on GitHub.
# Handling Nonces
Source: https://docs.abs.xyz/how-abstract-works/native-account-abstraction/handling-nonces
Learn the best practices for handling nonces when building smart contract accounts on Abstract.
As outlined in the [transaction flow](/how-abstract-works/native-account-abstraction/transaction-flow), a call to `validateNonceUsage`
is made to the [NonceHolder](/how-abstract-works/system-contracts/list-of-system-contracts#nonceholder) system contract
before each transaction starts, in order to check whether the provided nonce
of a transaction has already been used or not.
The bootloader enforces that the nonce:
1. Has not already been used before transaction validation begins.
2. The nonce *is* used (typically incremented) during transaction validation.
## Considering nonces in your smart contract account
{/* If you submit a nonce that is greater than the next expected nonce, the transaction will not be executed until each preceding nonce has been used. */}
As mentioned above, you must "use" the nonce in the validation step.
To mark a nonce as used there are two options:
1. Increment the `minNonce`: All nonces less than `minNonce` will become used.
2. Set a non-zero value under the nonce via `setValueUnderNonce`.
A convenience method, `incrementMinNonceIfEquals` is exposed
from the `NonceHolder` system contract. For example, inside of your [smart contract wallet](/how-abstract-works/native-account-abstraction/smart-contract-wallets),
you can use it to increment the `minNonce` of your account.
In order to use the [NonceHolder](/how-abstract-works/system-contracts/list-of-system-contracts#nonceholder) system contract,
the `isSystem` flag must be set to `true` in the transaction, which can be done by using the `SystemContractsCaller` library shown below.
[Learn more about using system contracts](/how-abstract-works/system-contracts/using-system-contracts#the-issystem-flag).
```solidity
// Required imports
import "@matterlabs/zksync-contracts/l2/system-contracts/interfaces/IAccount.sol";
import {SystemContractsCaller} from "@matterlabs/zksync-contracts/l2/system-contracts/libraries/SystemContractsCaller.sol";
import {NONCE_HOLDER_SYSTEM_CONTRACT, INonceHolder} from "@matterlabs/zksync-contracts/l2/system-contracts/Constants.sol";
import {TransactionHelper} from "@matterlabs/zksync-contracts/l2/system-contracts/libraries/TransactionHelper.sol";
function validateTransaction(
bytes32,
bytes32,
Transaction calldata _transaction
) external payable onlyBootloader returns (bytes4 magic) {
// Increment nonce during validation
SystemContractsCaller.systemCallWithPropagatedRevert(
uint32(gasleft()),
address(NONCE_HOLDER_SYSTEM_CONTRACT),
0,
abi.encodeCall(
INonceHolder.incrementMinNonceIfEquals,
(_transaction.nonce)
)
);
// ... rest of validation logic here
}
```
# Native Account Abstraction
Source: https://docs.abs.xyz/how-abstract-works/native-account-abstraction/overview
Learn how native account abstraction works on Abstract.
## What Are Accounts?
On Ethereum, there are two types of [accounts](https://ethereum.org/en/developers/docs/accounts/):
1. **Externally Owned Accounts (EOAs)**: Controlled by private keys that can sign transactions.
2. **Smart Contract Accounts**: Controlled by the code of a [smart contract](https://ethereum.org/en/developers/docs/smart-contracts/).
By default, Ethereum expects transactions to be signed by the private key of an **EOA**, and expects
the EOA to pay the [gas fees](https://ethereum.org/en/developers/docs/gas/) of their own transactions,
whereas **smart contracts** cannot initiate transactions; they can only be called by EOAs.
This approach has proven to be restrictive as it is an all-or-nothing approach
to account security where the private key holder has full control over the account.
For this reason, Ethereum introduced the concept of [account abstraction](#what-is-account-abstraction),
by adding a second, separate system to run in parallel to the existing protocol to handle smart contract transactions.
## What is Account Abstraction?
Account abstraction allows smart contracts to initiate transactions (instead of just EOAs).
This adds support for **smart contract wallets** that unlock many benefits for users, such as:
* Recovery mechanisms if the private key is lost.
* Spending limits, session keys, and other security features.
* Flexibility in gas payment options, such as gas sponsorship.
* Transaction batching for better UX such as when using ERC-20 tokens.
* Alternative signature validation methods & support for different [ECC](https://en.wikipedia.org/wiki/Elliptic-curve_cryptography) algorithms.
These features are essential to provide a consumer-friendly experience for users interacting on-chain.
However, since account abstraction was an afterthought on Ethereum, support for smart contract wallets is second-class,
requiring additional complexity for developers to implement into their applications.
In addition, users often aren’t able to bring their smart contract wallets
cross-application due to the lack of support for connecting smart contract wallets.
For these reasons, Abstract implements [native account abstraction](#what-is-native-account-abstraction)
in the protocol, providing first-class support for smart contract wallets.
## What is Native Account Abstraction?
Native account abstraction means **all accounts on Abstract are smart contract accounts** and all
transactions go through the same [transaction lifecycle](/how-abstract-works/architecture/transaction-lifecycle),
i.e. there is no parallel system like Ethereum implements.
Native account abstraction means:
* All accounts implement an [IAccount](/how-abstract-works/native-account-abstraction/smart-contract-wallets#iaccount-interface)
standard interface that defines the methods that each smart contract account must implement (at a minimum).
* Users can still use EOA wallets such as [MetaMask](https://metamask.io/), however, these accounts are "converted" to the
[DefaultAccount](/how-abstract-works/native-account-abstraction/smart-contract-wallets#defaultaccount-contract),
(which implements `IAccount`) during the transaction lifecycle.
* All accounts have native support for [paymasters](/how-abstract-works/native-account-abstraction/paymasters),
meaning any account can sponsor the gas fees of another account’s transaction, or pay gas fees in another ERC-20 token instead of ETH.
Native account abstraction makes building and supporting both smart contract wallets & paymasters much easier,
as the protocol understands these concepts natively. Every account (including EOAs)
is a smart contract wallet that follows the same standard interface and transaction lifecycle.
## Start building with Native Account Abstraction
View our [example repositories](https://github.com/Abstract-Foundation/examples)
on GitHub to see how to build smart contract wallets and paymasters on Abstract.
Build your own smart contract wallet that can initiate transactions.
Create a paymaster contract that can sponsor the gas fees of other accounts.
# Paymasters
Source: https://docs.abs.xyz/how-abstract-works/native-account-abstraction/paymasters
Learn how paymasters are built following the IPaymaster standard on Abstract.
Paymasters are smart contracts that pay for the gas fees of transactions on behalf of other accounts.
All paymasters must implement the
[IPaymaster](#ipaymaster-interface) interface. As outlined in the [transaction flow](/how-abstract-works/native-account-abstraction/transaction-flow),
after the [smart contract wallet](/how-abstract-works/native-account-abstraction/smart-contract-wallets) validates and executes the transaction,
it can optionally call `prepareForPaymaster` to delegate the payment of the gas fees to a paymaster set in the transaction,
at which point the paymaster will [validate and pay for the transaction](#validateandpayforpaymastertransaction).
## Get Started with Paymasters
Use our [example repositories](https://github.com/Abstract-Foundation/examples)
to quickly get started building paymasters.
Use our example repository to quickly get started building paymasters on
Abstract.
Or follow our [video tutorial](https://www.youtube.com/watch?v=oolgV2M8ZUI) for a step-by-step guide to building a smart contract wallet.
## IPaymaster Interface
The `IPaymaster` interface defines the mandatory functions that a paymaster must implement to be
compatible with Abstract. [View source code ↗](https://github.com/matter-labs/era-contracts/blob/main/system-contracts/contracts/interfaces/IPaymaster.sol).
First, install the [system contracts library](/how-abstract-works/system-contracts/using-system-contracts#installing-system-contracts):
```bash Hardhat
npm install @matterlabs/zksync-contracts
```
```bash Foundry
forge install matter-labs/era-contracts
```
Then, import and implement the `IPaymaster` interface in your smart contract:
```solidity
import {IPaymaster} from "@matterlabs/zksync-contracts/l2/system-contracts/interfaces/IPaymaster.sol";
contract MyPaymaster is IPaymaster {
// Implement the interface (see docs below)
// validateAndPayForPaymasterTransaction
// postTransaction
}
```
### validateAndPayForPaymasterTransaction
This function is called to perform 2 actions:
1. Validate (determine whether or not to sponsor the gas fees for) the transaction.
2. Pay the gas fee to the bootloader for the transaction. This method must send at least `tx.gasprice * tx.gasLimit`
to the bootloader. [Learn more about gas fees and gas refunds](/how-abstract-works/evm-differences/gas-fees).
To validate (i.e. agree to sponsor the gas fee for) a transaction, this function should
return `magic = PAYMASTER_VALIDATION_SUCCESS_MAGIC`.
Optionally, you can also provide `context` that is provided to the `postTransaction` function
called after the transaction is executed.
```solidity
function validateAndPayForPaymasterTransaction(
bytes32 _txHash,
bytes32 _suggestedSignedHash,
Transaction calldata _transaction
) external payable returns (bytes4 magic, bytes memory context);
```
### postTransaction
This function is optional and is called after the transaction is executed.
There is no guarantee this method will be called if the transaction fails with `out of gas` error.
```solidity
function postTransaction(
bytes calldata _context,
Transaction calldata _transaction,
bytes32 _txHash,
bytes32 _suggestedSignedHash,
ExecutionResult _txResult,
uint256 _maxRefundedGas
) external payable;
```
## Sending Transactions with a Paymaster
Use [EIP-712](https://eips.ethereum.org/EIPS/eip-712) formatted transactions to submit transactions with a paymaster set.
You must specify a `customData` object containing a valid `paymasterParams` object.
```typescript
import { Provider, Wallet } from "zksync-ethers";
import { getApprovalBasedPaymasterInput, getGeneralPaymasterInput, getPaymasterParams } from "zksync-ethers/build/paymaster-utils";
// Address of the deployed paymaster contract
const CONTRACT_ADDRESS = "YOUR-PAYMASTER-CONTRACT-ADDRESS";
// An example of a script to interact with the contract
export default async function () {
const provider = new Provider("https://api.testnet.abs.xyz");
const wallet = new Wallet(privateKey ?? process.env.WALLET_PRIVATE_KEY!, provider);
const type = "General"; // We're using a general flow in this example
// Create the object: You can use the helper functions that are imported!
const paymasterParams = getPaymasterParams(
CONTRACT_ADDRESS,
{
type,
innerInput: getGeneralPaymasterInput({
type,
innerInput: "0x", // Any additional info to send to the paymaster. We leave it empty here.
})
}
);
// Submit tx, as an example, send a message to another wallet.
const tx = await wallet.sendTransaction({
to: "0x8e729E23CDc8bC21c37a73DA4bA9ebdddA3C8B6d", // Example, send message to some other wallet
data: "0x1337", // Example, some arbitrary data
customData: {
paymasterParams, // Provide the paymaster params object here!
}
})
const res = await tx.wait();
}
```
## Paymaster Flows
Below are two example flows for paymasters you can use as a reference to build your own paymaster:
1. [General Paymaster Flow](#general-paymaster-flow): Showcases a minimal paymaster that sponsors all transactions.
2. [Approval-Based Paymaster Flow](#approval-based-paymaster-flow): Showcases how users can pay for gas fees with an ERC-20 token.
View the source code for an example general paymaster flow implementation.
View the source code for an example approval-based paymaster flow
implementation.
## Smart Contract References
View the source code for the IPaymaster interface.
View the source code for the TransactionHelper library.
# Signature Validation
Source: https://docs.abs.xyz/how-abstract-works/native-account-abstraction/signature-validation
Learn the best practices for signature validation when building smart contract accounts on Abstract.
Since smart contract accounts don’t have a way to validate signatures like an EOA,
it is also recommended that you implement [EIP-1271](https://eips.ethereum.org/EIPS/eip-1271)
for your smart contract accounts.
This EIP provides a standardized way for smart contracts to verify whether a signature
is valid for a given message.
## EIP-1271 Specification
EIP-1271 specifies a single function, `isValidSignature`, that can contain any arbitrary logic
to validate a given signature and largely depends on how you have implemented your smart contract account.
```solidity
contract ERC1271 {
// bytes4(keccak256("isValidSignature(bytes32,bytes)"))
bytes4 constant internal MAGICVALUE = 0x1626ba7e;
/**
* @dev Should return whether the signature provided is valid for the provided hash
* @param _hash Hash of the data to be signed
* @param _signature Signature byte array associated with _hash
*
* MUST return the bytes4 magic value 0x1626ba7e when function passes.
* MUST NOT modify state (using STATICCALL for solc < 0.5, view modifier for solc > 0.5)
* MUST allow external calls
*/
function isValidSignature(
bytes32 _hash,
bytes memory _signature)
public
view
returns (bytes4 magicValue);
}
```
### OpenZeppelin Implementation
OpenZeppelin provides a way to verify signatures for different account implementations that
you can use in your smart contract account.
Install the OpenZeppelin contracts library:
```bash
npm install @openzeppelin/contracts
```
Implement the `isValidSignature` function in your smart contract account:
```solidity
import {IAccount, ACCOUNT_VALIDATION_SUCCESS_MAGIC} from "./interfaces/IAccount.sol";
import { SignatureChecker } from "@openzeppelin/contracts/utils/cryptography/SignatureChecker.sol";
contract MyAccount is IAccount {
using SignatureChecker for address;
function isValidSignature(
address _address,
bytes32 _hash,
bytes memory _signature
) public pure returns (bool) {
return _address.isValidSignatureNow(_hash, _signature);
}
}
```
## Verifying Signatures
On the client, you can use [zksync-ethers](/build-on-abstract/applications/ethers) to
verify signatures for your smart contract account using either:
* `isMessageSignatureCorrect` for verifying a message signature.
* `isTypedDataSignatureCorrect` for verifying a typed data signature.
```typescript
export async function isMessageSignatureCorrect(address: string, message: ethers.Bytes | string, signature: SignatureLike): Promise;
export async function isTypedDataSignatureCorrect(
address: string,
domain: TypedDataDomain,
types: Record>,
value: Record,
signature: SignatureLike
): Promise;
```
Both of these methods return true or false depending on whether the message signature is correct.
Currently, these methods only support verifying ECDSA signatures, but will soon also
support EIP-1271 signature verification.
# Smart Contract Wallets
Source: https://docs.abs.xyz/how-abstract-works/native-account-abstraction/smart-contract-wallets
Learn how smart contract wallets are built following the IAccount standard on Abstract.
On Abstract, all accounts are smart contracts that implement the
[IAccount](#iaccount-interface) interface. As outlined in the [transaction flow](/how-abstract-works/native-account-abstraction/transaction-flow),
the bootloader calls the functions of the smart contract account deployed at the `tx.from` address for
each transaction that it processes.
Abstract maintains compatibility with popular EOA wallets from the Ethereum ecosystem (e.g. MetaMask) by
converting them to the [DefaultAccount](/how-abstract-works/native-account-abstraction/smart-contract-wallets#defaultaccount-contract) system contract during the transaction flow.
This contract acts as you would expect an EOA to act, with the added benefit of supporting paymasters.
## Get Started with Smart Contract Wallets
Use our [example repositories](https://github.com/Abstract-Foundation/examples)
to quickly get started building smart contract wallets.
Or follow our [video tutorial](https://www.youtube.com/watch?v=MFReCajqpNA) for a step-by-step guide to building a smart contract wallet.
## IAccount Interface
The `IAccount` interface defines the mandatory functions that a smart contract account must implement to be
compatible with Abstract. [View source code ↗](https://github.com/matter-labs/era-contracts/blob/main/system-contracts/contracts/interfaces/IAccount.sol).
First, install the [system contracts library](/how-abstract-works/system-contracts/using-system-contracts#installing-system-contracts):
```bash Hardhat
npm install @matterlabs/zksync-contracts
```
```bash Foundry
forge install matter-labs/era-contracts
```
Ensure you have the `isSystem` flag set to `true` in your config:
[Hardhat](/build-on-abstract/smart-contracts/hardhat#using-system-contracts) ‧
[Foundry](/build-on-abstract/smart-contracts/foundry#3-modify-foundry-configuration)
Then, import and implement the `IAccount` interface in your smart contract:
```solidity
import {IAccount} from "@matterlabs/zksync-contracts/l2/system-contracts/interfaces/IAccount.sol";
contract SmartAccount is IAccount {
// Implement the interface (see docs below)
// validateTransaction
// executeTransaction
// executeTransactionFromOutside
// payForTransaction
// prepareForPaymaster
}
```
See the [DefaultAccount contract](https://github.com/matter-labs/era-contracts/blob/main/system-contracts/contracts/DefaultAccount.sol)
for an example implementation.
Learn more about how to use system contracts in Solidity.
### validateTransaction
This function is called to determine whether or not the transaction should be executed (i.e. it validates the transaction).
Typically, you would perform some kind of check in this step to restrict who can use the account. This function must:
1. Increment the nonce for the account. See [handling nonces](/how-abstract-works/native-account-abstraction/handling-nonces) for more information.
2. Return `magic = ACCOUNT_VALIDATION_SUCCESS_MAGIC` if the transaction is valid and should be executed.
3. Should only be called by the bootloader contract (e.g. using an `onlyBootloader` modifier).
```solidity
function validateTransaction(
bytes32 _txHash,
bytes32 _suggestedSignedHash,
Transaction calldata _transaction
) external payable returns (bytes4 magic);
```
### executeTransaction
This function is called if the validation step
returned the `ACCOUNT_VALIDATION_SUCCESS_MAGIC` value. Consider:
1. Using the [EfficientCall](https://github.com/matter-labs/era-contracts/blob/main/system-contracts/contracts/libraries/EfficientCall.sol)
library for executing transactions efficiently using zkEVM-specific features.
2. Consider that the transaction may involve a contract deployment, in which case you should
use the [ContractDeployer](/how-abstract-works/system-contracts/list-of-system-contracts#contractdeployer)
system contract with the `isSystemCall` flag set to true.
3. Should only be called by the bootloader contract (e.g. using an `onlyBootloader` modifier).
```solidity
function executeTransaction(
bytes32 _txHash,
bytes32 _suggestedSignedHash,
Transaction calldata _transaction
) external payable;
```
### executeTransactionFromOutside
This function should be used to initiate a transaction from the smart contract wallet by an external call.
Accounts can implement this method to initiate a transaction on behalf of the account via L1 -> L2 communication.
```solidity
function executeTransactionFromOutside(
Transaction calldata _transaction
) external payable;
```
### payForTransaction
This function is called to pay the bootloader for the gas fee of the transaction.
It should only be called by the bootloader contract (e.g. using an `onlyBootloader` modifier).
For convenience, there is a `_transaction.payToTheBootloader()` function that can be used
to pay the bootloader for the gas fee.
```solidity
function payForTransaction(
bytes32 _txHash,
bytes32 _suggestedSignedHash,
Transaction calldata _transaction
) external payable;
```
### prepareForPaymaster
Alternatively to `payForTransaction`, if the transaction has a paymaster set,
you can use `prepareForPaymaster` to ask the paymaster to sponsor the gas fee for the transaction.
It should only be called by the bootloader contract (e.g. using an `onlyBootloader` modifier).
For convenience, there is a `_transaction.processPaymasterInput()` function that can be used to prepare the
transaction for the paymaster.
```solidity
function prepareForPaymaster(
bytes32 _txHash,
bytes32 _possibleSignedHash,
Transaction calldata _transaction
) external payable;
```
## Deploying a Smart Contract Wallet
The [ContractDeployer](/how-abstract-works/system-contracts/list-of-system-contracts#contractdeployer) system contract has separate functions
for deploying smart contract wallets: `createAccount` and `create2Account`.
Differentiate deploying an account contract from deploying a regular contract by providing either of these function names
when initializing a contract factory.
```typescript
import { ContractFactory } from "zksync-ethers";
const contractFactory = new ContractFactory(
abi,
bytecode,
initiator,
"createAccount" // Provide the fourth argument as "createAccount" or "create2Account"
);
const aa = await contractFactory.deploy();
await aa.deployed();
```
## Sending Transactions from a Smart Contract Wallet
Use [EIP-712](https://eips.ethereum.org/EIPS/eip-712) formatted transactions to submit transactions from a smart contract wallet.
You must specify:
1. The `from` field as the address of the deployed smart contract wallet.
2. Provide a `customData` object containing a `customSignature` that is not an empty string.
```typescript
import { VoidSigner } from "ethers";
import { Provider, utils } from "zksync-ethers";
import { serializeEip712 } from "zksync-ethers/build/utils";
// Here we are just creating a transaction object that we want to send to the network.
// This is just an example to populate fields like gas estimation, nonce calculation, etc.
const transactionGenerator = new VoidSigner(getWallet().address, getProvider());
const transactionFields = await transactionGenerator.populateTransaction({
to: "0x8e729E23CDc8bC21c37a73DA4bA9ebdddA3C8B6d", // As an example, send money to another wallet
});
// Now: Serialize an EIP-712 transaction
const serializedTx = serializeEip712({
...transactionFields,
nonce: 0,
from: "YOUR-SMART-CONTRACT-WALLET-CONTRACT-ADDRESS", // Your smart contract wallet address goes here
customData: {
customSignature: "0x1337", // Your custom signature goes here
},
});
// Broadcast the transaction to the network via JSON-RPC
const sentTx = await new Provider(
"https://api.testnet.abs.xyz"
).broadcastTransaction(serializedTx);
const resp = await sentTx.wait();
```
## DefaultAccount Contract
The `DefaultAccount` contract is a system contract that mimics the behavior of an EOA.
The bytecode of the contract is set by default for all addresses for which no other bytecodes are deployed.
Learn more about the DefaultAccount system contract and how it works.
## Smart Contract References
View the source code for the IAccount interface.
View the source code for the DefaultAccount contract.
View the source code for the TransactionHelper library.
# Transaction Flow
Source: https://docs.abs.xyz/how-abstract-works/native-account-abstraction/transaction-flow
Learn how Abstract processes transactions step-by-step using native account abstraction.
*Note: This page outlines the flow of transactions on Abstract, not including how they are batched,
sequenced and verified on Ethereum. For a higher-level overview of how transactions are finalized, see
[Transaction Lifecycle](/how-abstract-works/architecture/transaction-lifecycle).*
Since all accounts on Abstract are smart contracts, all transactions go through the same flow:
Transactions are submitted to the network via [JSON-RPC](https://ethereum.org/en/developers/docs/apis/json-rpc/)
and arrive in the transaction mempool. Since it is up to the smart contract account to determine how to validate transactions,
the `from` field can be set to a smart contract address in this step and submitted to the network.
The [bootloader](/how-abstract-works/system-contracts/bootloader) reads transactions from the mempool
and processes them in batches.
Before each transaction starts, the system queries the [NonceHolder](/how-abstract-works/system-contracts/list-of-system-contracts#nonceholder) system contract
to check whether the provided nonce has already been used or not. If it has not been used, the process continues.
Learn more on [handling nonces](/how-abstract-works/native-account-abstraction/handling-nonces).
For each transaction, the bootloader reads the `tx.from` field and checks if there is any contract code deployed at that address.
If there is no contract code, it assumes the sender account is an EOA and converts it to a
[DefaultAccount](/how-abstract-works/native-account-abstraction/smart-contract-wallets#defaultaccount-contract).
Learn more about the bootloader system contract and its role in processing transactions.
The bootloader then calls the following functions on the account deployed at the `tx.from` address:
1. `validateTransaction`: Determine whether or not to execute the transaction.
Typically, some kind of checks are performed in this step to restrict who can use the account.
2. `executeTransaction`: Execute the transaction if validation is passed.
3. Either `payForTransaction` or `prepareForPaymaster`: Pay the gas fee or request a paymaster to pay the gas fee for this transaction.
The `msg.sender` is set as the bootloader’s contract address for these function calls.
Learn more about how smart contract wallets work and how to build one.
If a paymaster is set, the bootloader calls the following [paymaster](/how-abstract-works/native-account-abstraction/paymasters) functions:
1. `validateAndPayForPaymasterTransaction`: Determine whether or not to pay for the transaction, and if so, pay the calculated gas fee for the transaction.
2. `postTransaction`: Optionally run some logic after the transaction has been executed.
The `msg.sender` is set as the bootloader’s contract address for these function calls.
Learn more about how paymasters work and how to build one.
# Bootloader
Source: https://docs.abs.xyz/how-abstract-works/system-contracts/bootloader
Learn more about the Bootloader that processes all transactions on Abstract.
The bootloader system contract plays several vital roles on Abstract, responsible for:
* Validating all transactions
* Executing all transactions
* Constructing new blocks for the L2
The bootloader processes transactions in batches that it
receives from the [VM](https://docs.zksync.io/build/developer-reference/era-vm) and puts
them all through the flow outlined in the
[transaction flow](/how-abstract-works/native-account-abstraction/transaction-flow) section.
View the source code for each system contract.
View in-depth documentation on the Bootloader.
## Bootloader Execution Flow
1. As the bootloader receives batches of transactions from the VM, it sends the information
about the current batch to the [SystemContext system contract](/how-abstract-works/system-contracts/list-of-system-contracts#systemcontext)
before processing each transaction.
2. As each transaction is processed, it goes through the flow outlined
in the [gas fees](/how-abstract-works/evm-differences/gas-fees) section.
3. At the end of each batch, the bootloader informs the [L1Messenger system contract](/how-abstract-works/system-contracts/list-of-system-contracts#l1messenger)
for it to begin sending data to Ethereum about the transactions that were processed.
## BootloaderUtilities System Contract
In addition to the bootloader itself, there is an additional
[BootloaderUtilities system contract](https://github.com/matter-labs/era-contracts/blob/main/system-contracts/contracts/BootloaderUtilities.sol)
that provides utility functions for the bootloader to use.
This separation is simply because the bootloader itself is written in [Yul](https://github.com/matter-labs/era-contracts/blob/main/system-contracts/bootloader/bootloader.yul)
whereas the utility functions are written in Solidity.
# List of System Contracts
Source: https://docs.abs.xyz/how-abstract-works/system-contracts/list-of-system-contracts
Explore all of the system contracts that Abstract implements.
## AccountCodeStorage
The `AccountCodeStorage` contract is responsible for storing the code hashes of accounts for retrieval
whenever the VM accesses an `address`.
The address is looked up in the `AccountCodeStorage` contract, if the associated value is non-zero (i.e. the address has code stored), this code hash
is used by the VM for the account.
**Contract Address:** `0x0000000000000000000000000000000000008002`
View the AccountCodeStorage source code on Github.
## BootloaderUtilities
Learn more about the bootloader and this system contract in the
[bootloader](/how-abstract-works/system-contracts/bootloader) section.
**Contract Address:** `0x000000000000000000000000000000000000800c`
View the BootloaderUtilities source code on Github.
## ComplexUpgrader
This contract is used to perform complex multi-step upgrades on the L2.
It contains a single function, `upgrade`, which executes an upgrade of the L2
by delegating calls to another contract.
**Contract Address:** `0x000000000000000000000000000000000000800f`
View the ComplexUpgrader source code on Github.
## Compressor
This contract is used to compress the data that is published to the L1, specifically, it:
* Compresses the deployed smart contract bytecodes.
* Compresses the state diffs (and validates state diff compression).
**Contract Address:** `0x000000000000000000000000000000000000800e`
View the Compressor source code on Github.
## Constants
This contract contains helpful constant values that are used throughout the system
and can be used in your own smart contracts. It includes:
* Addresses for all system contracts.
* Values for other system constants such as `MAX_NUMBER_OF_BLOBS`, `CREATE2_PREFIX`, etc.
View the Constants source code on Github.
## ContractDeployer
This contract is responsible for deploying smart contracts on Abstract as well as
generating the address of the deployed contract.
Before deployment, it ensures the code hash of the smart contract is known using the
[KnownCodesStorage](#knowncodesstorage) system contract.
See the [contract deployment](/how-abstract-works/evm-differences/contract-deployment) section
for more details.
**Contract Address:** `0x0000000000000000000000000000000000008006`
View the ContractDeployer source code on Github.
## Create2Factory
This contract can be used for deterministic contract deployment, i.e.
deploying a smart contract with the ability to predict the address of the deployed contract.
It contains two functions, `create2` and `create2Account`, which both
call a third function, `_relayCall` that relays the calldata to the
[ContractDeployer](#contractdeployer) contract.
You do not need to use this system contract directly, instead use [ContractDeployer](#contractdeployer).
**Contract Address:** `0x0000000000000000000000000000000000010000`
View the Create2Factory source code on Github.
## DefaultAccount
This contract is built to simulate the behavior of an EOA (Externally Owned Account) on the L2.
It is intended to act the same as an EOA would on Ethereum, enabling Abstract to support EOA wallets,
despite all accounts on Abstract being smart contracts.
As outlined in the [transaction flow](/how-abstract-works/native-account-abstraction/transaction-flow) section,
the `DefaultAccount` contract is used when the sender of a transaction is looked up and
no code is found for the address; indicating that the address of the sender is an EOA as opposed to
a [smart contract wallet](/how-abstract-works/native-account-abstraction/smart-contract-wallets).
View the DefaultAccount source code on Github.
## EmptyContract
Some contracts need no other code other than to return a success value.
An example of such an address is the `0` address. In addition, the
[bootloader](/how-abstract-works/system-contracts/bootloader) also needs to be
callable so that users can transfer ETH to it.
For these contracts, the EmptyContract code is inserted upon Genesis.
It is essentially a noop code, which does nothing and returns `success=1`.
**Contract Address:** `0x0000000000000000000000000000000000000000`
View the EmptyContract source code on Github.
## EventWriter
This contract is responsible for [emitting events](https://docs.soliditylang.org/en/latest/contracts.html#events).
It is not required to interact with this smart contract, the
standard Solidity `emit` keyword can be used.
**Contract Address:** `0x000000000000000000000000000000000000800d`
View the EventWriter source code on Github.
## ImmutableSimulator
This contract simulates the behavior of immutable variables in Solidity. It exists so that
smart contracts with the same Solidity code but different constructor parameters have the same bytecode.
It is not required to interact with this smart contract directly,
as it is used via the compiler.
**Contract Address:** `0x0000000000000000000000000000000000008005`
View the ImmutableSimulator source code on Github.
## KnownCodesStorage
Since Abstract stores the code hashes of smart contracts and not the code itself
(see [contract deployment](/how-abstract-works/evm-differences/contract-deployment)), the system must ensure that
it knows and stores the code hash of all smart contracts that are deployed.
The [ContractDeployer](#contractdeployer) checks this `KnownCodesStorage` contract to see if the
code hash of a smart contract is known before deploying it. If it is not known,
the contract will not be deployed and revert with an error `The code hash is not known`.
Likely, you are trying to deploy a smart contract without using the
[ContractDeployer](#contractdeployer) system contract.
See the [contract deployment section](/how-abstract-works/evm-differences/contract-deployment) for more details.
**Contract Address:** `0x0000000000000000000000000000000000008004`
View the KnownCodesStorage source code on Github.
## L1Messenger
This contract is used for sending messages from Abstract to Ethereum.
It is used by the [KnownCodesStorage](#knowncodesstorage) contract to publish the
code hash of smart contracts to Ethereum.
Learn more about what data is sent in the [contract deployment section](/how-abstract-works/evm-differences/contract-deployment) section.
**Contract Address:** `0x0000000000000000000000000000000000008008`
View the L1Messenger source code on Github.
## L2BaseToken
This contract holds the balances of ETH for all accounts on the L2 and updates them
whenever other system contracts such as the [Bootloader](/how-abstract-works/system-contracts/bootloader),
[ContractDeployer](#contractdeployer), or [MsgValueSimulator](#msgvaluesimulator) perform
balance changes while simulating the `msg.value` behavior of Ethereum.
This is because the L2 does not have a set "native" token unlike Ethereum,
so functions such as `transferFromTo`, `balanceOf`, `mint`, `withdraw`, etc. are
implemented in this contract as if it were an ERC-20.
**Contract Address:** `0x000000000000000000000000000000000000800a`
View the L2BaseToken source code on Github.
## MsgValueSimulator
This contract calls the [L2BaseToken](#l2basetoken) contract’s `transferFromTo` function to
simulate the `msg.value` behavior of Ethereum.
**Contract Address:** `0x0000000000000000000000000000000000008009`
View the MsgValueSimulator source code on Github.
## NonceHolder
This contract stores the nonce for each account on the L2. More specifically, it stores both
the deployment nonce for each account and the transaction nonce for each account.
Before each transaction starts, the bootloader uses the `NonceHolder` to ensure
that the provided nonce for the transaction has not already been used by the sender.
During the [transaction validation](/how-abstract-works/native-account-abstraction/handling-nonces#considering-nonces-in-your-smart-contract-account),
it also enforces that the nonce *is* set as used before the transaction execution begins.
See more details in the [nonces](/how-abstract-works/evm-differences/nonces) section.
**Contract Address:** `0x0000000000000000000000000000000000008003`
View the NonceHolder source code on Github.
## PubdataChunkPublisher
This contract is responsible for creating [EIP-4844 blobs](https://www.eip4844.com/) and
publishing them to Ethereum. Learn more in the
[transaction lifecycle](/how-abstract-works/architecture/transaction-lifecycle) section.
**Contract Address:** `0x0000000000000000000000000000000000008011`
View the PubdataChunkPublisher source code on Github.
## SystemContext
This contract is used to store and provide various system parameters not included in the VM by default,
such as block-scoped, transaction-scoped, or system-wide parameters.
For example, variables such as `chainId`, `gasPrice`, `baseFee`, as well as system functions
such as `setL2Block` and `setNewBatch` are stored in this contract.
**Contract Address:** `0x000000000000000000000000000000000000800b`
View the SystemContext source code on Github.
# System Contracts
Source: https://docs.abs.xyz/how-abstract-works/system-contracts/overview
Learn how Abstract implements system contracts with special privileges to support some EVM opcodes.
Abstract has a set of smart contracts with
special privileges that were deployed in the Genesis block
called **system contracts**. These system contracts are built to provide support
for [EVM opcodes](https://www.evm.codes/) that are not natively supported by the ZK-EVM that Abstract uses.
These system contracts are located in a special kernel space
*(i.e. in the address space in range `[0..2^16-1]`)*, and
they can only be changed via a system upgrade through Ethereum.
View the file containing the addresses of all system contracts.
View the source code for each system contract.
# Using System Contracts
Source: https://docs.abs.xyz/how-abstract-works/system-contracts/using-system-contracts
Understand how to best use system contracts on Abstract.
When building smart contracts on Abstract, you often need to interact directly with **system contracts**
to perform operations, such as:
* Deploying smart contracts with the [ContractDeployer](/how-abstract-works/system-contracts/list-of-system-contracts#contractdeployer).
* Paying gas fees to the [Bootloader](/how-abstract-works/system-contracts/bootloader).
* Using nonces via the [NonceHolder](/how-abstract-works/system-contracts/list-of-system-contracts#nonceholder).
## Installing system contracts
To use system contracts into your smart contracts, install the
[@matterlabs/zksync-contracts](https://www.npmjs.com/package/@matterlabs/zksync-contracts) package.
forge install matter-labs/era-contracts
```bash Hardhat
npm install @matterlabs/zksync-contracts
```
```bash Foundry
forge install matter-labs/era-contracts
```
Then, import the system contracts into your smart contract:
```solidity
// Example imports:
import "@matterlabs/zksync-contracts/l2/system-contracts/interfaces/IAccount.sol";
import { TransactionHelper } from "@matterlabs/zksync-contracts/l2/system-contracts/libraries/TransactionHelper.sol";
import { BOOTLOADER_FORMAL_ADDRESS } from "@matterlabs/zksync-contracts/l2/system-contracts/Constants.sol";
```
## Available System Contract Helper Libraries
A set of libraries also exist alongside the system contracts to help you interact with them more easily.
| Name | Description |
| -------------------------------------------------------------------------------------------------------------------------------------------------- | --------------------------------------------------------------------------------------------------------- |
| [EfficientCall.sol](https://github.com/matter-labs/era-contracts/blob/main/system-contracts/contracts/libraries/EfficientCall.sol) | Perform ultra-efficient calls using zkEVM-specific features. |
| [RLPEncoder.sol](https://github.com/matter-labs/era-contracts/blob/main/system-contracts/contracts/libraries/RLPEncoder.sol) | Recursive-length prefix (RLP) encoding functionality. |
| [SystemContractHelper.sol](https://github.com/matter-labs/era-contracts/blob/main/system-contracts/contracts/libraries/SystemContractHelper.sol) | Library used for accessing zkEVM-specific opcodes, needed for the development of system contracts. |
| [SystemContractsCaller.sol](https://github.com/matter-labs/era-contracts/blob/main/system-contracts/contracts/libraries/SystemContractsCaller.sol) | Allows calling contracts with the `isSystem` flag. It is needed to call ContractDeployer and NonceHolder. |
| [TransactionHelper.sol](https://github.com/matter-labs/era-contracts/blob/main/system-contracts/contracts/libraries/TransactionHelper.sol) | Used to help custom smart contract accounts to work with common methods for the Transaction type. |
| [UnsafeBytesCalldata.sol](https://github.com/matter-labs/era-contracts/blob/main/system-contracts/contracts/libraries/UnsafeBytesCalldata.sol) | Provides a set of functions that help read data from calldata bytes. |
| [Utils.sol](https://github.com/matter-labs/era-contracts/blob/main/system-contracts/contracts/libraries/Utils.sol) | Common utilities used in Abstract system contracts. |
View all the source code for the system contract libraries.
## The isSystem Flag
Each transaction can contain an `isSystem` flag that indicates whether the transaction
intends to use a system contract’s functionality. Specifically, this flag needs to be true
when interacting with the [ContractDeployer](/how-abstract-works/system-contracts/list-of-system-contracts#contractdeployer)
or the [NonceHolder](/how-abstract-works/system-contracts/list-of-system-contracts#nonceholder) system contracts.
To make a call with this flag, use the [SystemContractsCaller](https://github.com/matter-labs/era-contracts/blob/main/system-contracts/contracts/libraries/SystemContractsCaller.sol)
library, which exposes functions like `systemCall`, `systemCallWithPropagatedRevert`, and `systemCallWithReturndata`.
```solidity
import {SystemContractsCaller} from "@matterlabs/zksync-contracts/l2/system-contracts/libraries/SystemContractsCaller.sol";
import {NONCE_HOLDER_SYSTEM_CONTRACT, INonceHolder} from "@matterlabs/zksync-contracts/l2/system-contracts/Constants.sol";
import {TransactionHelper} from "@matterlabs/zksync-contracts/l2/system-contracts/libraries/TransactionHelper.sol";
function validateTransaction(
bytes32,
bytes32,
Transaction calldata _transaction
) external payable onlyBootloader returns (bytes4 magic) {
// Increment nonce during validation
SystemContractsCaller.systemCallWithPropagatedRevert(
uint32(gasleft()),
address(NONCE_HOLDER_SYSTEM_CONTRACT),
0,
abi.encodeCall(
INonceHolder.incrementMinNonceIfEquals,
(_transaction.nonce)
)
);
// ... rest of validation logic here
}
```
### Configuring Hardhat & Foundry to use isSystem
You can also enable the `isSystem` flag for your smart contract development environment.
#### Hardhat
Add `enableEraVMExtensions: true` within the `settings` object of the `zksolc` object in the `hardhat.config.js` file.
```typescript
import { HardhatUserConfig } from "hardhat/config";
import "@matterlabs/hardhat-zksync";
const config: HardhatUserConfig = {
zksolc: {
version: "latest",
settings: {
// This is the current name of the "isSystem" flag
enableEraVMExtensions: true, // Note: NonceHolder and the ContractDeployer system contracts can only be called with a special isSystem flag as true
},
},
defaultNetwork: "abstractTestnet",
networks: {
abstractTestnet: {
url: "https://api.testnet.abs.xyz",
ethNetwork: "sepolia",
zksync: true,
verifyURL:
"https://api-explorer-verify.testnet.abs.xyz/contract_verification",
},
},
solidity: {
version: "0.8.24",
},
};
export default config;
```
#### Foundry
Add the `is_system = true` flag to the `foundry.toml` configuration file.
```toml {5}
[profile.default]
src = 'src'
libs = ['lib']
fallback_oz = true
is_system = true # Note: NonceHolder and the ContractDeployer system contracts can only be called with a special isSystem flag as true
mode = "3"
[etherscan]
abstractTestnet = { chain = "11124", url = "", key = ""} # You can replace these values or leave them blank to override via CLI
abstractMainnet = { chain = "2741", url = "", key = ""} # You can replace these values or leave them blank to override via CLI
```
# Components
Source: https://docs.abs.xyz/infrastructure/nodes/components
Learn the components of an Abstract node and how they work together.
This section contains an overview of the Abstract node's main components.
## API
The Abstract node can serve both the HTTP and the WS Web3 API, as well as PubSub.
Whenever possible, it provides data based on the local state, with a few exceptions:
* Submitting transactions: Since it is a read replica,
submitted transactions are proxied to the main node,
and the response is returned from the main node.
* Querying transactions: The Abstract node is not aware of the main node's mempool,
and it does not sync rejected transactions.
Therefore, if a local lookup for a transaction or its receipt fails,
the Abstract node will attempt the same query on the main node.
Apart from these cases, the API does not depend on the main node.
Even if the main node is temporarily unavailable, the Abstract node can continue to serve the state it has locally.
## Fetcher
The Fetcher component is responsible for maintaining synchronization between the Abstract node and the main node.
Its primary task is to fetch new blocks in order to update the local chain state.
However, its responsibilities extend beyond that.
For instance, the Fetcher is also responsible for keeping track of L1 batch statuses.
This involves monitoring whether locally applied batches have been committed, proven, or executed on L1.
It is worth noting that in addition to fetching the *state*, the Abstract node also retrieves the L1 gas price from the main node
for the purpose of estimating fees for L2 transactions (since this also happens based on the local state).
This information is necessary to ensure that gas estimations are performed in the exact same manner as the main node,
thereby reducing the chances of a transaction not being included in a block.
## State Keeper / VM
The State Keeper component serves as the "sequencer" part of the node.
It shares most of its functionality with the main node, with one key distinction.
The main node retrieves transactions from the mempool and has the authority to decide when a specific L2 block or L1 batch should be sealed.
On the other hand, the Abstract node retrieves transactions from the queue populated by the Fetcher and seals the corresponding blocks/batches
based on the data obtained from the Fetcher queue.
The actual execution of batches takes place within the VM, which is identical in any Abstract node.
## Reorg Detector
In Abstract, it is theoretically possible for L1 batches to be reverted before the corresponding "execute" operation
is applied on L1, that is before the block is [final](https://docs.zksync.io/zk-stack/concepts/finality).
Such situations are highly uncommon and typically occur due to significant issues:
e.g. a bug in the sequencer implementation preventing L1 batch commitment.
Prior to batch finality, the Abstract operator can perform a rollback,
reverting one or more batches and restoring the blockchain state to a previous point.
Finalized batches cannot be reverted at all.
However, even though such situations are rare, the Abstract node must handle them correctly.
To address this, the Abstract node incorporates a Reorg Detector component.
This module keeps track of all L1 batches that have not yet been finalized.
It compares the locally obtained state root hashes with those provided by the main node's API.
If the root hashes for the latest available L1 batch do not match,
the Reorg Detector searches for the specific L1 batch responsible for the divergence.
Subsequently, it rolls back the local state and restarts the node.
Upon restart, the Abstract node resumes normal operation.
## Consistency Checker
The main node API serves as the primary source of information for the Abstract node.
However, relying solely on the API may not provide sufficient security since the API data could potentially be incorrect due to various reasons.
The primary source of truth for the rollup system is the L1 smart contract.
Therefore, to enhance the security of the EN, each L1 batch undergoes cross-checking against
the L1 smart contract by a component called the Consistency Checker.
When the Consistency Checker detects that a particular batch has been sent to L1,
it recalculates a portion of the input known as the "block commitment" for the L1 transaction.
The block commitment contains crucial data such as the state root and batch number,
and is the same commitment that is used for generating a proof for the batch.
The Consistency Checker then compares the locally obtained commitment with the actual commitment sent to L1.
If the data does not match, it indicates a potential bug in either the main node
or Abstract node implementation or that the main node API has provided incorrect data.
In either case, the state of the Abstract node cannot be trusted, and the Abstract node enters a crash loop until the issue is resolved.
## Health check server
The Abstract node also exposes an additional server that returns HTTP 200 response when the Abstract node is operating normally,
and HTTP 503 response when some of the health checks don't pass (e.g. when the Abstract node is not fully initialized yet).
This server can be used, for example, to implement the readiness probe in an orchestration solution you use.
# Introduction
Source: https://docs.abs.xyz/infrastructure/nodes/introduction
Learn how Abstract Nodes work at a high level.
This documentation explains the basics of the Abstract node. The contents of this section were heavily inspired from [zkSync's node running docs](https://docs.zksync.io/zksync-node).
## Disclaimers
* The Abstract node software is provided "as-is" without any express or implied warranties.
* The Abstract node is in the beta phase, and should be used with caution.
* The Abstract node is a read-only replica of the main node.
* The Abstract node is not going to be the consensus node.
* Running a sequencer node is currently not possible and there is no option to vote on blocks as part of the consensus mechanism
or [fork-choice](https://eth2book.info/capella/part3/forkchoice/#whats-a-fork-choice) like on Ethereum.
## What is the Abstract Node?
The Abstract node is a read-replica of the main (centralized) node that can be run by anyone. It
functions by fetching data from the Abstract API and re-applying transactions locally, starting from the genesis block.
The Abstract node shares most of its codebase with the main node. Consequently, when it re-applies transactions, it does
so exactly as the main node did in the past.
In Ethereum terms, the current state of the Abstract Node represents an archive node, providing access to the entire history of the blockchain.
## High-level Overview
At a high level, the Abstract Node can be seen as an application that has the following modules:
* API server that provides the publicly available Web3 interface.
* Synchronization layer that interacts with the main node and retrieves transactions and blocks to re-execute.
* Sequencer component that actually executes and persists transactions received from the synchronization layer.
* Several checker modules that ensure the consistency of the Abstract Node state.
With the Abstract Node, you are able to:
* Locally recreate and verify the Abstract mainnet/testnet state.
* Interact with the recreated state in a trustless way (in a sense that the validity is locally verified, and you should
not rely on a third-party API Abstract provides).
* Use the Web3 API without having to query the main node.
* Send L2 transactions (that will be proxied to the main node).
With the Abstract Node, you *can not*:
* Create L2 blocks or L1 batches on your own.
* Generate proofs.
* Submit data to L1.
A more detailed overview of the Abstract Node's components is provided in the components section.
## API Overview
API exposed by the Abstract Node strives to be Web3-compliant.
If some method is exposed but behaves differently compared to
Ethereum, it should be considered a bug.
Please [report](https://zksync.io/contact) such cases.
### `eth_` Namespace
Data getters in this namespace operate in the L2 space: require/return L2 block numbers, check balances in L2, etc.
Available methods:
| Method | Notes |
| ----------------------------------------- | ------------------------------------------------------------------------- |
| `eth_blockNumber` | |
| `eth_chainId` | |
| `eth_call` | |
| `eth_estimateGas` | |
| `eth_gasPrice` | |
| `eth_newFilter` | Maximum amount of installed filters is configurable |
| `eth_newBlockFilter` | Same as above |
| `eth_newPendingTransactionsFilter` | Same as above |
| `eth_uninstallFilter` | |
| `eth_getLogs` | Maximum amount of returned entities can be configured |
| `eth_getFilterLogs` | Same as above |
| `eth_getFilterChanges` | Same as above |
| `eth_getBalance` | |
| `eth_getBlockByNumber` | |
| `eth_getBlockByHash` | |
| `eth_getBlockTransactionCountByNumber` | |
| `eth_getBlockTransactionCountByHash` | |
| `eth_getCode` | |
| `eth_getStorageAt` | |
| `eth_getTransactionCount` | |
| `eth_getTransactionByHash` | |
| `eth_getTransactionByBlockHashAndIndex` | |
| `eth_getTransactionByBlockNumberAndIndex` | |
| `eth_getTransactionReceipt` | |
| `eth_protocolVersion` | |
| `eth_sendRawTransaction` | |
| `eth_syncing` | EN is considered synced if it's less than 11 blocks behind the main node. |
| `eth_coinbase` | Always returns a zero address |
| `eth_accounts` | Always returns an empty list |
| `eth_getCompilers` | Always returns an empty list |
| `eth_hashrate` | Always returns zero |
| `eth_getUncleCountByBlockHash` | Always returns zero |
| `eth_getUncleCountByBlockNumber` | Always returns zero |
| `eth_mining` | Always returns false |
### PubSub
Only available on the WebSocket servers.
Available methods:
| Method | Notes |
| ------------------ | ----------------------------------------------- |
| `eth_subscribe` | Maximum amount of subscriptions is configurable |
| `eth_subscription` | |
### `net_` Namespace
Available methods:
| Method | Notes |
| ---------------- | -------------------- |
| `net_version` | |
| `net_peer_count` | Always returns 0 |
| `net_listening` | Always returns false |
### `web3_` Namespace
Available methods:
| Method | Notes |
| -------------------- | ----- |
| `web3_clientVersion` | |
### `debug` namespace
The `debug` namespace gives access to several non-standard RPC methods, which will allow developers to inspect and debug
calls and transactions.
This namespace is disabled by default and can be configured via setting `EN_API_NAMESPACES` as described in the example config.
Available methods:
| Method | Notes |
| -------------------------- | ----- |
| `debug_traceBlockByNumber` | |
| `debug_traceBlockByHash` | |
| `debug_traceCall` | |
| `debug_traceTransaction` | |
### `zks` namespace
This namespace contains rollup-specific extensions to the Web3 API.
Note that *only methods* specified in the documentation are considered public.
There may be other methods exposed in this namespace, but undocumented
methods come without any kind of stability guarantees and can be changed or removed without notice.
Always refer to the documentation linked above and [API reference documentation](https://docs.zksync.io/build/api-reference) to see the list of stabilized methods in this namespace.
### `en` namespace
This namespace contains methods that Abstract Nodes call on the main node while syncing. If this namespace is enabled
other Abstract Nodes can sync from this node.
# Running a node
Source: https://docs.abs.xyz/infrastructure/nodes/running-a-node
Learn how to run your own Abstract node.
## Prerequisites
* **Installations Required:**
* [Docker](https://docs.docker.com/get-docker/)
* [Docker Compose](https://docs.docker.com/compose/install/)
## Setup Instructions
Clone the Abstract node repository and navigate to `external-node/`:
```bash
git clone https://github.com/Abstract-Foundation/abstract-node
cd abstract-node/external-node
```
## Running an Abstract Node Locally
### Starting the Node
```bash
docker compose --file testnet-external-node.yml up -d
```
### Reading Logs
```bash
docker logs -f --tail=0
```
Container name options:
* `testnet-node-external-node-1`
* `testnet-node-postgres-1`
* `testnet-node-prometheus-1`
* `testnet-node-grafana-1`
### Resetting the Node State
```bash
docker compose --file testnet-external-node.yml down --volumes
```
### Monitoring Node Status
Access the [local Grafana dashboard](http://localhost:3000/d/0/external-node) to see the node status after recovery.
### API Access
* **HTTP JSON-RPC API:** Port `3060`
* **WebSocket API:** Port `3061`
### Important Notes
* **Initial Recovery:** The node will recover from genesis (until we set up a snapshot) on its first run, which may take up to a while. During
this period, the API server will not serve any requests.
* **Historical Data:** For access to historical transaction data, consider recovery from DB dumps. Refer to the Advanced Setup section for more details.
* **DB Dump:** For nodes that operate from a DB dump, which allows starting an Abstract node with a full historical
transactions history, refer to the documentation on running from DB dumps at [03\_running.md](https://github.com/matter-labs/zksync-era/blob/78af2bf786bb4f7a639fef9fd169594101818b79/docs/src/guides/external-node/03_running.md).
## System Requirements
The following are minimal requirements:
* **CPU:** A relatively modern CPU is recommended.
* **RAM:** 32 GB
* **Storage:**
* **Testnet Nodes:** 30 GB
* **Mainnet Nodes:** 300 GB, with the state growing about 1TB per month.
* **Network:** 100 Mbps connection (1 Gbps+ recommended)
## Advanced Setup
For additional configurations like monitoring, backups, recovery from DB dump or snapshot, and custom PostgreSQL
settings, please refer to the [ansible-en-role repository](https://github.com/matter-labs/ansible-en-role).
# Introduction
Source: https://docs.abs.xyz/overview
Welcome to the Abstract documentation. Dive into our resources to learn more about the blockchain leading the next generation of consumer crypto.
 ## Get started with Abstract
Start building smart contracts and applications on Abstract with our quickstart guides.
Connect your wallet or development environment to Abstract.
Start developing smart contracts or applications on Abstract.
## Explore Abstract Resources
Use our tutorials to kickstart your development journey on Abstract.
Browse our collection of cloneable starter kits and example repositories on
GitHub.
Watch our video tutorials to learn more about building on Abstract.
## Learn more about Abstract
Dive deeper into how Abstract works and how you can leverage its features.
Learn more about the blockchain leading the next generation of consumer
crypto.
Learn more about how the technology powering Abstract works.
Understand the architecture and components that make up Abstract.
Discover Abstract Global Wallet - the smart contract wallet powering the
Abstract ecosystem.
# Portal
Source: https://docs.abs.xyz/portal/overview
Discover the Abstract Portal - your gateway to onchain discovery.
The [Portal](https://abs.xyz) is the homepage of consumer crypto. Users can manage their
[Abstract Global Wallet](/abstract-global-wallet/overview), earn XP and badges, and discover
the top apps & creators in the ecosystem.
Explore a curated universe of onchain apps, watch trusted creators, and earn
rewards.
## Frequently Asked Questions
Find answers to common questions about the Portal below.
### Funding your wallet
You can fund your account in multiple ways:
1. **Funding from Solana, Ethereum, or any other chain:**
* Click the deposit button on wallet page and select "Bridge"
* Connect your existing wallet and select the chain
* Wait for confirmation (may take several minutes)
2. **Funding from Coinbase:**
* Click deposit and select "Coinbase"
* Sign in to Coinbase and follow prompts
* Wait for confirmation (may take several minutes)
3. **Funding from other exchanges (Binance, OKX, etc.):**
* Click deposit and select "Centralized Exchange"
* Use the generated QR code to send funds from zkSync Era wallet
* **Important:** Send funds on zkSync Era only. Use QR code once only.
* Note: This address differs from your Abstract wallet address
4. **Funding via bank account:**
* Click deposit and select "Moonpay"
* Follow prompts to sign in/create Moonpay account
The native currency on Abstract is Ether (ETH). Other currencies including USDC.e and USDT are also available.
1. Click the send button on the wallet page
2. Select the token to send and enter the exact amount to send
3. Enter the recipient's address, domain, or identity.
4. Double check everything looks correct. **Transactions cannot be reversed, and funds sent to wrong places are impossible to recover**
5. Confirm transaction (recipient receives funds in \< 1 minute)
Do NOT send funds to your Abstract Global Wallet on any other network. Your
AGW only exists on Abstract.
Various reasons may cause funds to not display properly:
1. Navigate to the [Abstract Explorer](https://abscan.org/) and search your address (e.g. 0x1234...abcd)
2. Verify if there is an inbound transaction that you are expecting.
3. Check that the sender has sent funds to the correct address and network.
If you are using the Abstract network without using Abstract Global Wallet, to see your funds, you must [connect your wallet to the Abstract network](/connect-to-abstract)
and switch to the Abstract network.
Your Abstract Global Wallet is a [smart contract wallet](abstract-global-wallet/architecture), not a traditional EOA.
This means it does not have a private key for you to export.
Try again, turn off your VPN if you are using one.
### Profile
Navigate to "Profile Page" in left-hand menu to:
* Update profile information
* Edit pictures
* Link X (Twitter) and Discord accounts
Social connections enhance ecosystem security by: - Providing additional layer
to identify and filter out bots - Allowing rewards for content about Abstract
and ecosystem projects
Discord connections help identify active community members by:
* Linking offchain community participation to onchain portal activity
* Providing additional verification to filter out bots
* Enabling XP rewards for helpful community contributions
Select "Edit Profile" option on the "Profile Page" to unlink social accounts.
Enable 2FA under "Security Settings" using either: - Authenticator App -
Passkey
Click the pencil icon over your profile picture to use any NFT in your wallet as your PFP.
### Discover
Click the upvote button on the "Discover" page to support an app.
Either: - You have already upvoted that app - You need to fund your account
(visit abs.xyz/wallet and click fund button)
The spotlight features apps that have received the most upvotes and user
interaction during a given time period.
Trending tokens are ranked based on volume and price change in real time.
**Important:** This is not financial advice or endorsement. The trending tokens section is not an endorsement of any team or project, and the algorithm may yield unexpected results. Always consult your financial advisor before investing.
Browse app categories at the bottom of the discover page:
* Gaming
* Trading
* Collectibles
And more, sorted by user engagement in each category
### Trade
Two options available:
1. Visit the "Trade" page for native trading features
2. Explore trading apps in the "Trading" category on the Discover page
Check to verify: - You have enough ETH to fund the transaction - Your slippage
is set correctly
Slippage is the difference between expected trade price and actual execution
price, common with high volume/volatility tokens.
Find your trading history in the "Transaction History" section of your Profile Page.
### Rewards
XP is the native reward system built to reward users for having fun. Users and creators earn XP for:
* Using Abstract apps
* Streaming via Abstract Global Wallet
* Building successful apps
Earn XP by engaging with Abstract-powered apps listed on the Discover page.
XP is updated weekly and reflected in your rewards profile.
Earn Badges by completing hidden or public quests. Eligible badges appear in
the "Badges" section of the "Rewards" page.
Bonus XP users can earn based on community standing and exclusive rewards.
Yes, XP can be lost for: - Cheating the system - Breaking streamer rules
No, XP is not transferable between accounts.
### Streaming
Currently:
* Anyone can create an account to watch and interact
* Only whitelisted accounts can stream
* More creators will be supported over time
Yes: - Earn XP based on engagement and app usage validated onchain -
Abstract-based application usage provides more XP compared to outside content
All types of content can be streamed, but Abstract Apps usage provides
additional XP.
Recover your account using your email address. We recommend: - Setting up
passkeys - Enabling 2FA Both found in settings
Abstract is an open platform but users must follow Terms of Use: - No
harassment - No hate speech
Yes, Abstract supports multiple languages and is available globally.
Streamers can receive tips from their audience members.
All streamers are capable of receiving tips.
Basic requirements: - Computer capable of running streaming software (e.g.,
OBS) - Stable internet connection - Microphone - Optional: webcam - Mobile
streaming requires third-party apps with stream key support
* Supports up to 1080p & 4k Bitrate - 5-15 second stream delay depending on
internet/settings - Test different settings for optimal performance
Yes, but: - Makes Luca sad - May impact potential XP earnings
* Abstract provides basic chat moderation platform-wide - Additional
moderation features may be added in future as needed
Yes, but:
* We encourage exploring our ecosystem
* Non-Abstract content may earn reduced or no XP
# Block Explorers
Source: https://docs.abs.xyz/tooling/block-explorers
Learn how to view transactions, blocks, batches, and more on Abstract block explorers.
The block explorer allows you to:
* View, verify, and interact with smart contract source code.
* View transaction, block, and batch information.
* Track the finality status of transactions as they reach Ethereum.
Go to the Abstract mainnet explorer to view transactions, blocks, and more.
Go to the Abstract testnet explorer to view transactions, blocks, and more.
# Bridges
Source: https://docs.abs.xyz/tooling/bridges
Learn how to bridge assets between Abstract and Ethereum.
A bridge is a tool that allows users to move assets such as ETH from Ethereum to Abstract and vice versa.
Under the hood, bridging works by having two smart contracts deployed:
1. A smart contract deployed to Ethereum (L1).
2. A smart contract deployed to Abstract (L2).
These smart contracts communicate with each other to facilitate the deposit and withdrawal of assets between the two chains.
## Native Bridge
Abstract has a native bridge to move assets between Ethereum and
Abstract for free (excluding gas fees) that supports bridging both ETH and ERC-20 tokens.
Deposits from L1 to L2 take around \~15 minutes, whereas
withdrawals from L2 to L1 currently take up to 24 hours due to the
built-in [withdrawal delay](https://docs.zksync.io/build/resources/withdrawal-delay#withdrawal-delay).
Visit the native bridge to move assets between Ethereum and Abstract.
Visit the native bridge to move assets between Ethereum and Abstract.
## Third-party Bridges
In addition to the native bridge, users can also utilize third-party bridges
to move assets from other chains to Abstract and vice versa.
These bridges offer alternative routes that are typically faster and cheaper than the native bridge,
however come with different **security risks**.
Use third-party bridges to move assets between other chains and Abstract.
# Deployed Contracts
Source: https://docs.abs.xyz/tooling/deployed-contracts
Discover a list of commonly used contracts deployed on Abstract.
## Currencies
| Token | Mainnet | Testnet |
| ----- | -------------------------------------------- | -------------------------------------------- |
| WETH9 | `0x3439153EB7AF838Ad19d56E1571FBD09333C2809` | `0x9EDCde0257F2386Ce177C3a7FCdd97787F0D841d` |
| USDC | `0x84A71ccD554Cc1b02749b35d22F684CC8ec987e1` | `0xe4C7fBB0a626ed208021ccabA6Be1566905E2dFc` |
| USDT | `0x0709F39376dEEe2A2dfC94A58EdEb2Eb9DF012bD` | - |
## NFT Markets
| Contract Type | Mainnet | Testnet |
| ------------------ | -------------------------------------------- | -------------------------------------------- |
| Seaport | `0xDF3969A315e3fC15B89A2752D0915cc76A5bd82D` | `0xDF3969A315e3fC15B89A2752D0915cc76A5bd82D` |
| Transfer Validator | `0x3203c3f64312AF9344e42EF8Aa45B97C9DFE4594` | `0x3203c3f64312af9344e42ef8aa45b97c9dfe4594` |
## Uniswap V2
| Contract Type | Mainnet | Testnet |
| ----------------- | -------------------------------------------------------------------- | -------------------------------------------------------------------- |
| UniswapV2Factory | `0x566d7510dEE58360a64C9827257cF6D0Dc43985E` | `0x566d7510dEE58360a64C9827257cF6D0Dc43985E` |
| UniswapV2Router02 | `0xad1eCa41E6F772bE3cb5A48A6141f9bcc1AF9F7c` | `0x96ff7D9dbf52FdcAe79157d3b249282c7FABd409` |
| Init code hash | `0x0100065f2f2a556816a482652f101ddda2947216a5720dd91a79c61709cbf2b8` | `0x0100065f2f2a556816a482652f101ddda2947216a5720dd91a79c61709cbf2b8` |
## Uniswap V3
| Contract Type | Mainnet | Testnet |
| ------------------------------------------ | -------------------------------------------------------------------- | -------------------------------------------------------------------- |
| UniswapV3Factory | `0xA1160e73B63F322ae88cC2d8E700833e71D0b2a1` | `0x2E17FF9b877661bDFEF8879a4B31665157a960F0` |
| multicall2Address | `0x9CA4dcb2505fbf536F6c54AA0a77C79f4fBC35C0` | `0x84B11838e53f53DBc1fca7a6413cDd2c7Ab15DB8` |
| proxyAdminAddress | `0x76d539e3c8bc2A565D22De95B0671A963667C4aD` | `0x10Ef01fF2CCc80BdDAF51dF91814e747ae61a5f1` |
| tickLensAddress | `0x9c7d30F93812f143b6Efa673DB8448EfCB9f747E` | `0x2EC62f97506E0184C423B01c525ab36e1c61f78A` |
| nftDescriptorLibraryAddressV1\_3\_0 | `0x30cF3266240021f101e388D9b80959c42c068C7C` | `0x99C98e979b15eD958d0dfb8F24D8EfFc2B41f9Fe` |
| nonfungibleTokenPositionDescriptorV1\_3\_0 | `0xb9F2d038150E296CdAcF489813CE2Bbe976a4C62` | `0x8041c4f03B6CA2EC7b795F33C10805ceb98733dB` |
| descriptorProxyAddress | `0x8433dEA5F658D9003BB6e52c5170126179835DaC` | `0x7a5d1718944bfA246e42c8b95F0a88E37bAC5495` |
| nonfungibleTokenPositionManagerAddress | `0xfA928D3ABc512383b8E5E77edd2d5678696084F9` | `0x069f199763c045A294C7913E64bA80E5F362A5d7` |
| v3MigratorAddress | `0x117Fc8DEf58147016f92bAE713533dDB828aBB7e` | `0xf3C430AF1C9C18d414b5cf890BEc08789431b6Ed` |
| quoterV2Address | `0x728BD3eC25D5EDBafebB84F3d67367Cd9EBC7693` | `0xdE41045eb15C8352413199f35d6d1A32803DaaE2` |
| swapRouter02 | `0x7712FA47387542819d4E35A23f8116C90C18767C` | `0xb9D4347d129a83cBC40499Cd4fF223dE172a70dF` |
| permit2 | `0x0000000000225e31d15943971f47ad3022f714fa` | `0x7d174F25ADcd4157EcB5B3448fEC909AeCB70033` |
| universalRouter | `0xE1b076ea612Db28a0d768660e4D81346c02ED75e` | `0xCdFB71b46bF3f44FC909B5B4Eaf4967EC3C5B4e5` |
| v3StakerAddress | `0x2cB10Ac97F2C3dAEDEaB7b72DbaEb681891f51B8` | `0xe17e6f1518a5185f646eB34Ac5A8055792bD3c9D` |
| Init code hash | `0x010013f177ea1fcbc4520f9a3ca7cd2d1d77959e05aa66484027cb38e712aeed` | `0x010013f177ea1fcbc4520f9a3ca7cd2d1d77959e05aa66484027cb38e712aeed` |
## Safe
Access the Safe UI at [https://safe.abs.xyz/](https://safe.abs.xyz/).
| Contract Type | Mainnet | Testnet |
| ---------------------------- | -------------------------------------------- | -------------------------------------------- |
| SimulateTxAccessor | `0xdd35026932273768A3e31F4efF7313B5B7A7199d` | `0xdd35026932273768A3e31F4efF7313B5B7A7199d` |
| SafeProxyFactory | `0xc329D02fd8CB2fc13aa919005aF46320794a8629` | `0xc329D02fd8CB2fc13aa919005aF46320794a8629` |
| TokenCallbackHandler | `0xd508168Db968De1EBc6f288322e6C820137eeF79` | `0xd508168Db968De1EBc6f288322e6C820137eeF79` |
| CompatibilityFallbackHandler | `0x9301E98DD367135f21bdF66f342A249c9D5F9069` | `0x9301E98DD367135f21bdF66f342A249c9D5F9069` |
| CreateCall | `0xAAA566Fe7978bB0fb0B5362B7ba23038f4428D8f` | `0xAAA566Fe7978bB0fb0B5362B7ba23038f4428D8f` |
| MultiSend | `0x309D0B190FeCCa8e1D5D8309a16F7e3CB133E885` | `0x309D0B190FeCCa8e1D5D8309a16F7e3CB133E885` |
| MultiSendCallOnly | `0x0408EF011960d02349d50286D20531229BCef773` | `0x0408EF011960d02349d50286D20531229BCef773` |
| SignMessageLib | `0xAca1ec0a1A575CDCCF1DC3d5d296202Eb6061888` | `0xAca1ec0a1A575CDCCF1DC3d5d296202Eb6061888` |
| SafeToL2Setup | `0x199A9df0224031c20Cc27083A4164c9c8F1Bcb39` | `0x199A9df0224031c20Cc27083A4164c9c8F1Bcb39` |
| Safe | `0xC35F063962328aC65cED5D4c3fC5dEf8dec68dFa` | `0xC35F063962328aC65cED5D4c3fC5dEf8dec68dFa` |
| SafeL2 | `0x610fcA2e0279Fa1F8C00c8c2F71dF522AD469380` | `0x610fcA2e0279Fa1F8C00c8c2F71dF522AD469380` |
| SafeToL2Migration | `0xa26620d1f8f1a2433F0D25027F141aaCAFB3E590` | `0xa26620d1f8f1a2433F0D25027F141aaCAFB3E590` |
| SafeMigration | `0x817756C6c555A94BCEE39eB5a102AbC1678b09A7` | `0x817756C6c555A94BCEE39eB5a102AbC1678b09A7` |
# Faucets
Source: https://docs.abs.xyz/tooling/faucets
Learn how to easily get testnet funds for development on Abstract.
Faucets distribute small amounts of testnet ETH to enable developers & users to deploy and
interact with smart contracts on the testnet.
Abstract has its own testnet that uses
the [Sepolia](https://ethereum.org/en/developers/docs/networks/#sepolia) network as the L1, meaning
you can get testnet ETH on Abstract directly or [bridge](/tooling/bridges) Sepolia ETH to the
Abstract testnet.
## Abstract Testnet Faucets
| Name | Requires Signup |
| ----------------------------------------------------------------------- | --------------- |
| [Triangle faucet](https://faucet.triangleplatform.com/abstract/testnet) | No |
| [Thirdweb faucet](https://thirdweb.com/abstract-testnet) | Yes |
## L1 Sepolia Faucets
| Name | Requires Signup | Requirements |
| ---------------------------------------------------------------------------------------------------- | --------------- | --------------------------------------- |
| [Ethereum Ecosystem Sepolia PoW faucet](https://www.ethereum-ecosystem.com/faucets/ethereum-sepolia) | No | ENS Handle |
| [Sepolia PoW faucet](https://sepolia-faucet.pk910.de/) | No | Gitcoin Passport score |
| [Google Cloud Sepolia faucet](https://cloud.google.com/application/web3/faucet/ethereum/sepolia) | No | 0.001 mainnet ETH |
| [Grabteeth Sepolia faucet](https://grabteeth.xyz/) | No | A smart contract deployment before 2023 |
| [Infura Sepolia faucet](https://www.infura.io/faucet/sepolia) | Yes | - |
| [Chainstack Sepolia faucet](https://faucet.chainstack.com/sepolia-testnet-faucet) | Yes | - |
| [Alchemy Sepolia faucet](https://www.alchemy.com/faucets/ethereum-sepolia) | Yes | 0.001 mainnet ETH |
Use a [bridge](/tooling/bridges) to move Sepolia ETH to the Abstract testnet.
# What is Abstract?
Source: https://docs.abs.xyz/what-is-abstract
A high-level overview of what Abstract is and how it works.
Abstract is a [Layer 2](https://ethereum.org/en/layer-2/) (L2) network built on top of
[Ethereum](https://ethereum.org/en/developers/docs/), designed to securely power consumer-facing
blockchain applications at scale with low fees and fast transaction speeds.
Built on top of the [ZK Stack](https://docs.zksync.io/zk-stack), Abstract is a
[zero-knowledge (ZK) rollup](https://ethereum.org/en/developers/docs/scaling/zk-rollups/) built to
be a more scalable alternative to Ethereum; it achieves this scalability by executing transactions off-chain, batching them together,
and verifying batches of transactions on Ethereum using [(ZK) proofs](https://ethereum.org/en/zero-knowledge-proofs/).
Abstract is [EVM](https://ethereum.org/en/developers/docs/evm/) compatible, meaning it looks and feels like
Ethereum, but with lower gas fees and higher transaction throughput. Existing smart contracts built for Ethereum will work
out of the box on Abstract ([with some differences](/how-abstract-works/evm-differences/overview)),
meaning developers can easily port applications to Abstract with no or minimal changes.
## Start using Abstract
Ready to start building on Abstract? Here are some next steps to get you started:
Connect your wallet or development environment to Abstract.
Start developing smart contracts or applications on Abstract.
## Get started with Abstract
Start building smart contracts and applications on Abstract with our quickstart guides.
Connect your wallet or development environment to Abstract.
Start developing smart contracts or applications on Abstract.
## Explore Abstract Resources
Use our tutorials to kickstart your development journey on Abstract.
Browse our collection of cloneable starter kits and example repositories on
GitHub.
Watch our video tutorials to learn more about building on Abstract.
## Learn more about Abstract
Dive deeper into how Abstract works and how you can leverage its features.
Learn more about the blockchain leading the next generation of consumer
crypto.
Learn more about how the technology powering Abstract works.
Understand the architecture and components that make up Abstract.
Discover Abstract Global Wallet - the smart contract wallet powering the
Abstract ecosystem.
# Portal
Source: https://docs.abs.xyz/portal/overview
Discover the Abstract Portal - your gateway to onchain discovery.
The [Portal](https://abs.xyz) is the homepage of consumer crypto. Users can manage their
[Abstract Global Wallet](/abstract-global-wallet/overview), earn XP and badges, and discover
the top apps & creators in the ecosystem.
Explore a curated universe of onchain apps, watch trusted creators, and earn
rewards.
## Frequently Asked Questions
Find answers to common questions about the Portal below.
### Funding your wallet
You can fund your account in multiple ways:
1. **Funding from Solana, Ethereum, or any other chain:**
* Click the deposit button on wallet page and select "Bridge"
* Connect your existing wallet and select the chain
* Wait for confirmation (may take several minutes)
2. **Funding from Coinbase:**
* Click deposit and select "Coinbase"
* Sign in to Coinbase and follow prompts
* Wait for confirmation (may take several minutes)
3. **Funding from other exchanges (Binance, OKX, etc.):**
* Click deposit and select "Centralized Exchange"
* Use the generated QR code to send funds from zkSync Era wallet
* **Important:** Send funds on zkSync Era only. Use QR code once only.
* Note: This address differs from your Abstract wallet address
4. **Funding via bank account:**
* Click deposit and select "Moonpay"
* Follow prompts to sign in/create Moonpay account
The native currency on Abstract is Ether (ETH). Other currencies including USDC.e and USDT are also available.
1. Click the send button on the wallet page
2. Select the token to send and enter the exact amount to send
3. Enter the recipient's address, domain, or identity.
4. Double check everything looks correct. **Transactions cannot be reversed, and funds sent to wrong places are impossible to recover**
5. Confirm transaction (recipient receives funds in \< 1 minute)
Do NOT send funds to your Abstract Global Wallet on any other network. Your
AGW only exists on Abstract.
Various reasons may cause funds to not display properly:
1. Navigate to the [Abstract Explorer](https://abscan.org/) and search your address (e.g. 0x1234...abcd)
2. Verify if there is an inbound transaction that you are expecting.
3. Check that the sender has sent funds to the correct address and network.
If you are using the Abstract network without using Abstract Global Wallet, to see your funds, you must [connect your wallet to the Abstract network](/connect-to-abstract)
and switch to the Abstract network.
Your Abstract Global Wallet is a [smart contract wallet](abstract-global-wallet/architecture), not a traditional EOA.
This means it does not have a private key for you to export.
Try again, turn off your VPN if you are using one.
### Profile
Navigate to "Profile Page" in left-hand menu to:
* Update profile information
* Edit pictures
* Link X (Twitter) and Discord accounts
Social connections enhance ecosystem security by: - Providing additional layer
to identify and filter out bots - Allowing rewards for content about Abstract
and ecosystem projects
Discord connections help identify active community members by:
* Linking offchain community participation to onchain portal activity
* Providing additional verification to filter out bots
* Enabling XP rewards for helpful community contributions
Select "Edit Profile" option on the "Profile Page" to unlink social accounts.
Enable 2FA under "Security Settings" using either: - Authenticator App -
Passkey
Click the pencil icon over your profile picture to use any NFT in your wallet as your PFP.
### Discover
Click the upvote button on the "Discover" page to support an app.
Either: - You have already upvoted that app - You need to fund your account
(visit abs.xyz/wallet and click fund button)
The spotlight features apps that have received the most upvotes and user
interaction during a given time period.
Trending tokens are ranked based on volume and price change in real time.
**Important:** This is not financial advice or endorsement. The trending tokens section is not an endorsement of any team or project, and the algorithm may yield unexpected results. Always consult your financial advisor before investing.
Browse app categories at the bottom of the discover page:
* Gaming
* Trading
* Collectibles
And more, sorted by user engagement in each category
### Trade
Two options available:
1. Visit the "Trade" page for native trading features
2. Explore trading apps in the "Trading" category on the Discover page
Check to verify: - You have enough ETH to fund the transaction - Your slippage
is set correctly
Slippage is the difference between expected trade price and actual execution
price, common with high volume/volatility tokens.
Find your trading history in the "Transaction History" section of your Profile Page.
### Rewards
XP is the native reward system built to reward users for having fun. Users and creators earn XP for:
* Using Abstract apps
* Streaming via Abstract Global Wallet
* Building successful apps
Earn XP by engaging with Abstract-powered apps listed on the Discover page.
XP is updated weekly and reflected in your rewards profile.
Earn Badges by completing hidden or public quests. Eligible badges appear in
the "Badges" section of the "Rewards" page.
Bonus XP users can earn based on community standing and exclusive rewards.
Yes, XP can be lost for: - Cheating the system - Breaking streamer rules
No, XP is not transferable between accounts.
### Streaming
Currently:
* Anyone can create an account to watch and interact
* Only whitelisted accounts can stream
* More creators will be supported over time
Yes: - Earn XP based on engagement and app usage validated onchain -
Abstract-based application usage provides more XP compared to outside content
All types of content can be streamed, but Abstract Apps usage provides
additional XP.
Recover your account using your email address. We recommend: - Setting up
passkeys - Enabling 2FA Both found in settings
Abstract is an open platform but users must follow Terms of Use: - No
harassment - No hate speech
Yes, Abstract supports multiple languages and is available globally.
Streamers can receive tips from their audience members.
All streamers are capable of receiving tips.
Basic requirements: - Computer capable of running streaming software (e.g.,
OBS) - Stable internet connection - Microphone - Optional: webcam - Mobile
streaming requires third-party apps with stream key support
* Supports up to 1080p & 4k Bitrate - 5-15 second stream delay depending on
internet/settings - Test different settings for optimal performance
Yes, but: - Makes Luca sad - May impact potential XP earnings
* Abstract provides basic chat moderation platform-wide - Additional
moderation features may be added in future as needed
Yes, but:
* We encourage exploring our ecosystem
* Non-Abstract content may earn reduced or no XP
# Block Explorers
Source: https://docs.abs.xyz/tooling/block-explorers
Learn how to view transactions, blocks, batches, and more on Abstract block explorers.
The block explorer allows you to:
* View, verify, and interact with smart contract source code.
* View transaction, block, and batch information.
* Track the finality status of transactions as they reach Ethereum.
Go to the Abstract mainnet explorer to view transactions, blocks, and more.
Go to the Abstract testnet explorer to view transactions, blocks, and more.
# Bridges
Source: https://docs.abs.xyz/tooling/bridges
Learn how to bridge assets between Abstract and Ethereum.
A bridge is a tool that allows users to move assets such as ETH from Ethereum to Abstract and vice versa.
Under the hood, bridging works by having two smart contracts deployed:
1. A smart contract deployed to Ethereum (L1).
2. A smart contract deployed to Abstract (L2).
These smart contracts communicate with each other to facilitate the deposit and withdrawal of assets between the two chains.
## Native Bridge
Abstract has a native bridge to move assets between Ethereum and
Abstract for free (excluding gas fees) that supports bridging both ETH and ERC-20 tokens.
Deposits from L1 to L2 take around \~15 minutes, whereas
withdrawals from L2 to L1 currently take up to 24 hours due to the
built-in [withdrawal delay](https://docs.zksync.io/build/resources/withdrawal-delay#withdrawal-delay).
Visit the native bridge to move assets between Ethereum and Abstract.
Visit the native bridge to move assets between Ethereum and Abstract.
## Third-party Bridges
In addition to the native bridge, users can also utilize third-party bridges
to move assets from other chains to Abstract and vice versa.
These bridges offer alternative routes that are typically faster and cheaper than the native bridge,
however come with different **security risks**.
Use third-party bridges to move assets between other chains and Abstract.
# Deployed Contracts
Source: https://docs.abs.xyz/tooling/deployed-contracts
Discover a list of commonly used contracts deployed on Abstract.
## Currencies
| Token | Mainnet | Testnet |
| ----- | -------------------------------------------- | -------------------------------------------- |
| WETH9 | `0x3439153EB7AF838Ad19d56E1571FBD09333C2809` | `0x9EDCde0257F2386Ce177C3a7FCdd97787F0D841d` |
| USDC | `0x84A71ccD554Cc1b02749b35d22F684CC8ec987e1` | `0xe4C7fBB0a626ed208021ccabA6Be1566905E2dFc` |
| USDT | `0x0709F39376dEEe2A2dfC94A58EdEb2Eb9DF012bD` | - |
## NFT Markets
| Contract Type | Mainnet | Testnet |
| ------------------ | -------------------------------------------- | -------------------------------------------- |
| Seaport | `0xDF3969A315e3fC15B89A2752D0915cc76A5bd82D` | `0xDF3969A315e3fC15B89A2752D0915cc76A5bd82D` |
| Transfer Validator | `0x3203c3f64312AF9344e42EF8Aa45B97C9DFE4594` | `0x3203c3f64312af9344e42ef8aa45b97c9dfe4594` |
## Uniswap V2
| Contract Type | Mainnet | Testnet |
| ----------------- | -------------------------------------------------------------------- | -------------------------------------------------------------------- |
| UniswapV2Factory | `0x566d7510dEE58360a64C9827257cF6D0Dc43985E` | `0x566d7510dEE58360a64C9827257cF6D0Dc43985E` |
| UniswapV2Router02 | `0xad1eCa41E6F772bE3cb5A48A6141f9bcc1AF9F7c` | `0x96ff7D9dbf52FdcAe79157d3b249282c7FABd409` |
| Init code hash | `0x0100065f2f2a556816a482652f101ddda2947216a5720dd91a79c61709cbf2b8` | `0x0100065f2f2a556816a482652f101ddda2947216a5720dd91a79c61709cbf2b8` |
## Uniswap V3
| Contract Type | Mainnet | Testnet |
| ------------------------------------------ | -------------------------------------------------------------------- | -------------------------------------------------------------------- |
| UniswapV3Factory | `0xA1160e73B63F322ae88cC2d8E700833e71D0b2a1` | `0x2E17FF9b877661bDFEF8879a4B31665157a960F0` |
| multicall2Address | `0x9CA4dcb2505fbf536F6c54AA0a77C79f4fBC35C0` | `0x84B11838e53f53DBc1fca7a6413cDd2c7Ab15DB8` |
| proxyAdminAddress | `0x76d539e3c8bc2A565D22De95B0671A963667C4aD` | `0x10Ef01fF2CCc80BdDAF51dF91814e747ae61a5f1` |
| tickLensAddress | `0x9c7d30F93812f143b6Efa673DB8448EfCB9f747E` | `0x2EC62f97506E0184C423B01c525ab36e1c61f78A` |
| nftDescriptorLibraryAddressV1\_3\_0 | `0x30cF3266240021f101e388D9b80959c42c068C7C` | `0x99C98e979b15eD958d0dfb8F24D8EfFc2B41f9Fe` |
| nonfungibleTokenPositionDescriptorV1\_3\_0 | `0xb9F2d038150E296CdAcF489813CE2Bbe976a4C62` | `0x8041c4f03B6CA2EC7b795F33C10805ceb98733dB` |
| descriptorProxyAddress | `0x8433dEA5F658D9003BB6e52c5170126179835DaC` | `0x7a5d1718944bfA246e42c8b95F0a88E37bAC5495` |
| nonfungibleTokenPositionManagerAddress | `0xfA928D3ABc512383b8E5E77edd2d5678696084F9` | `0x069f199763c045A294C7913E64bA80E5F362A5d7` |
| v3MigratorAddress | `0x117Fc8DEf58147016f92bAE713533dDB828aBB7e` | `0xf3C430AF1C9C18d414b5cf890BEc08789431b6Ed` |
| quoterV2Address | `0x728BD3eC25D5EDBafebB84F3d67367Cd9EBC7693` | `0xdE41045eb15C8352413199f35d6d1A32803DaaE2` |
| swapRouter02 | `0x7712FA47387542819d4E35A23f8116C90C18767C` | `0xb9D4347d129a83cBC40499Cd4fF223dE172a70dF` |
| permit2 | `0x0000000000225e31d15943971f47ad3022f714fa` | `0x7d174F25ADcd4157EcB5B3448fEC909AeCB70033` |
| universalRouter | `0xE1b076ea612Db28a0d768660e4D81346c02ED75e` | `0xCdFB71b46bF3f44FC909B5B4Eaf4967EC3C5B4e5` |
| v3StakerAddress | `0x2cB10Ac97F2C3dAEDEaB7b72DbaEb681891f51B8` | `0xe17e6f1518a5185f646eB34Ac5A8055792bD3c9D` |
| Init code hash | `0x010013f177ea1fcbc4520f9a3ca7cd2d1d77959e05aa66484027cb38e712aeed` | `0x010013f177ea1fcbc4520f9a3ca7cd2d1d77959e05aa66484027cb38e712aeed` |
## Safe
Access the Safe UI at [https://safe.abs.xyz/](https://safe.abs.xyz/).
| Contract Type | Mainnet | Testnet |
| ---------------------------- | -------------------------------------------- | -------------------------------------------- |
| SimulateTxAccessor | `0xdd35026932273768A3e31F4efF7313B5B7A7199d` | `0xdd35026932273768A3e31F4efF7313B5B7A7199d` |
| SafeProxyFactory | `0xc329D02fd8CB2fc13aa919005aF46320794a8629` | `0xc329D02fd8CB2fc13aa919005aF46320794a8629` |
| TokenCallbackHandler | `0xd508168Db968De1EBc6f288322e6C820137eeF79` | `0xd508168Db968De1EBc6f288322e6C820137eeF79` |
| CompatibilityFallbackHandler | `0x9301E98DD367135f21bdF66f342A249c9D5F9069` | `0x9301E98DD367135f21bdF66f342A249c9D5F9069` |
| CreateCall | `0xAAA566Fe7978bB0fb0B5362B7ba23038f4428D8f` | `0xAAA566Fe7978bB0fb0B5362B7ba23038f4428D8f` |
| MultiSend | `0x309D0B190FeCCa8e1D5D8309a16F7e3CB133E885` | `0x309D0B190FeCCa8e1D5D8309a16F7e3CB133E885` |
| MultiSendCallOnly | `0x0408EF011960d02349d50286D20531229BCef773` | `0x0408EF011960d02349d50286D20531229BCef773` |
| SignMessageLib | `0xAca1ec0a1A575CDCCF1DC3d5d296202Eb6061888` | `0xAca1ec0a1A575CDCCF1DC3d5d296202Eb6061888` |
| SafeToL2Setup | `0x199A9df0224031c20Cc27083A4164c9c8F1Bcb39` | `0x199A9df0224031c20Cc27083A4164c9c8F1Bcb39` |
| Safe | `0xC35F063962328aC65cED5D4c3fC5dEf8dec68dFa` | `0xC35F063962328aC65cED5D4c3fC5dEf8dec68dFa` |
| SafeL2 | `0x610fcA2e0279Fa1F8C00c8c2F71dF522AD469380` | `0x610fcA2e0279Fa1F8C00c8c2F71dF522AD469380` |
| SafeToL2Migration | `0xa26620d1f8f1a2433F0D25027F141aaCAFB3E590` | `0xa26620d1f8f1a2433F0D25027F141aaCAFB3E590` |
| SafeMigration | `0x817756C6c555A94BCEE39eB5a102AbC1678b09A7` | `0x817756C6c555A94BCEE39eB5a102AbC1678b09A7` |
# Faucets
Source: https://docs.abs.xyz/tooling/faucets
Learn how to easily get testnet funds for development on Abstract.
Faucets distribute small amounts of testnet ETH to enable developers & users to deploy and
interact with smart contracts on the testnet.
Abstract has its own testnet that uses
the [Sepolia](https://ethereum.org/en/developers/docs/networks/#sepolia) network as the L1, meaning
you can get testnet ETH on Abstract directly or [bridge](/tooling/bridges) Sepolia ETH to the
Abstract testnet.
## Abstract Testnet Faucets
| Name | Requires Signup |
| ----------------------------------------------------------------------- | --------------- |
| [Triangle faucet](https://faucet.triangleplatform.com/abstract/testnet) | No |
| [Thirdweb faucet](https://thirdweb.com/abstract-testnet) | Yes |
## L1 Sepolia Faucets
| Name | Requires Signup | Requirements |
| ---------------------------------------------------------------------------------------------------- | --------------- | --------------------------------------- |
| [Ethereum Ecosystem Sepolia PoW faucet](https://www.ethereum-ecosystem.com/faucets/ethereum-sepolia) | No | ENS Handle |
| [Sepolia PoW faucet](https://sepolia-faucet.pk910.de/) | No | Gitcoin Passport score |
| [Google Cloud Sepolia faucet](https://cloud.google.com/application/web3/faucet/ethereum/sepolia) | No | 0.001 mainnet ETH |
| [Grabteeth Sepolia faucet](https://grabteeth.xyz/) | No | A smart contract deployment before 2023 |
| [Infura Sepolia faucet](https://www.infura.io/faucet/sepolia) | Yes | - |
| [Chainstack Sepolia faucet](https://faucet.chainstack.com/sepolia-testnet-faucet) | Yes | - |
| [Alchemy Sepolia faucet](https://www.alchemy.com/faucets/ethereum-sepolia) | Yes | 0.001 mainnet ETH |
Use a [bridge](/tooling/bridges) to move Sepolia ETH to the Abstract testnet.
# What is Abstract?
Source: https://docs.abs.xyz/what-is-abstract
A high-level overview of what Abstract is and how it works.
Abstract is a [Layer 2](https://ethereum.org/en/layer-2/) (L2) network built on top of
[Ethereum](https://ethereum.org/en/developers/docs/), designed to securely power consumer-facing
blockchain applications at scale with low fees and fast transaction speeds.
Built on top of the [ZK Stack](https://docs.zksync.io/zk-stack), Abstract is a
[zero-knowledge (ZK) rollup](https://ethereum.org/en/developers/docs/scaling/zk-rollups/) built to
be a more scalable alternative to Ethereum; it achieves this scalability by executing transactions off-chain, batching them together,
and verifying batches of transactions on Ethereum using [(ZK) proofs](https://ethereum.org/en/zero-knowledge-proofs/).
Abstract is [EVM](https://ethereum.org/en/developers/docs/evm/) compatible, meaning it looks and feels like
Ethereum, but with lower gas fees and higher transaction throughput. Existing smart contracts built for Ethereum will work
out of the box on Abstract ([with some differences](/how-abstract-works/evm-differences/overview)),
meaning developers can easily port applications to Abstract with no or minimal changes.
## Start using Abstract
Ready to start building on Abstract? Here are some next steps to get you started:
Connect your wallet or development environment to Abstract.
Start developing smart contracts or applications on Abstract.